Azure Resource Manager - Tools for ARM template design, authoring, and deployment
The first part of this series of articles on Azure Resource Manager (ARM) provided a quick overview of ARM. You looked a quick introduction to ARM templates as well and looked at an overview of different template deployment methods. In this part of the series, we will look at different methods to author ARM templates and an in-depth look at preferred deployment methods. You can choose any of the methods mentioned here but this series of articles will use one preferred method each for authoring and deploying templates. You will read more about those methods and the reasons behind that choice as well.
Authoring Tools
ARM templates, as mentioned in the last part, are JSON documents. These files can be authored in notepad as well but there are better ways to deal with this task. You will learn about three different methods that I have used and my observations and preferences around these methods. Let us start with the template editor that Azure Portal offers.
Template Editor in Azure Portal
The web-based template editor in the Azure portal is one way but I see it as a better way to edit existing templates than writing one from scratch. You can import a quick start template and use that as a starting point for building your own template.
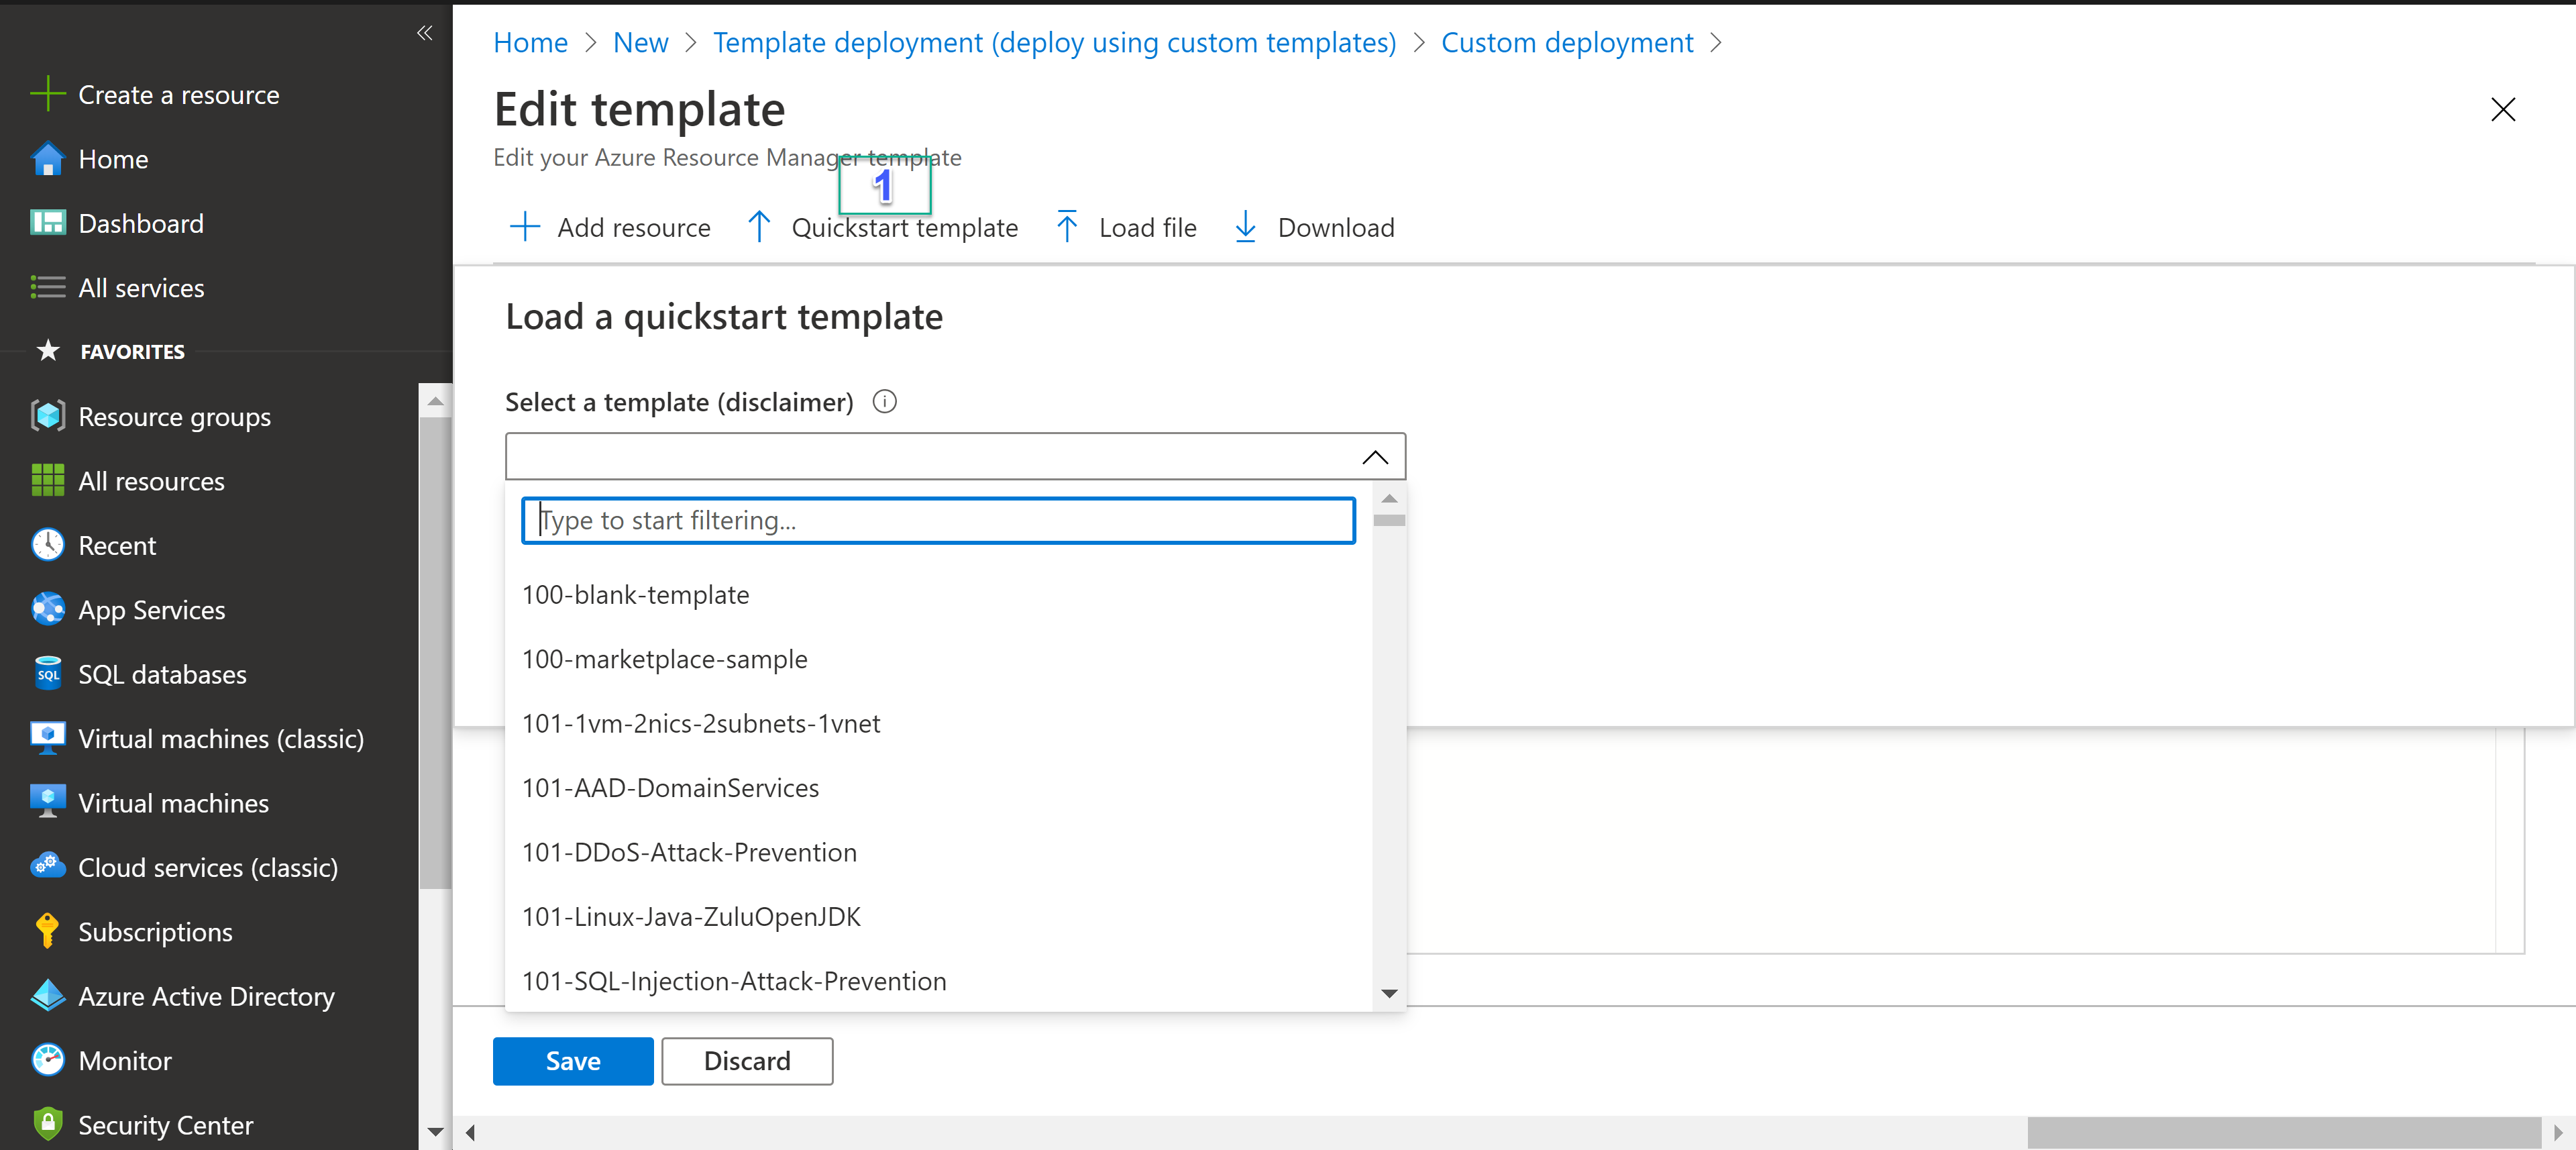
Once you click on Quickstart template [1], you will be shown a list of templates available from the GitHub repository. The selected template then gets loaded into the editor for further updates or deployment. I selected the 101-vm-simple-windows template from the list.
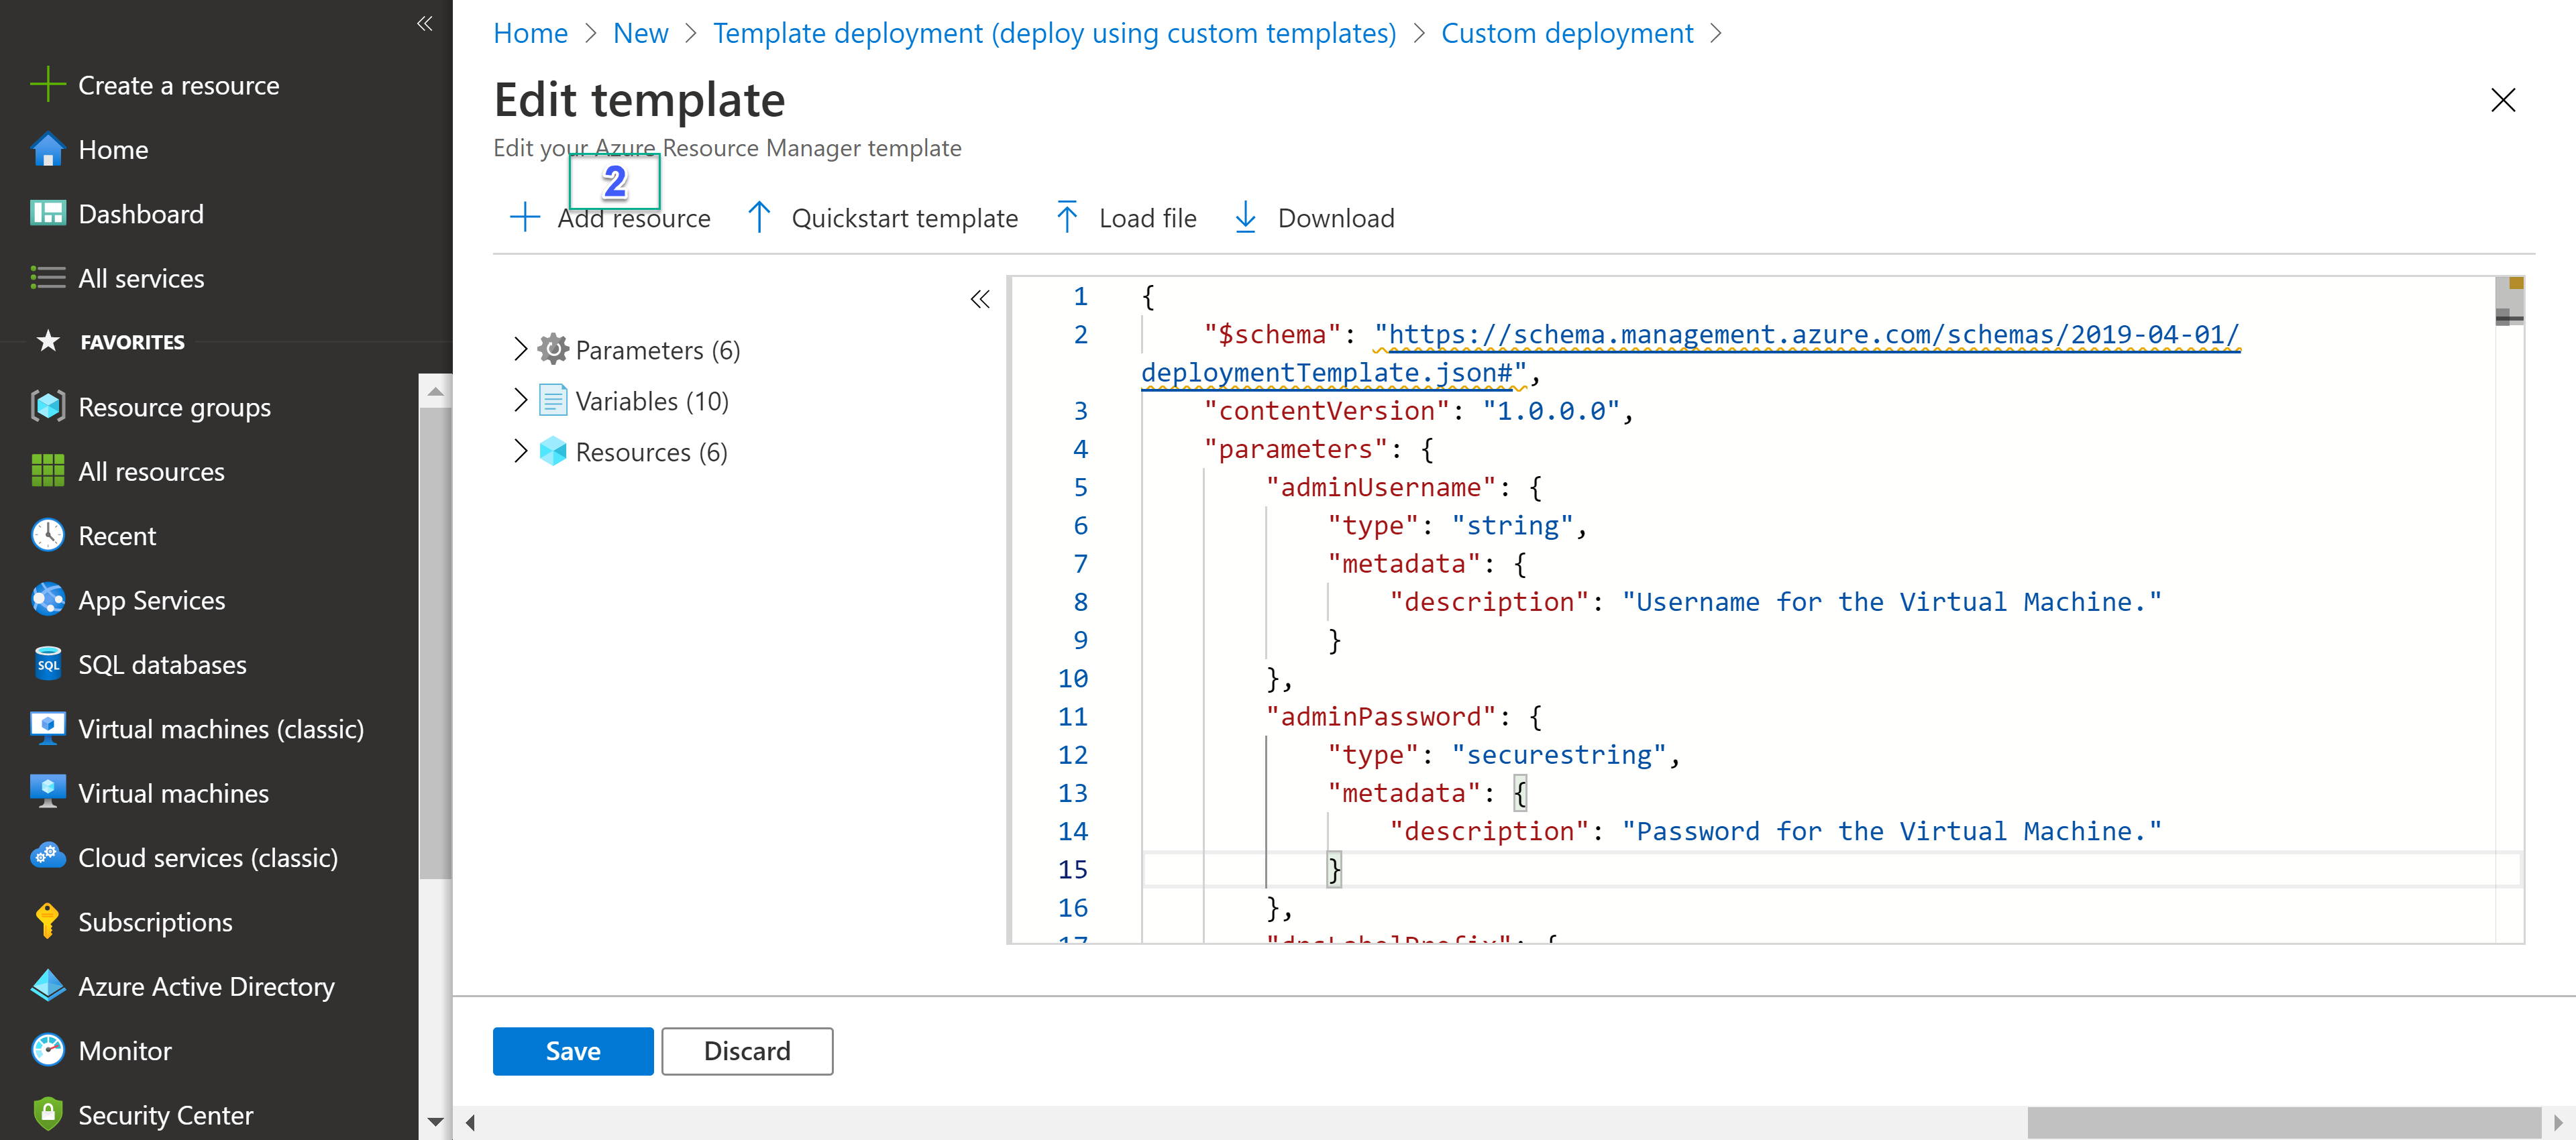
At this point, you can click on Add resource [2] to add another resource to this template. This will bring up a limited set of additional resources you can add to the loaded template. You may select a Windows Virtual Machine.
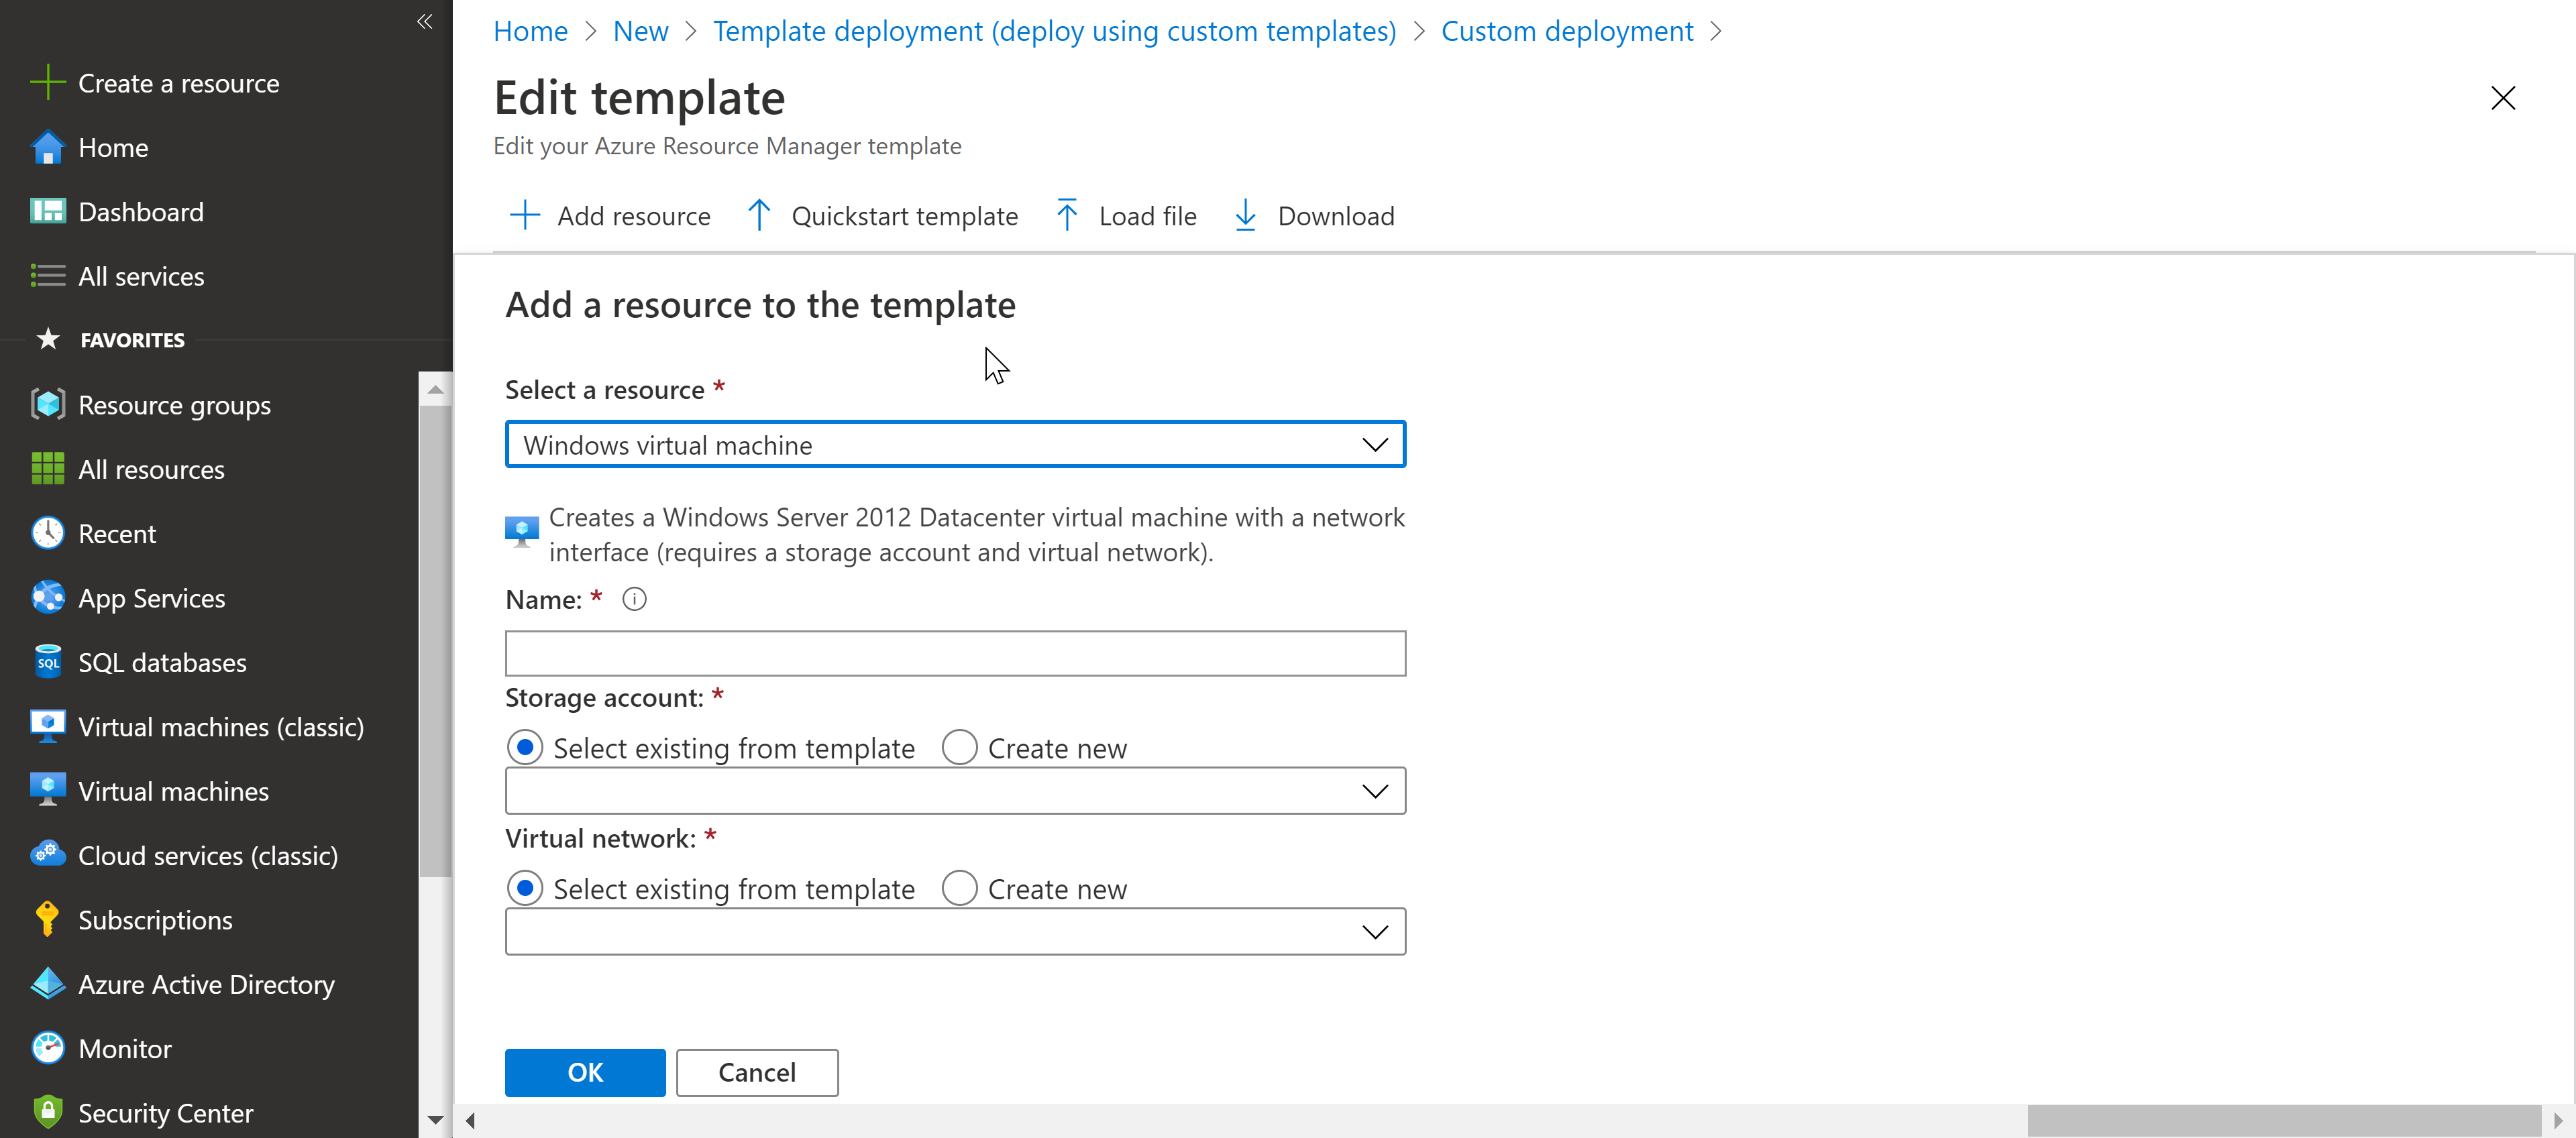
This brings up a few input parameters needed for the new VM instance. Once you enter these values and click OK, the template in the editor window gets updated to add the new VM resource instance. You can review the updated template and click on Save to move ahead to deploy this template.
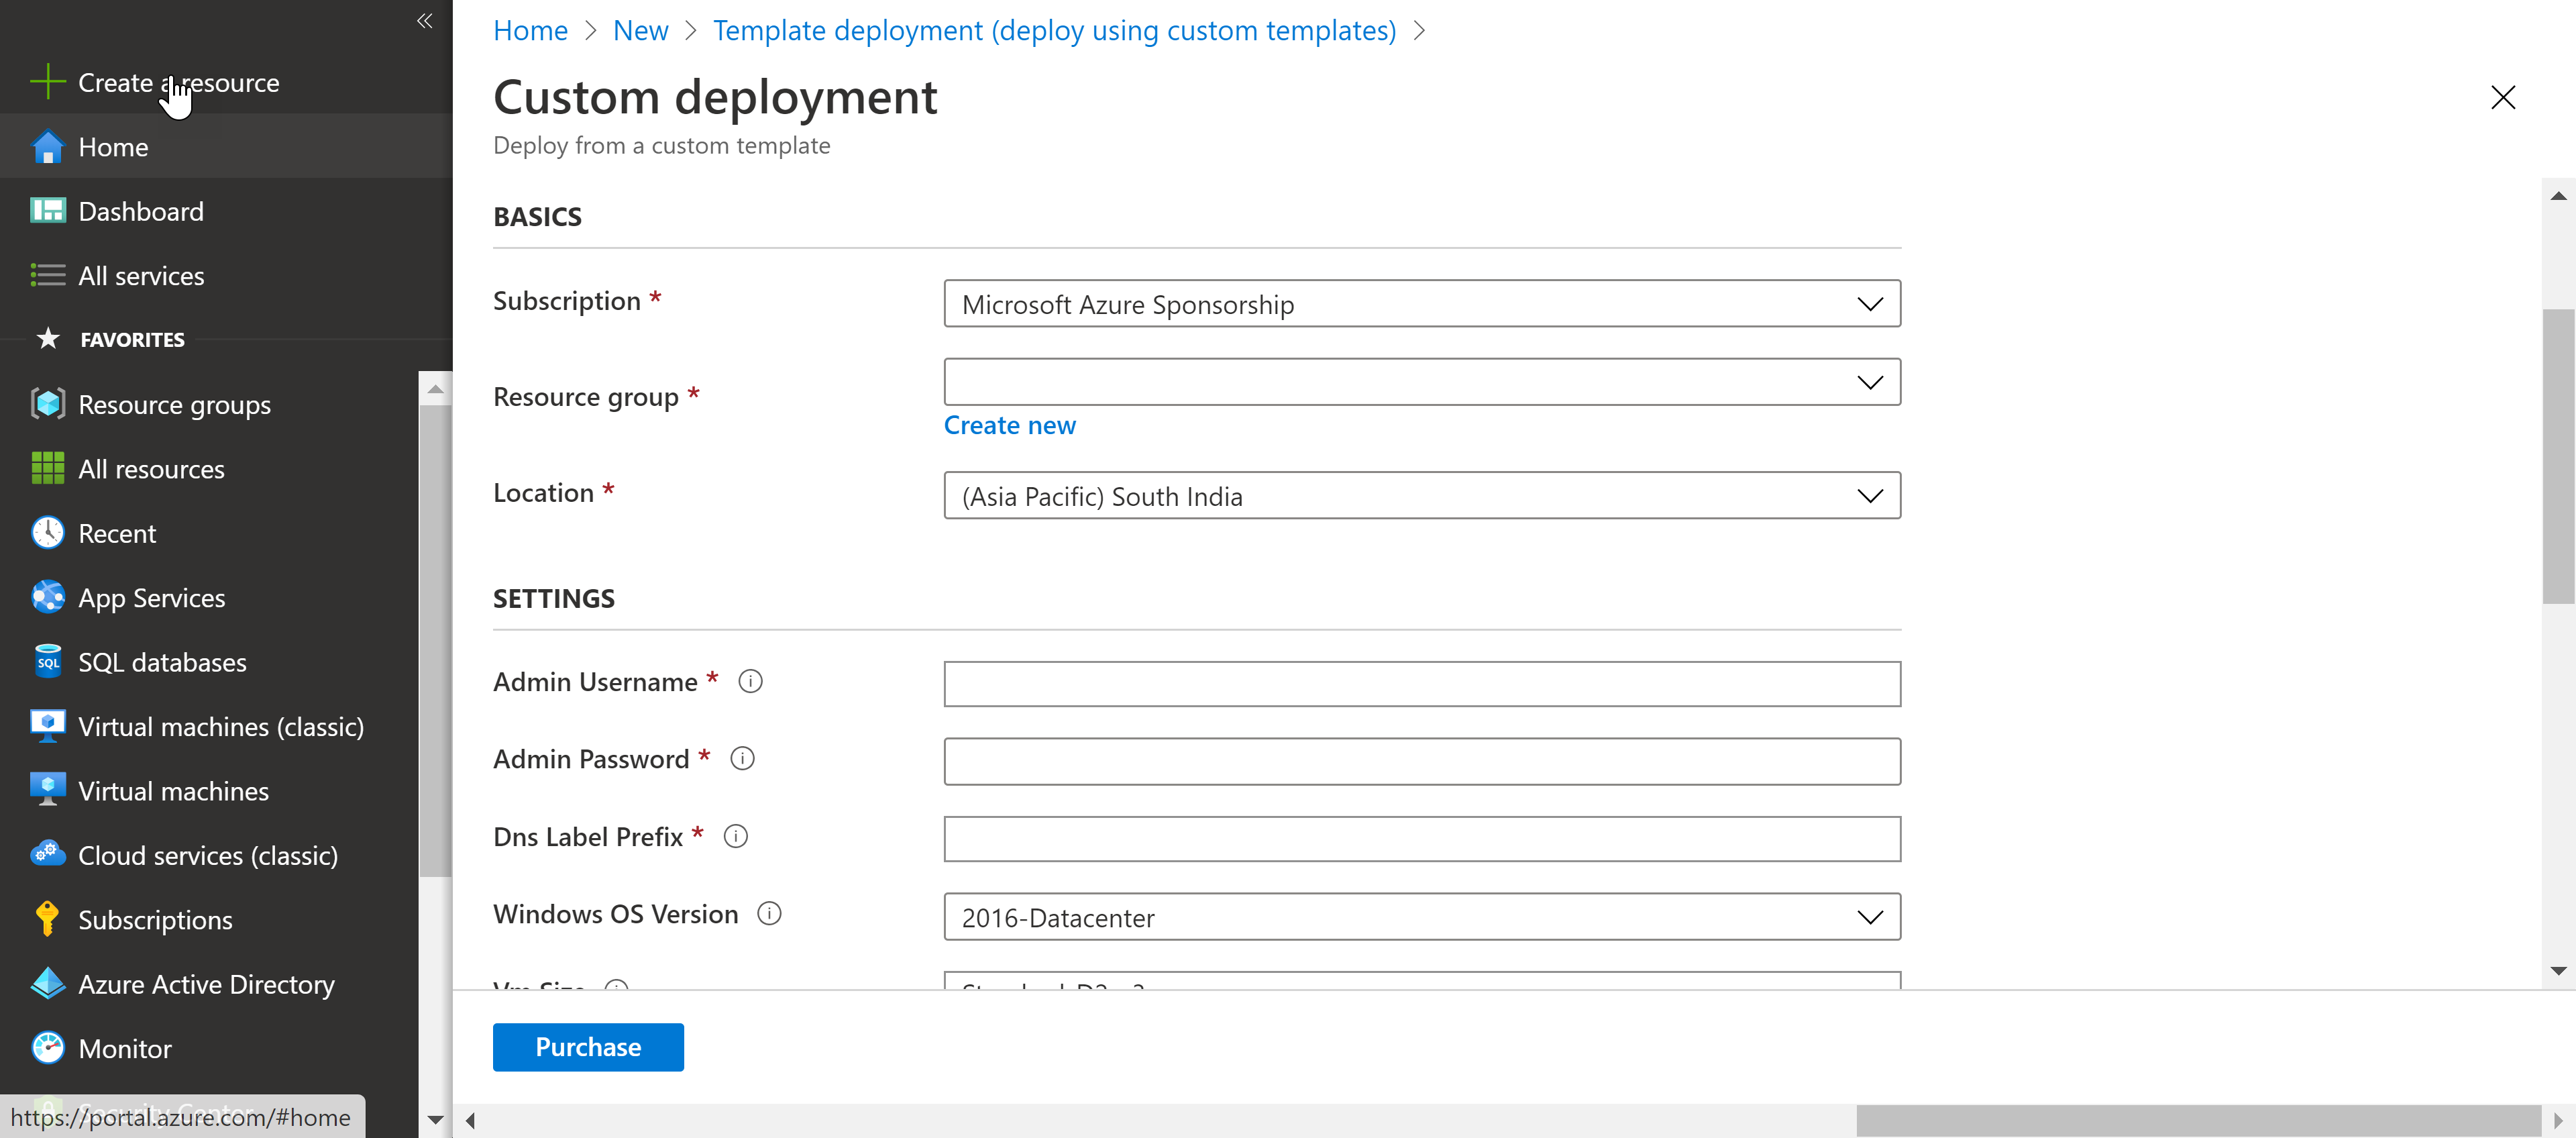
At this point, you will presented with a list of input parameters needed for this template deployment. You can enter these values and click Purchase to start the template validation and deploy it if there are no validation errors. However, it is not always this straightforward. I ended up updating a few language expressions to make this working. If you have tried this option, you will know that the editing experience is limited. It supports adding only a few types of additional resources to the template. And, of course, this isn’t a great way to edit or build anything other than a simple template. You need a better way than this web-based editor.
Visual Studio
Visual Studio provides a rich integrated development environment (IDE) for developing various types of applications. You can use some of the starter templates packaged along with Visual Studio and build upon those existing templates to add your own resources or start from a blank template and build everything from scratch. For this quick overview of using Visual Studio for template authoring and deployment, I will use Visual Studio 2019 Community Edition.
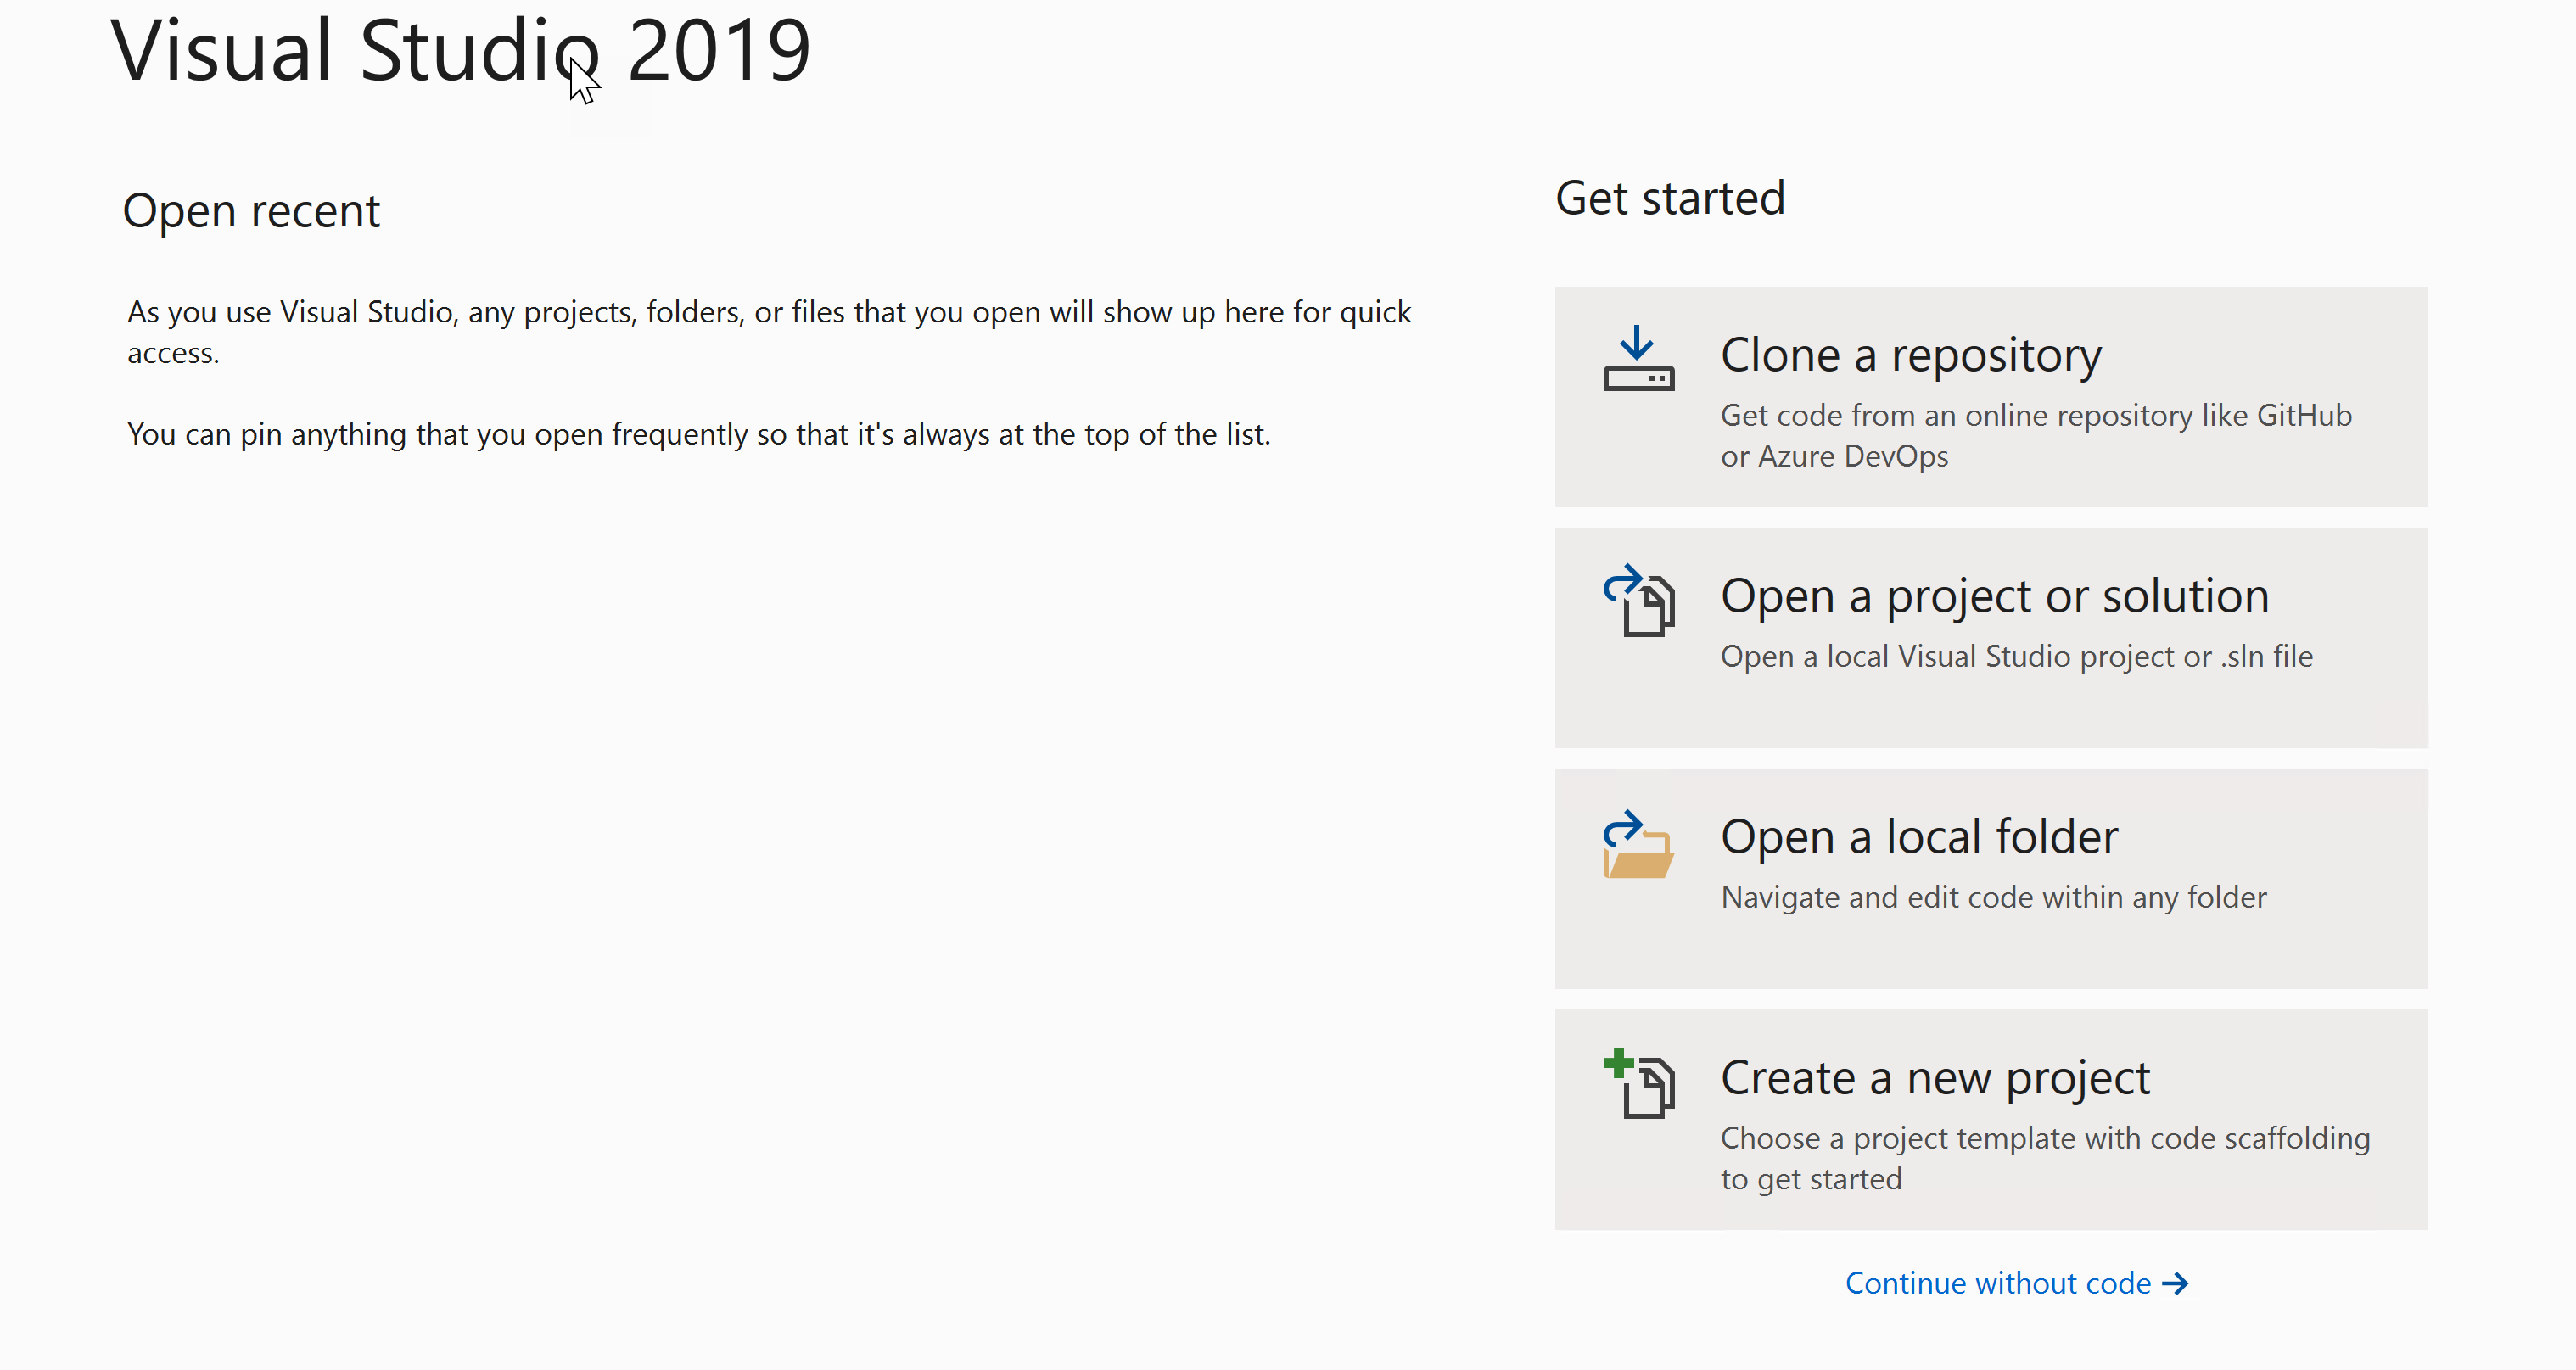
When you install and open Visual Studio, you will see different options to get started. Select Create a new project.
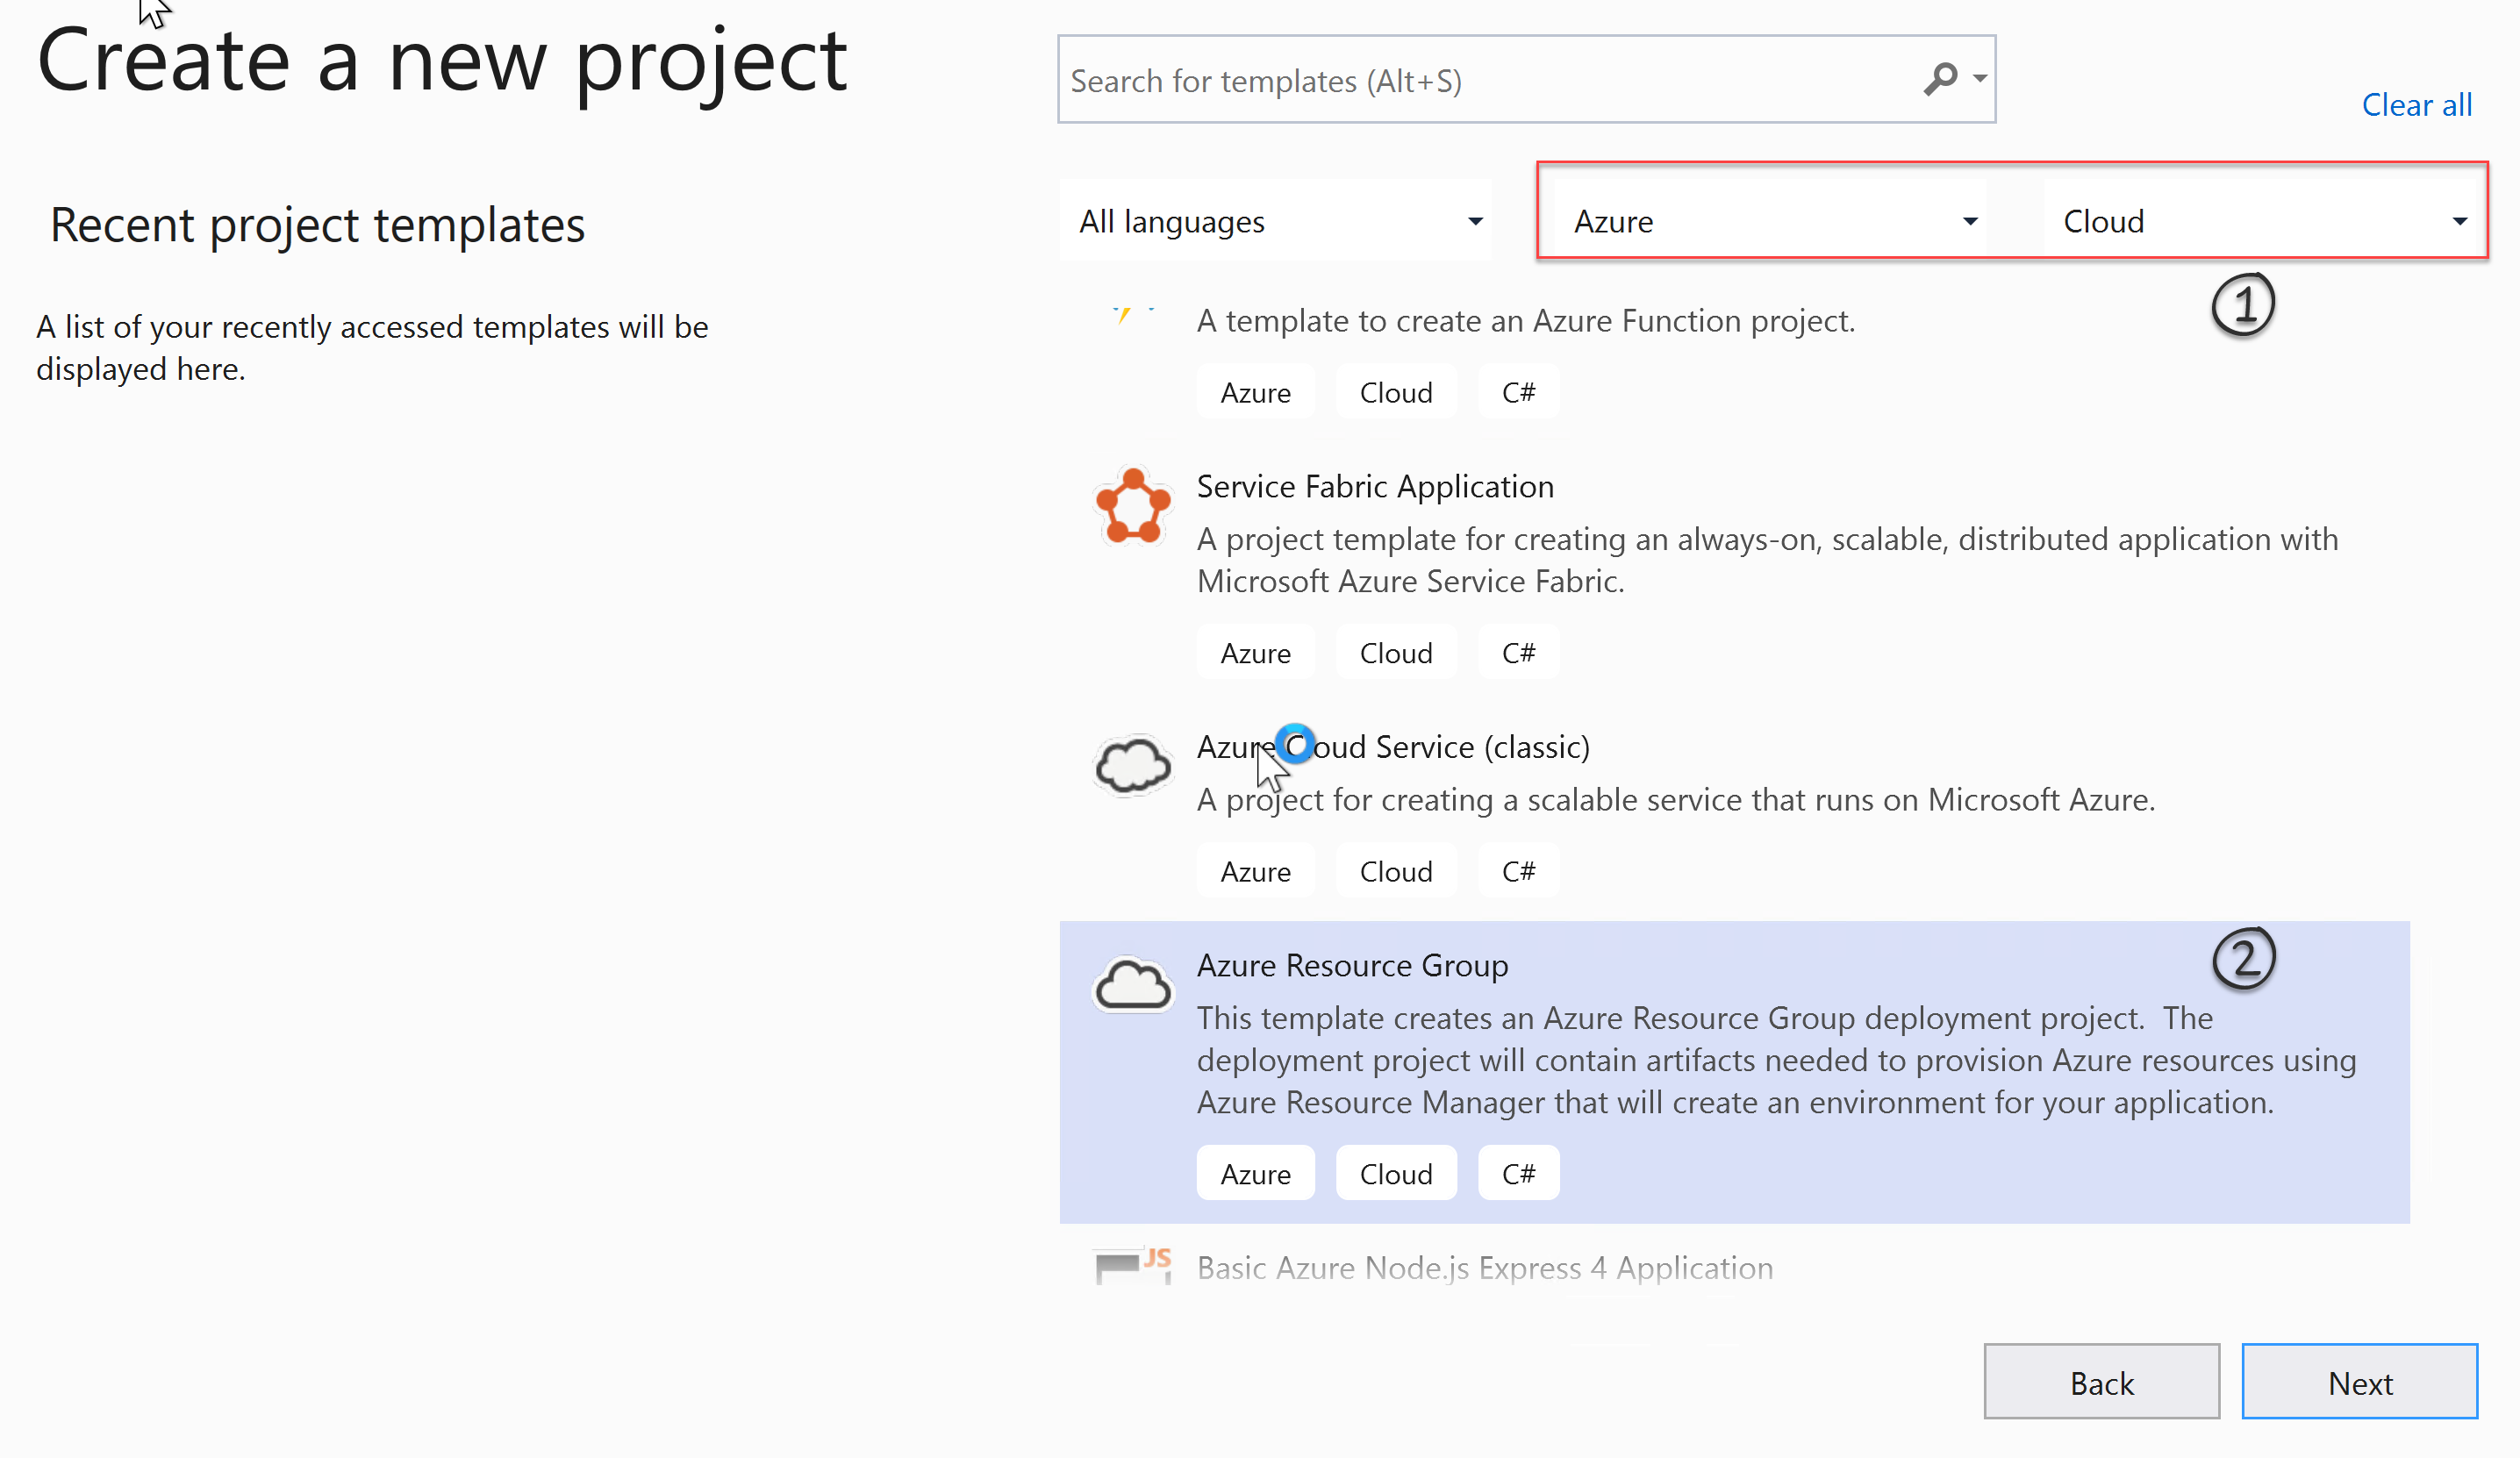
In the next window, filter down the options [1] to Azure and Cloud. In the filtered project templates, select Azure Resource Group [2] and click Next.
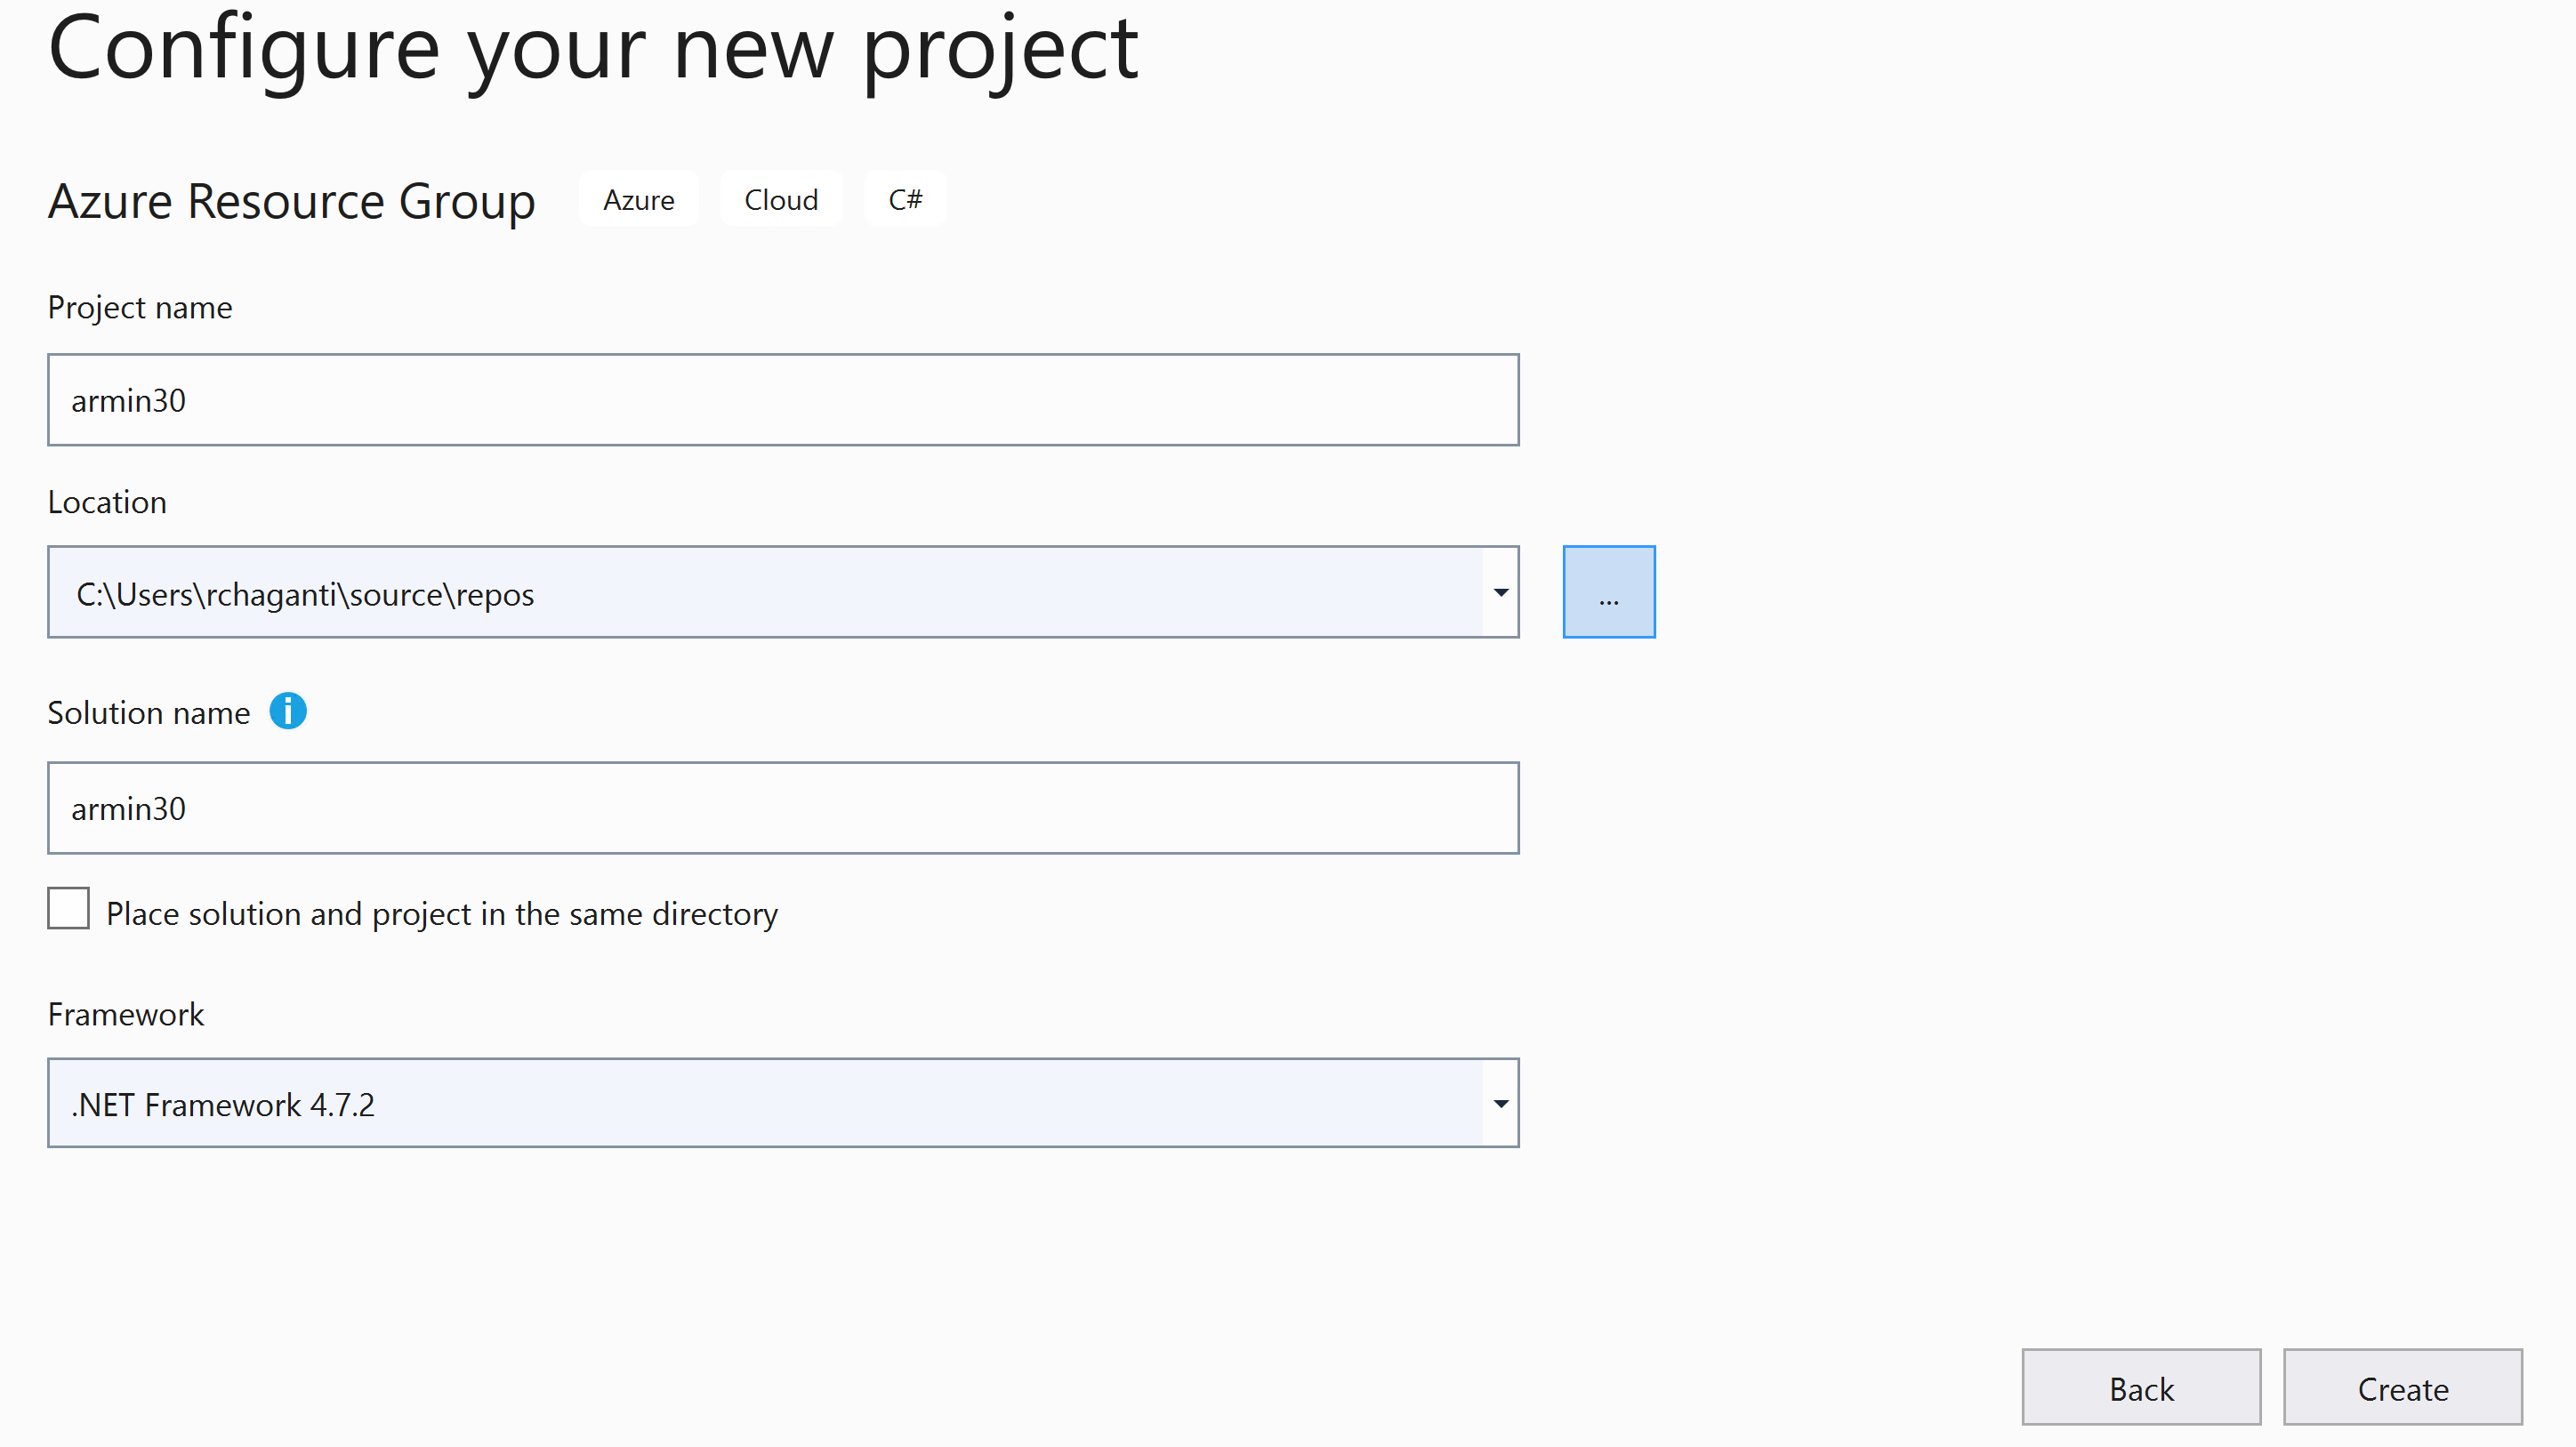
Enter the relevant input for creating a Visual Studio project and click Create.

As you see in the above screenshot, you can select one of the canned starter templates or start with a blank template. Since we have learned the basics of template authoring yet, scroll down in the template list and select Windows Virtual Machine and click OK. This creates the Visual Studio solution.
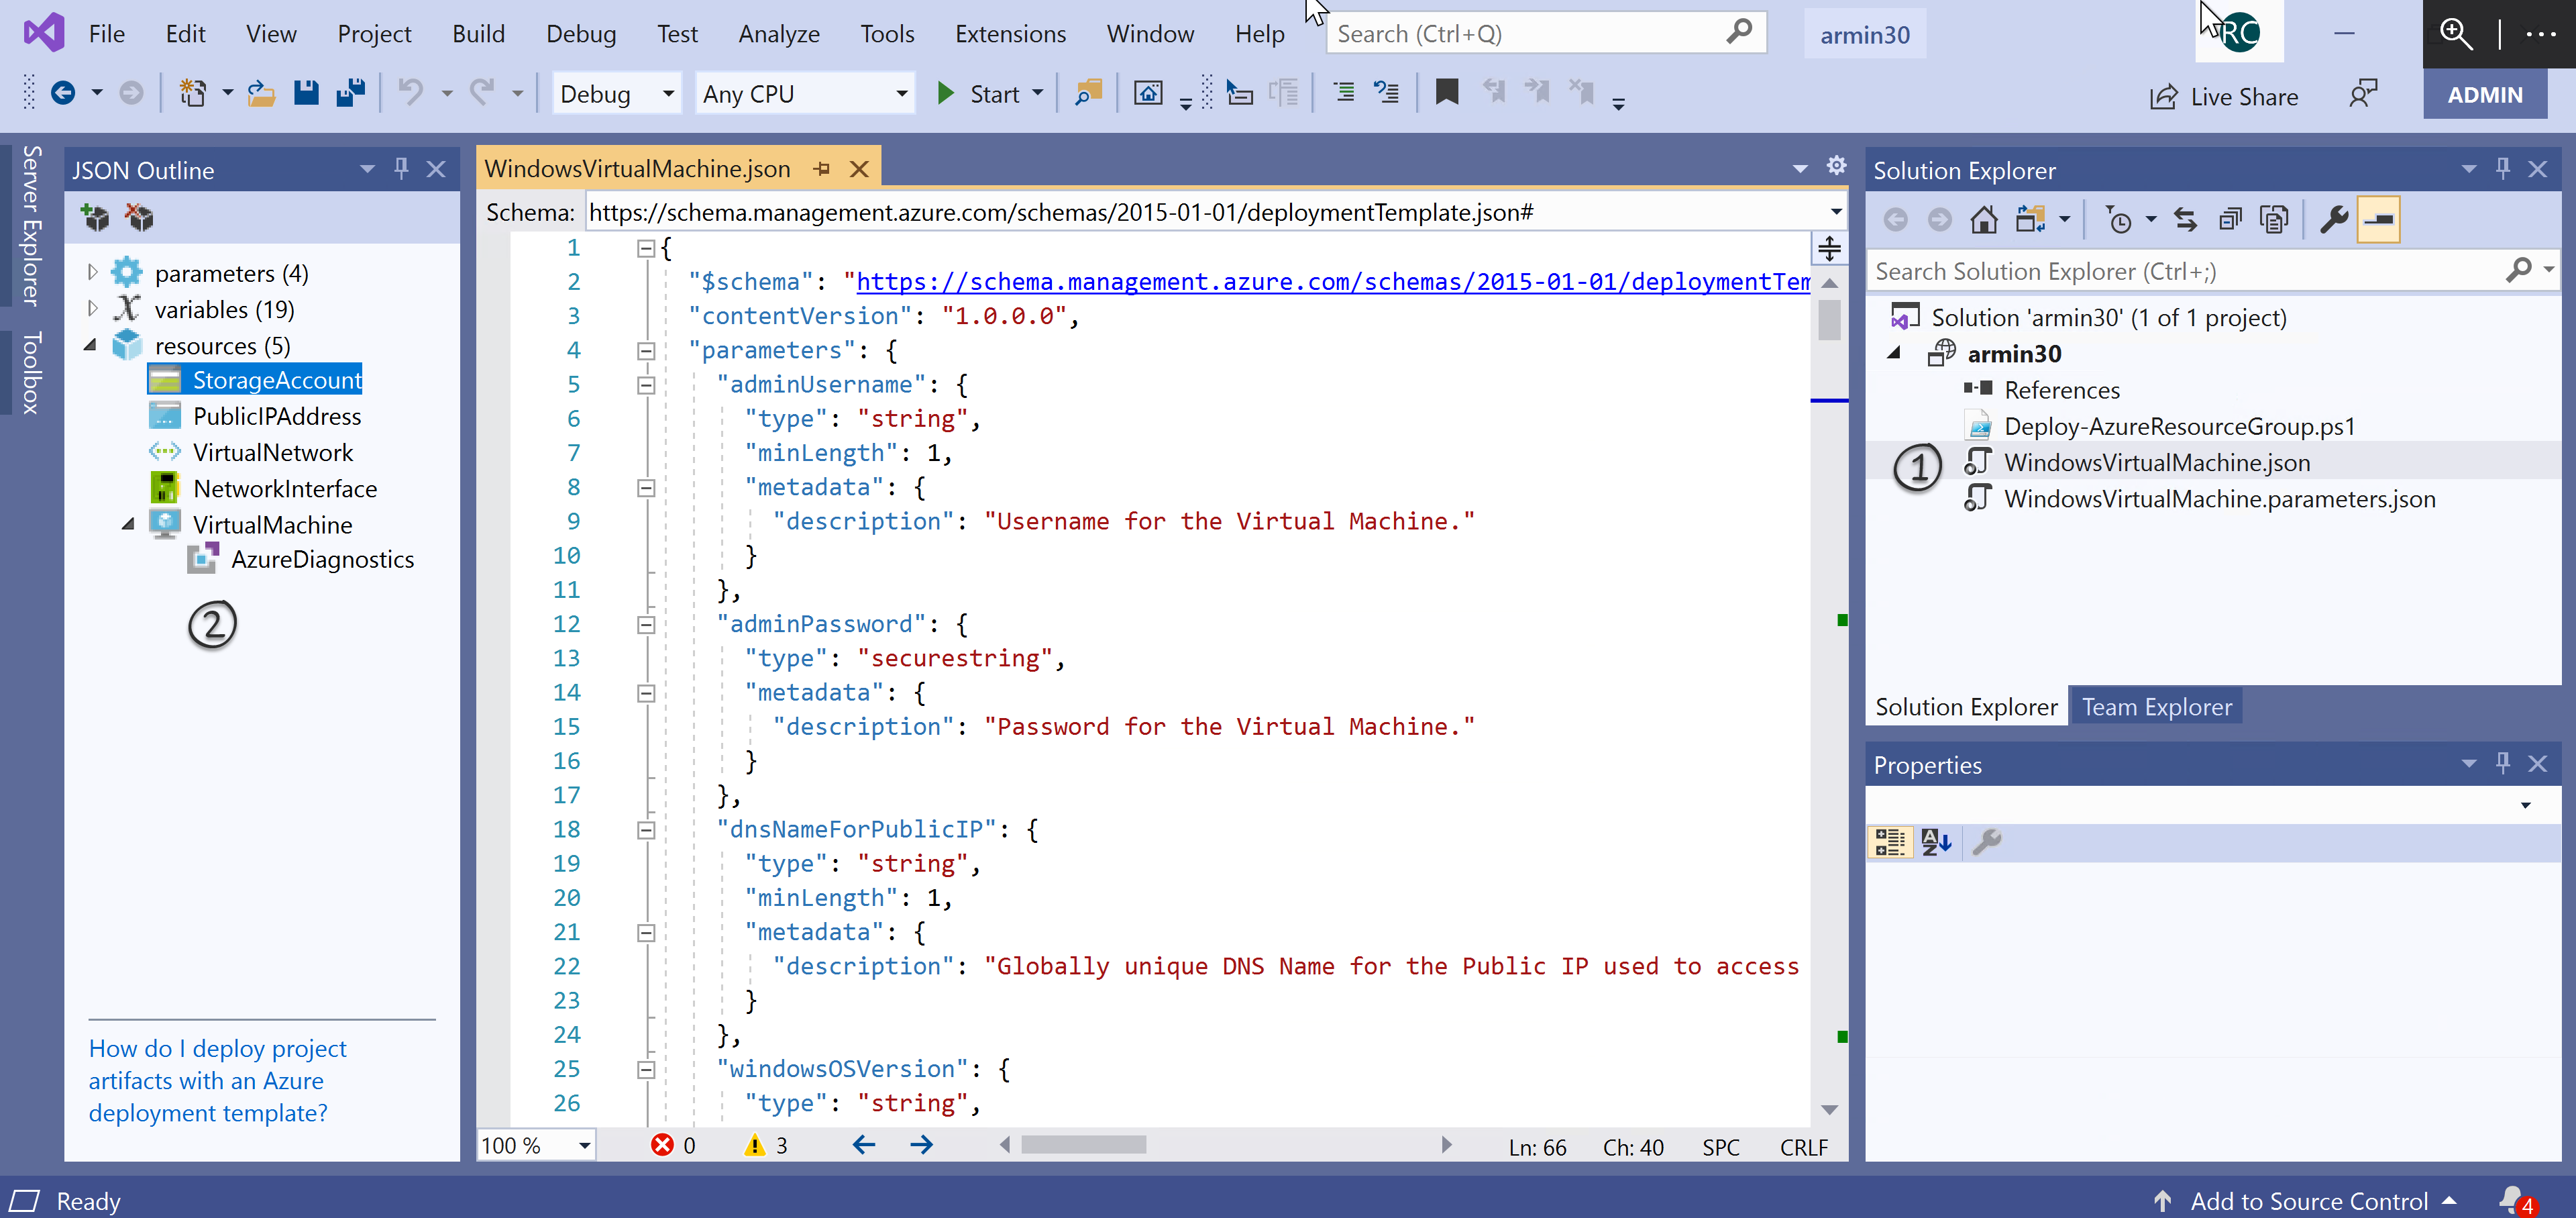
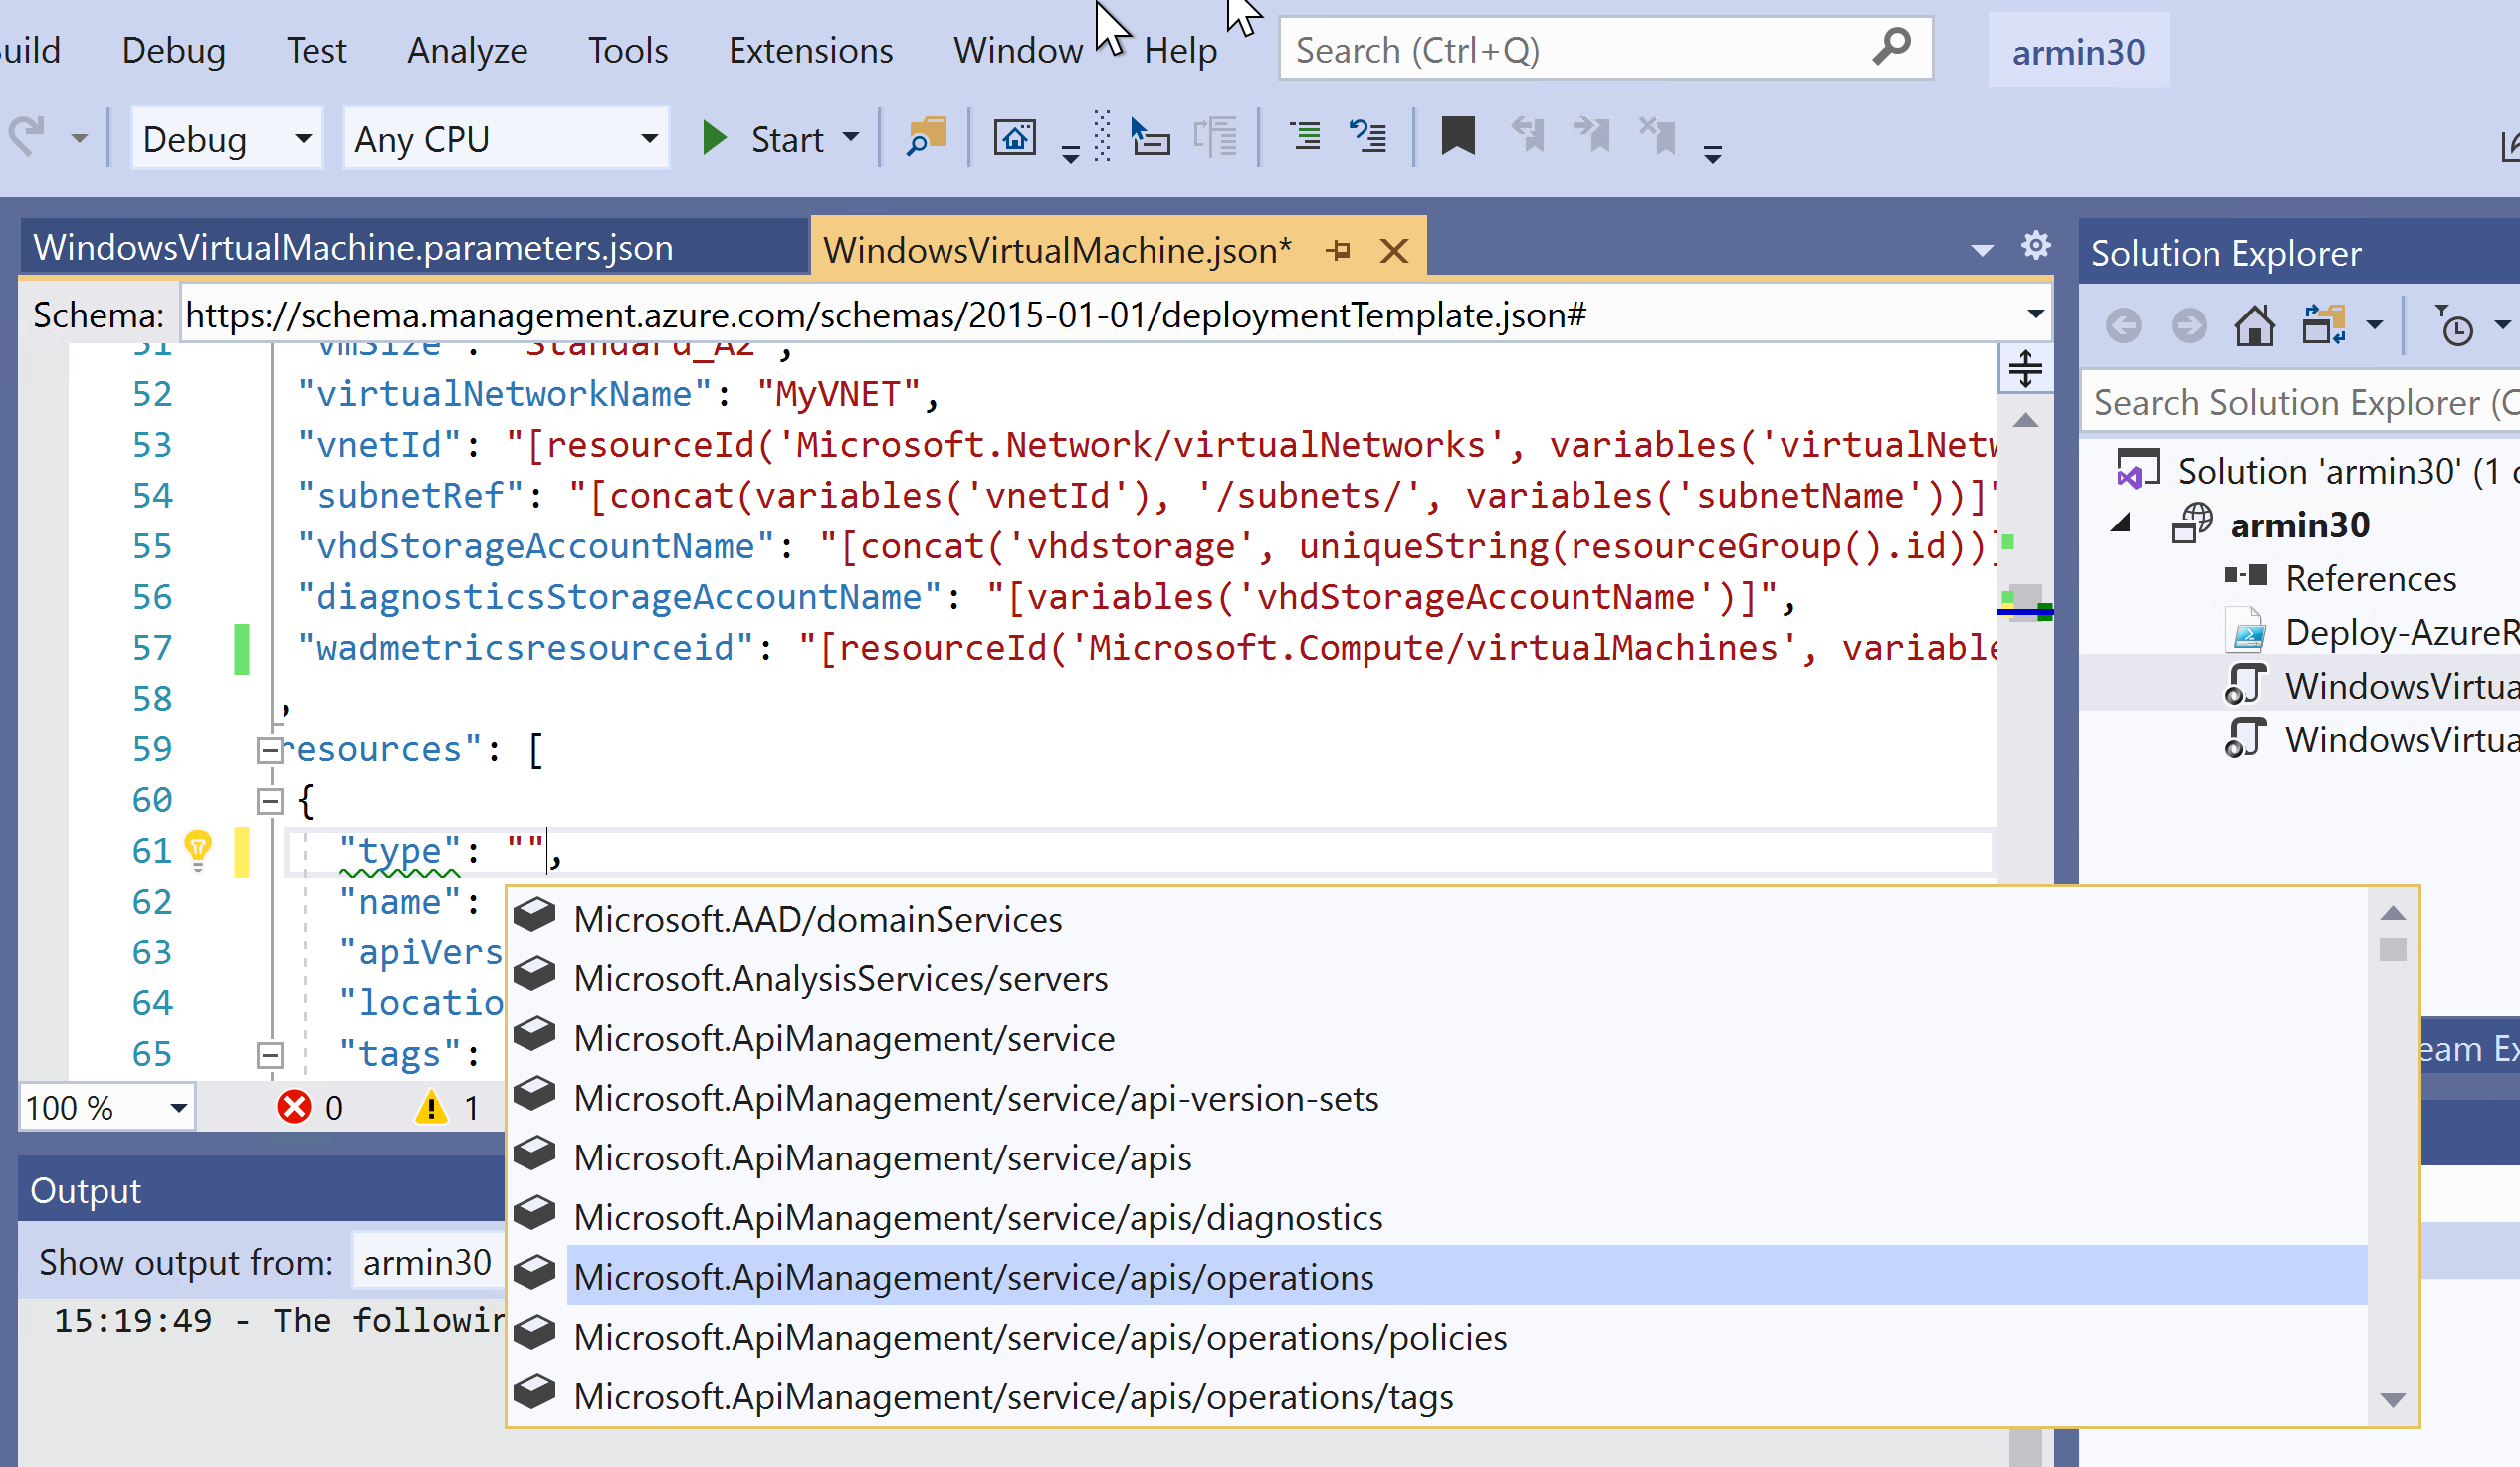
Once the solution gets created, click on WindowsVirtualMachine.json [1] in the Solution Explorer pane. This opens the ARM template. On the left-hand side, you can see the JSON Outline [2] pane which shows parameters, variables, and resources defined in the template.
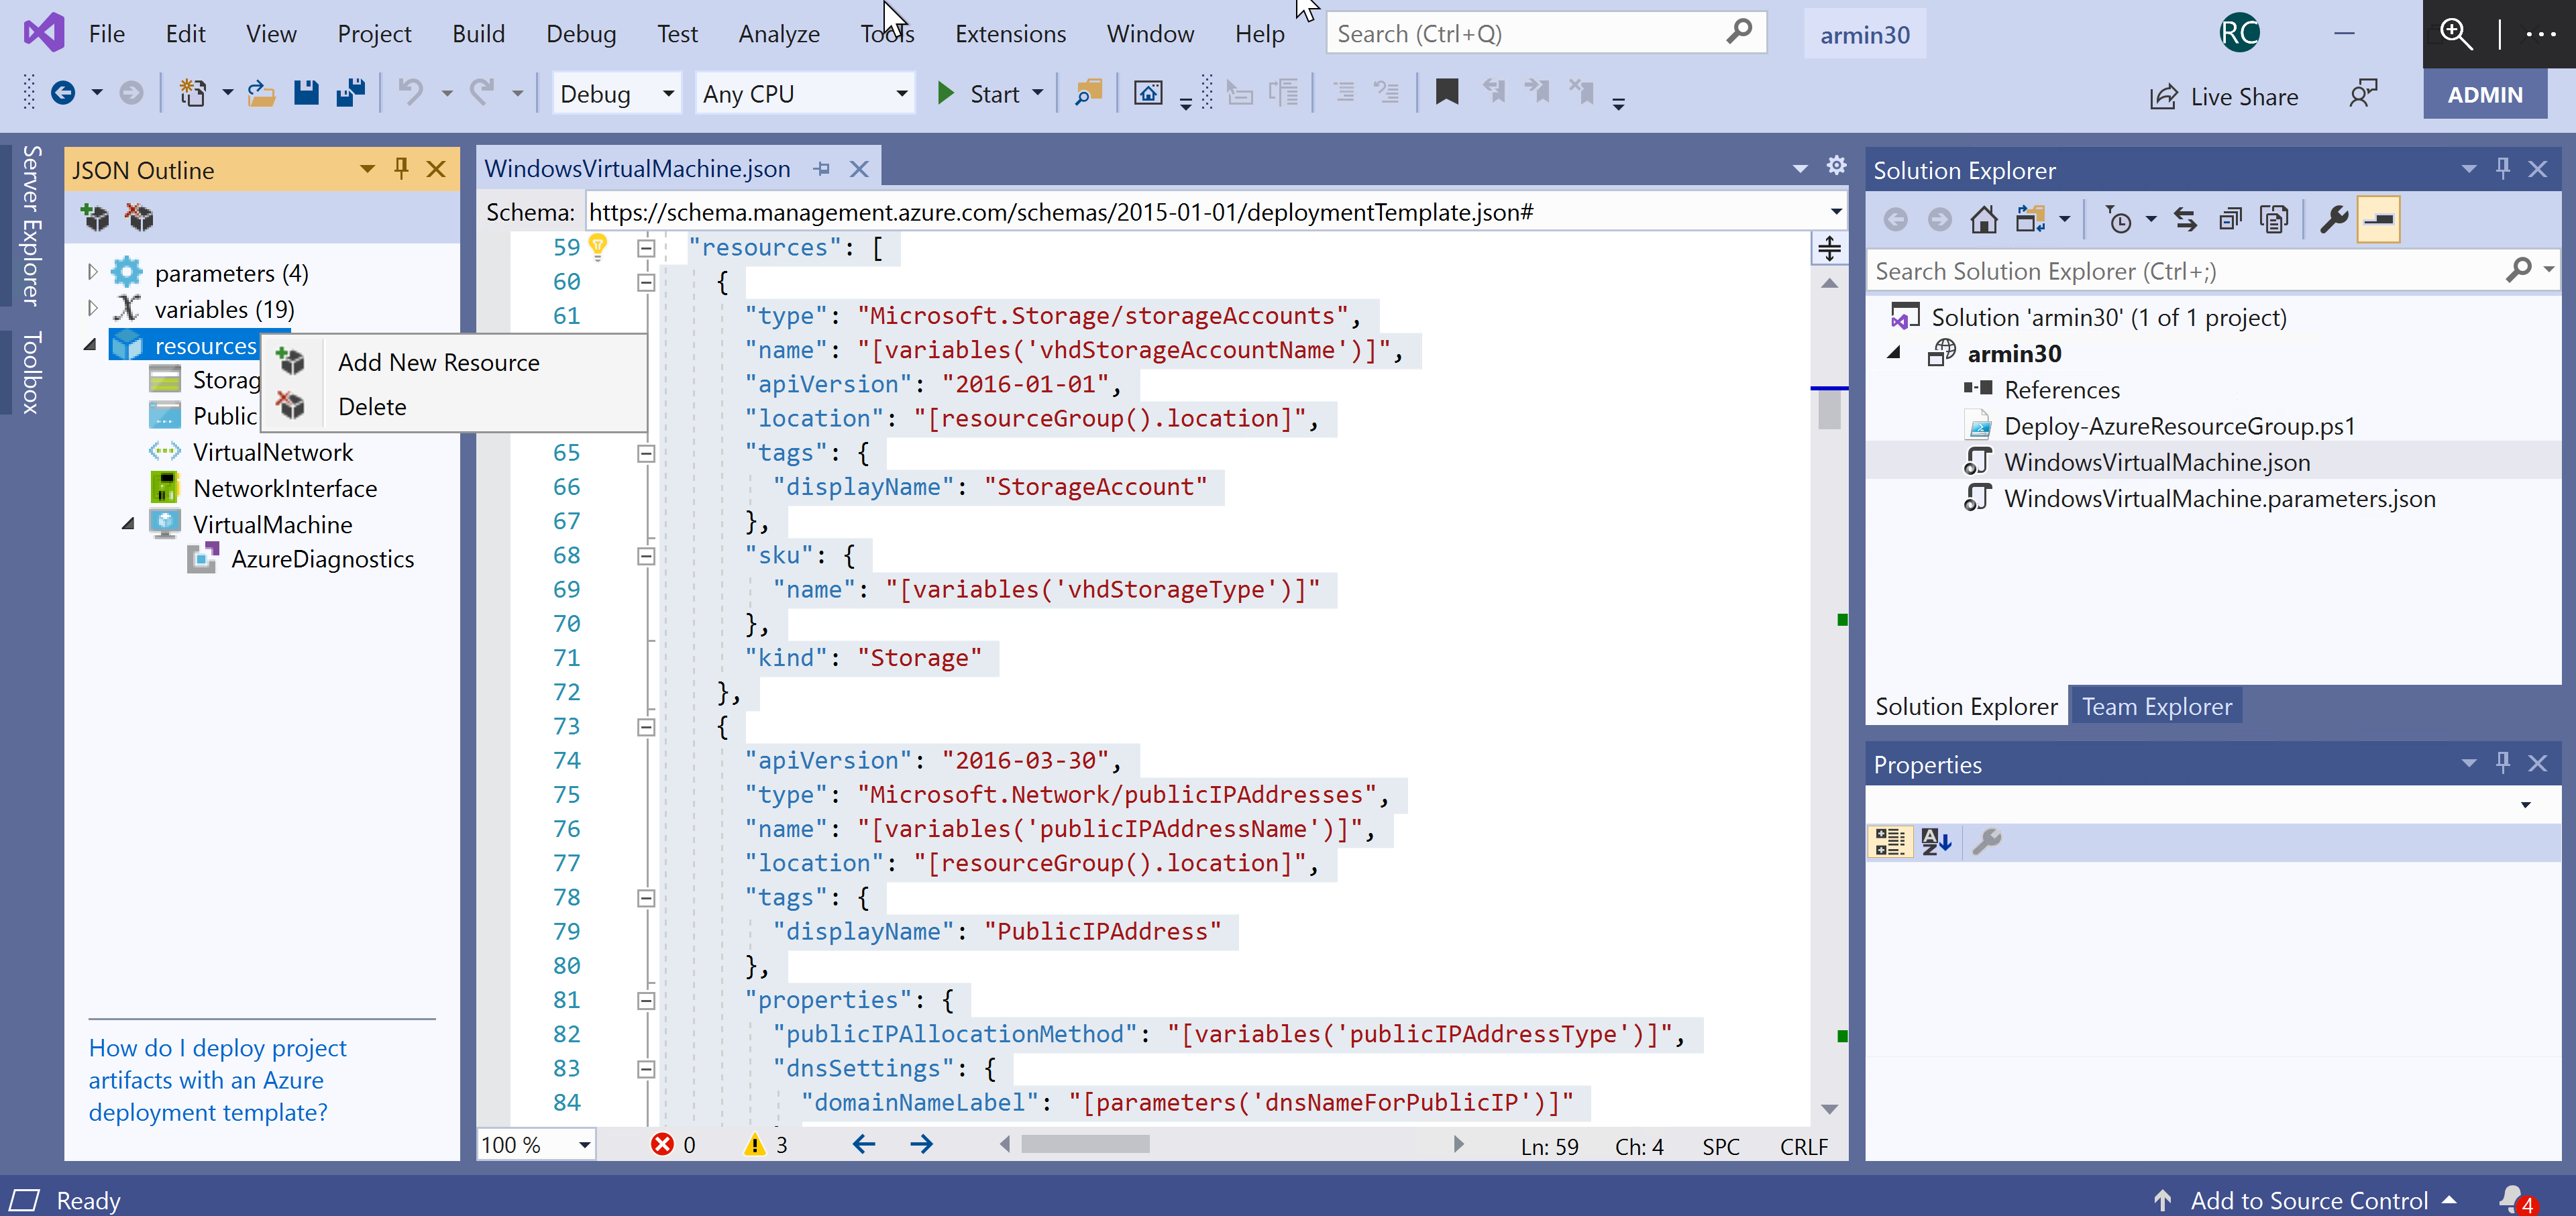
Similar to the Azure Portal template editing experience, you can add resources to this existing template by right-clicking on resources node in the JSON outline and selecting Add New Resource.
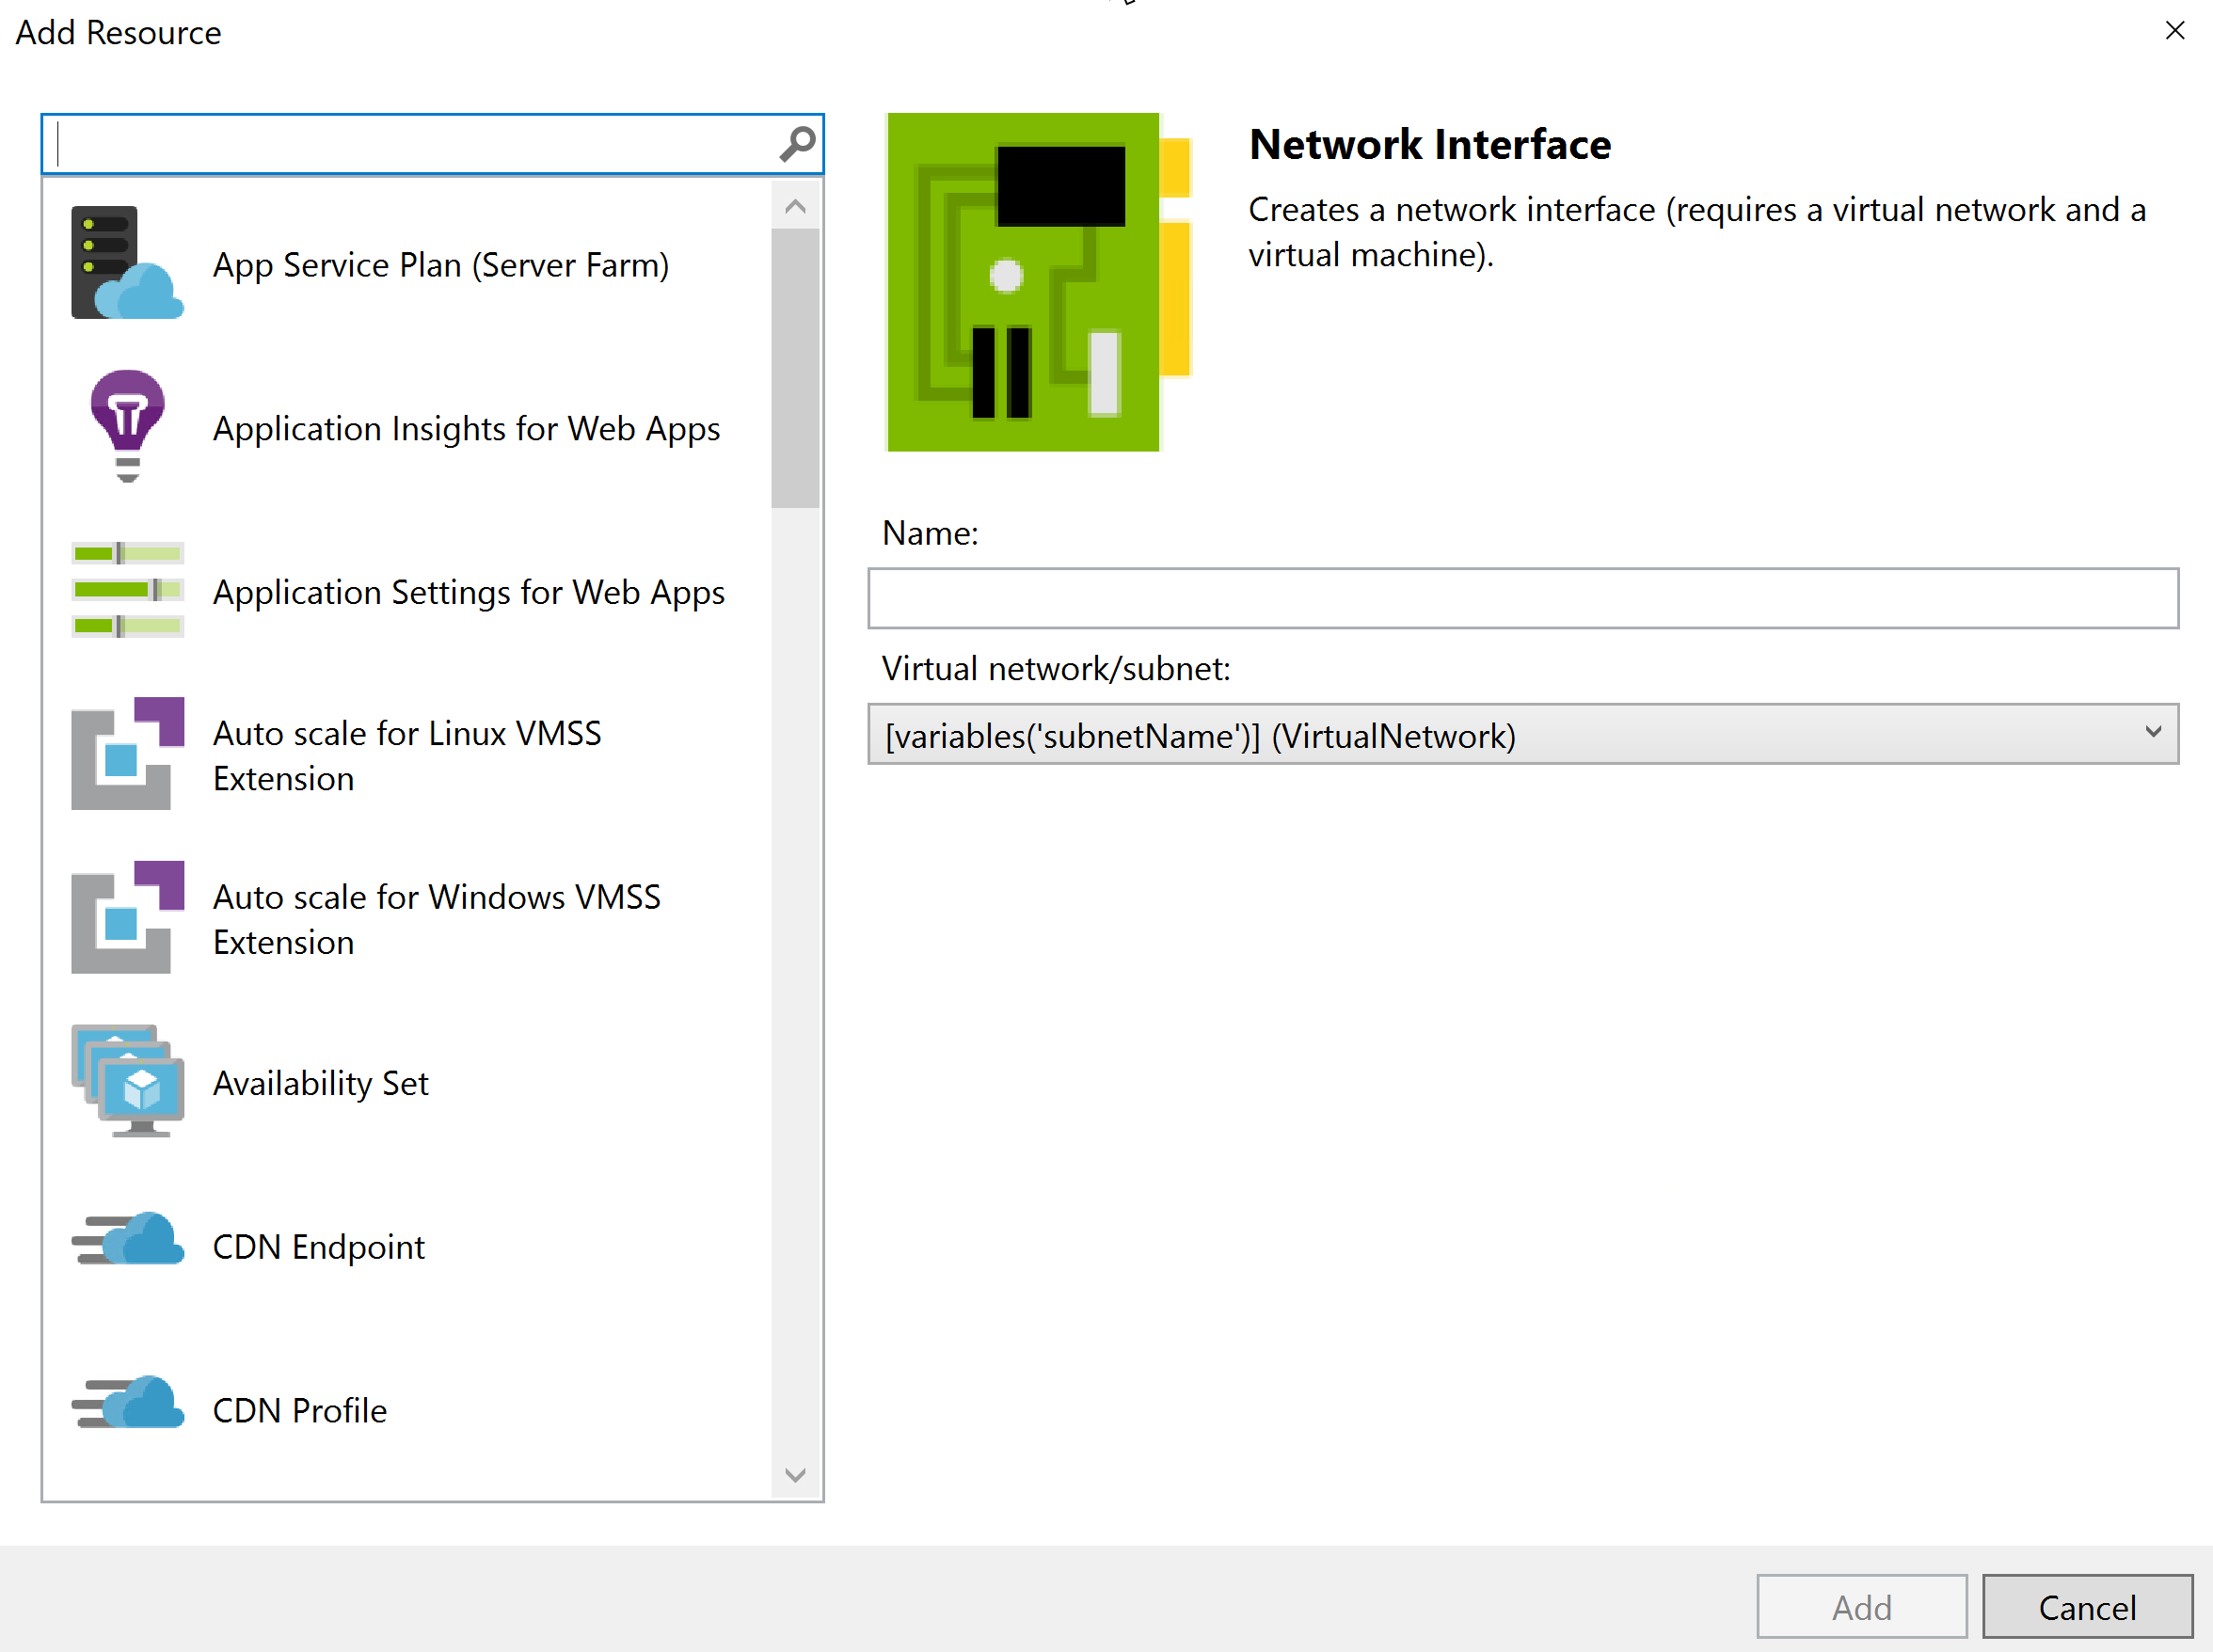
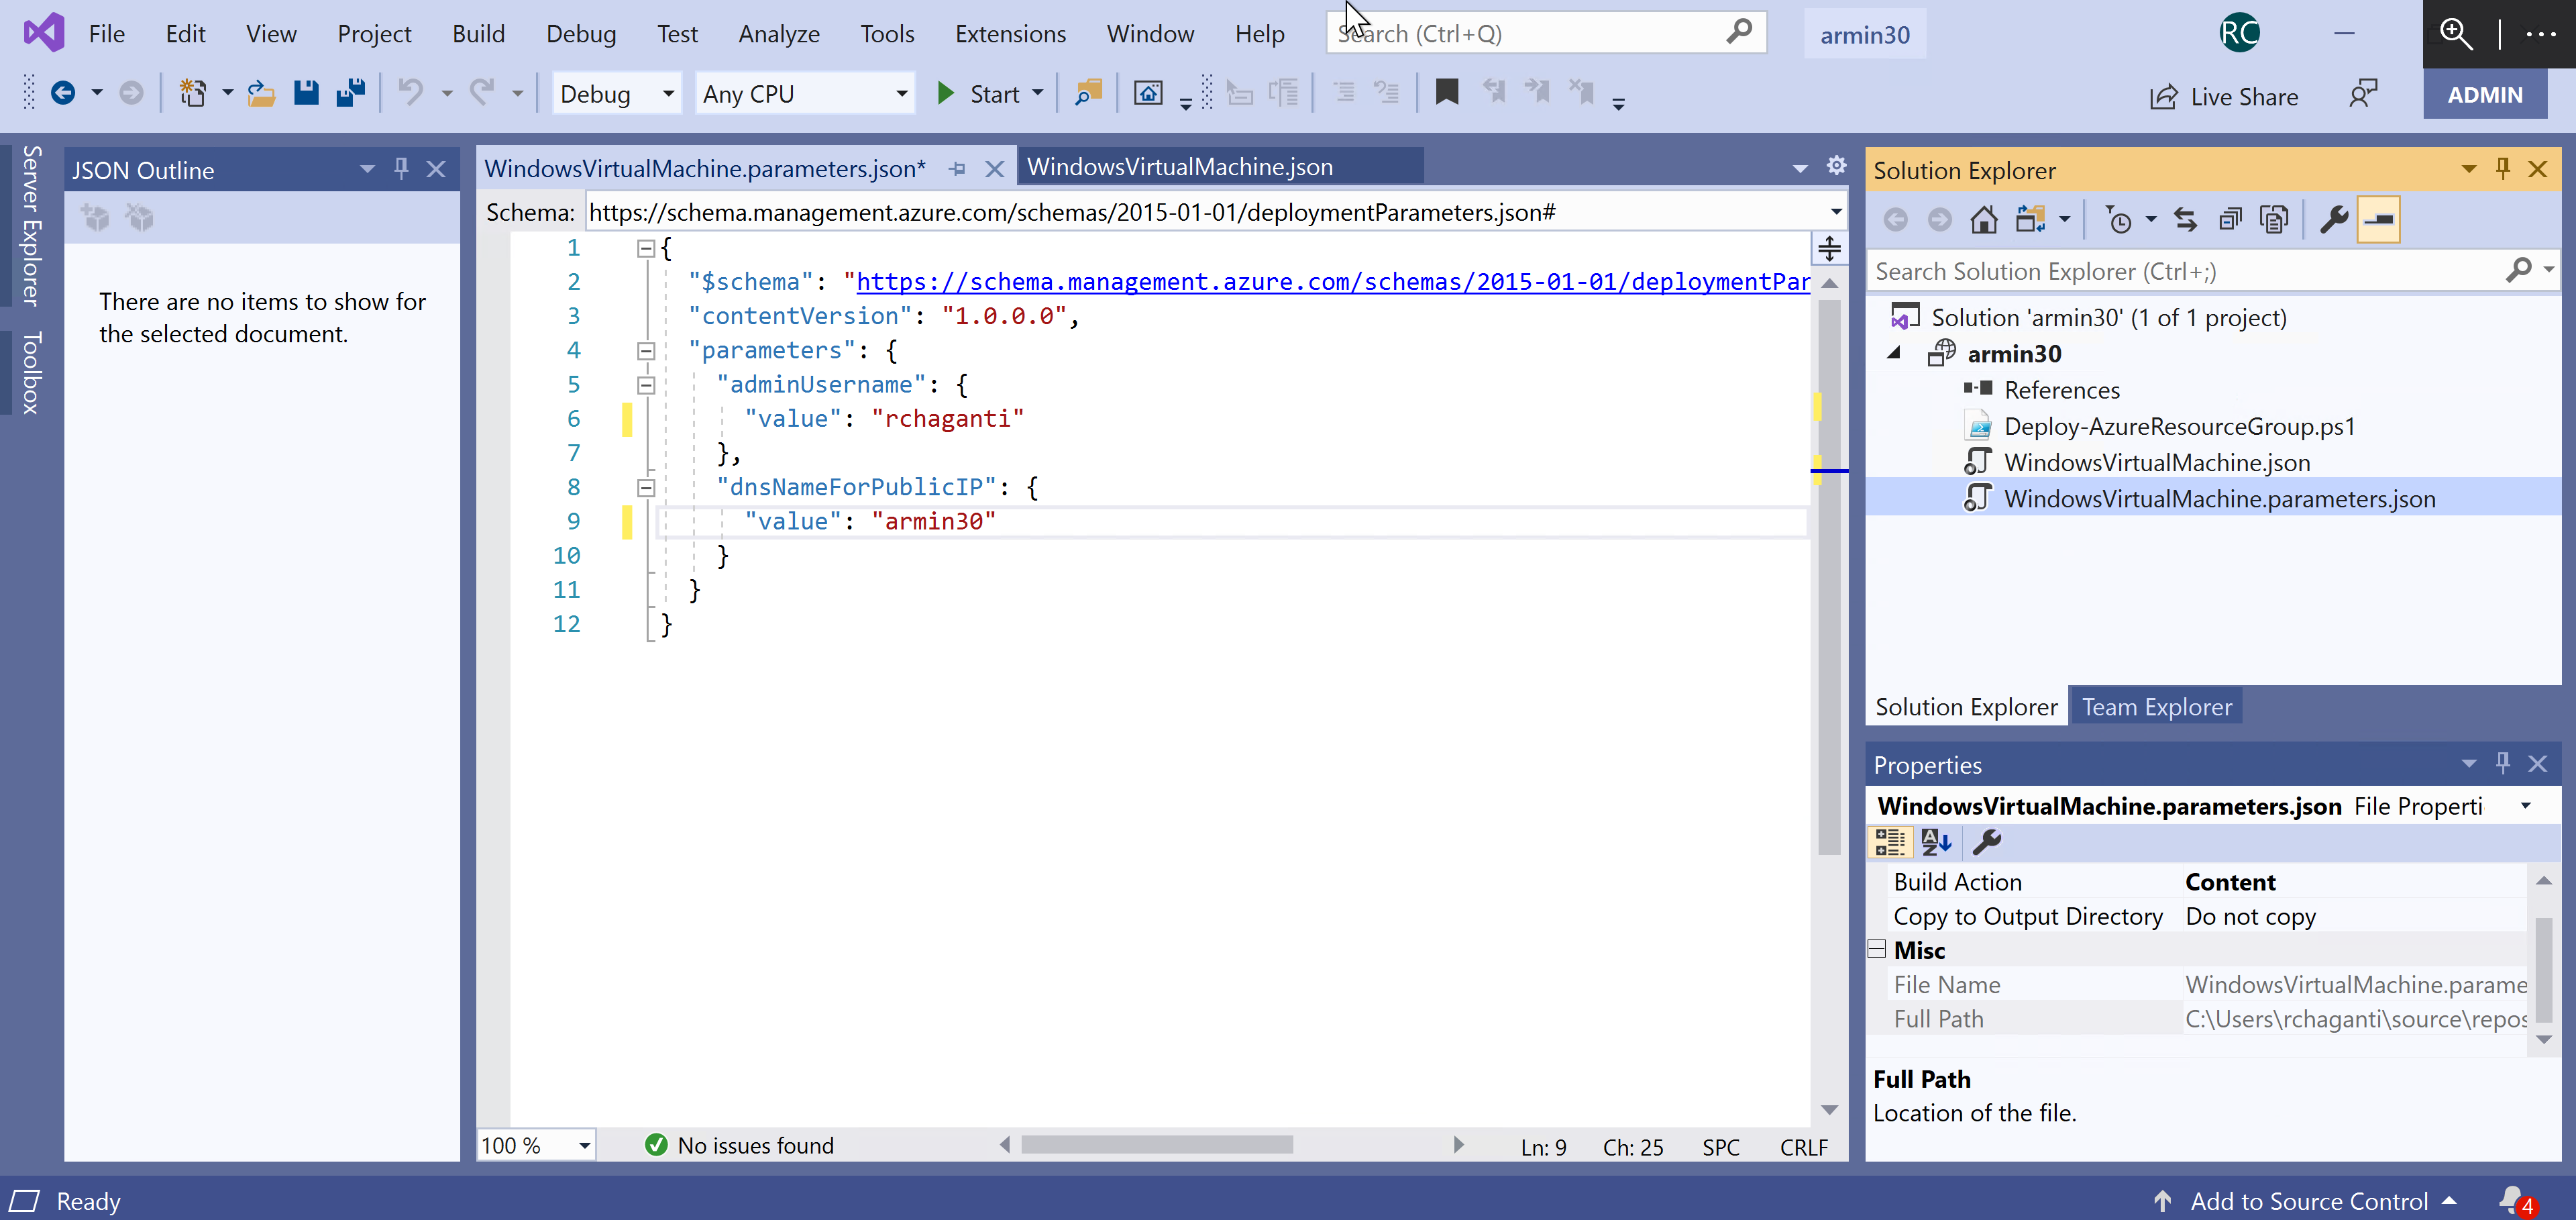
From a set of limited resource types, you can select the resource type you want to add, provide the necessary input parameter values and click Add. The selected resource gets added to the template. You can now customize the template and start a deployment. Before you can deploy the template, you will have to provide the values for the template parameters. This can be done by opening the WindowsVirtualMachine.parameters.json file and enter the relevant values.
Before starting a deployment of this template, you can validate the template. For that, right click on the solution name in the Solution Explorer and select Validate.
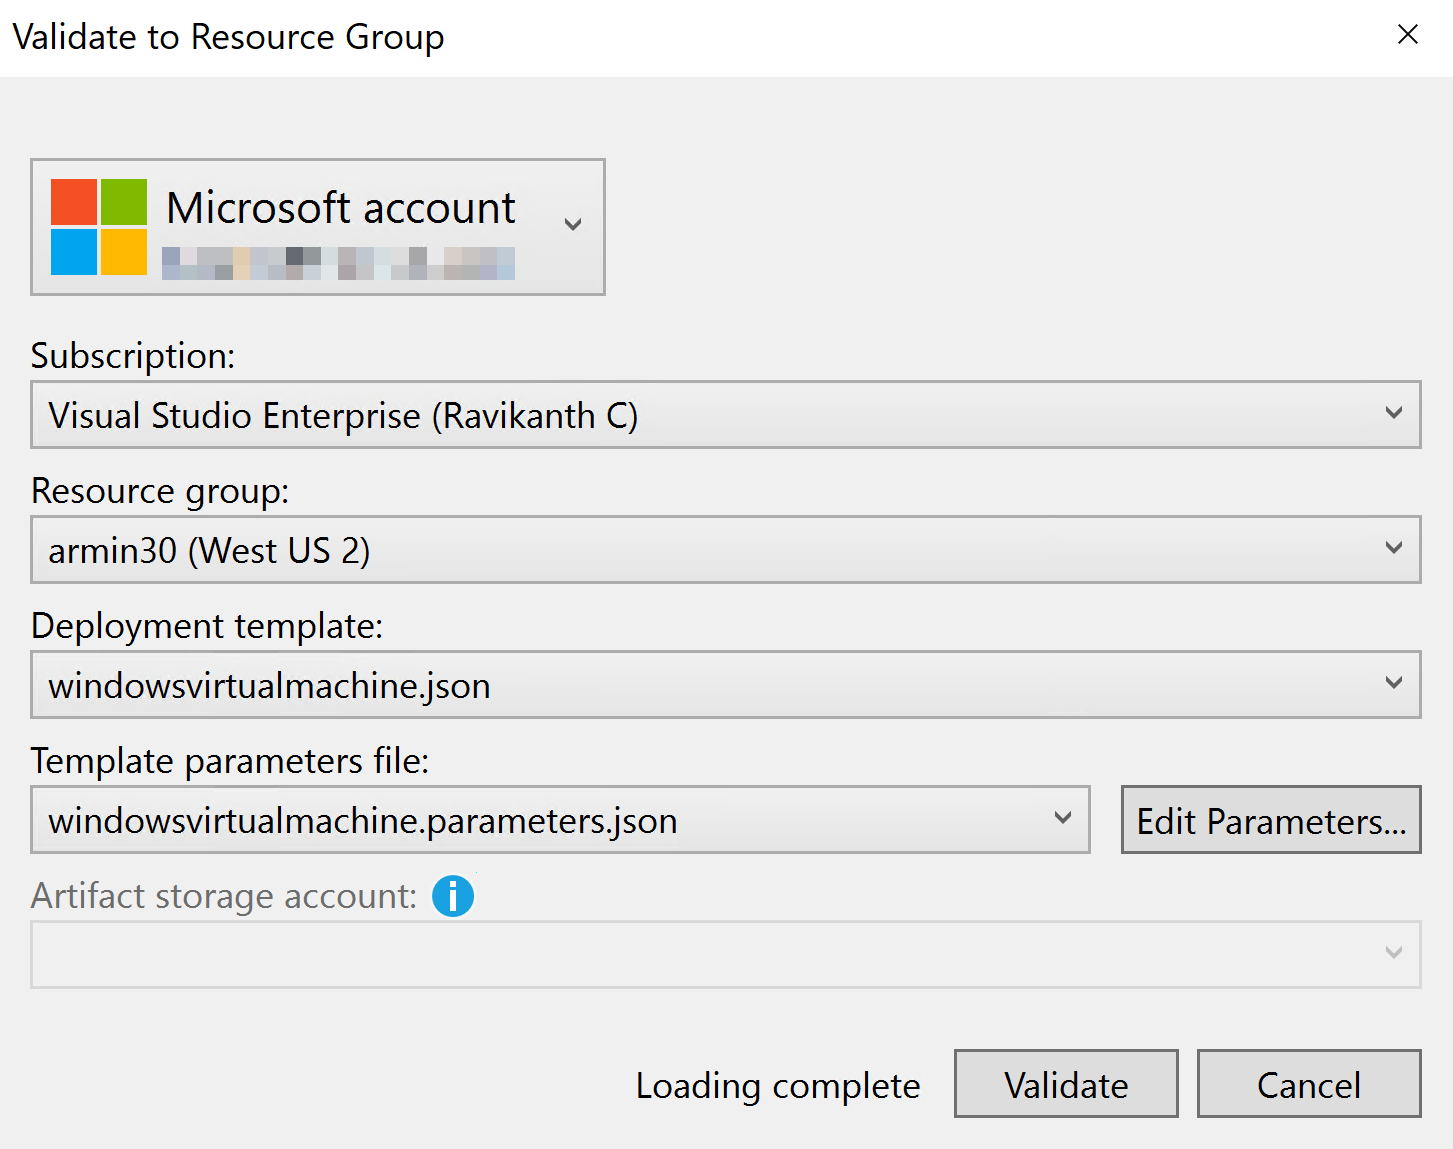
You will be prompted to enter the password for the admin user to continue validation. If the validation completes with no errors, you can again right-click on the solution name in the Solution Explorer and click Deploy to provision the ARM resources defined in the template.
Overall experience with authoring templates in Visual Studio is good. This method provides intellisense for different resource properties based on the template schema version.
The editor experience in Visual Studio also provides insights into what might be wrong with certain resource property values and / or what might be missing therefore providing better editing experience.
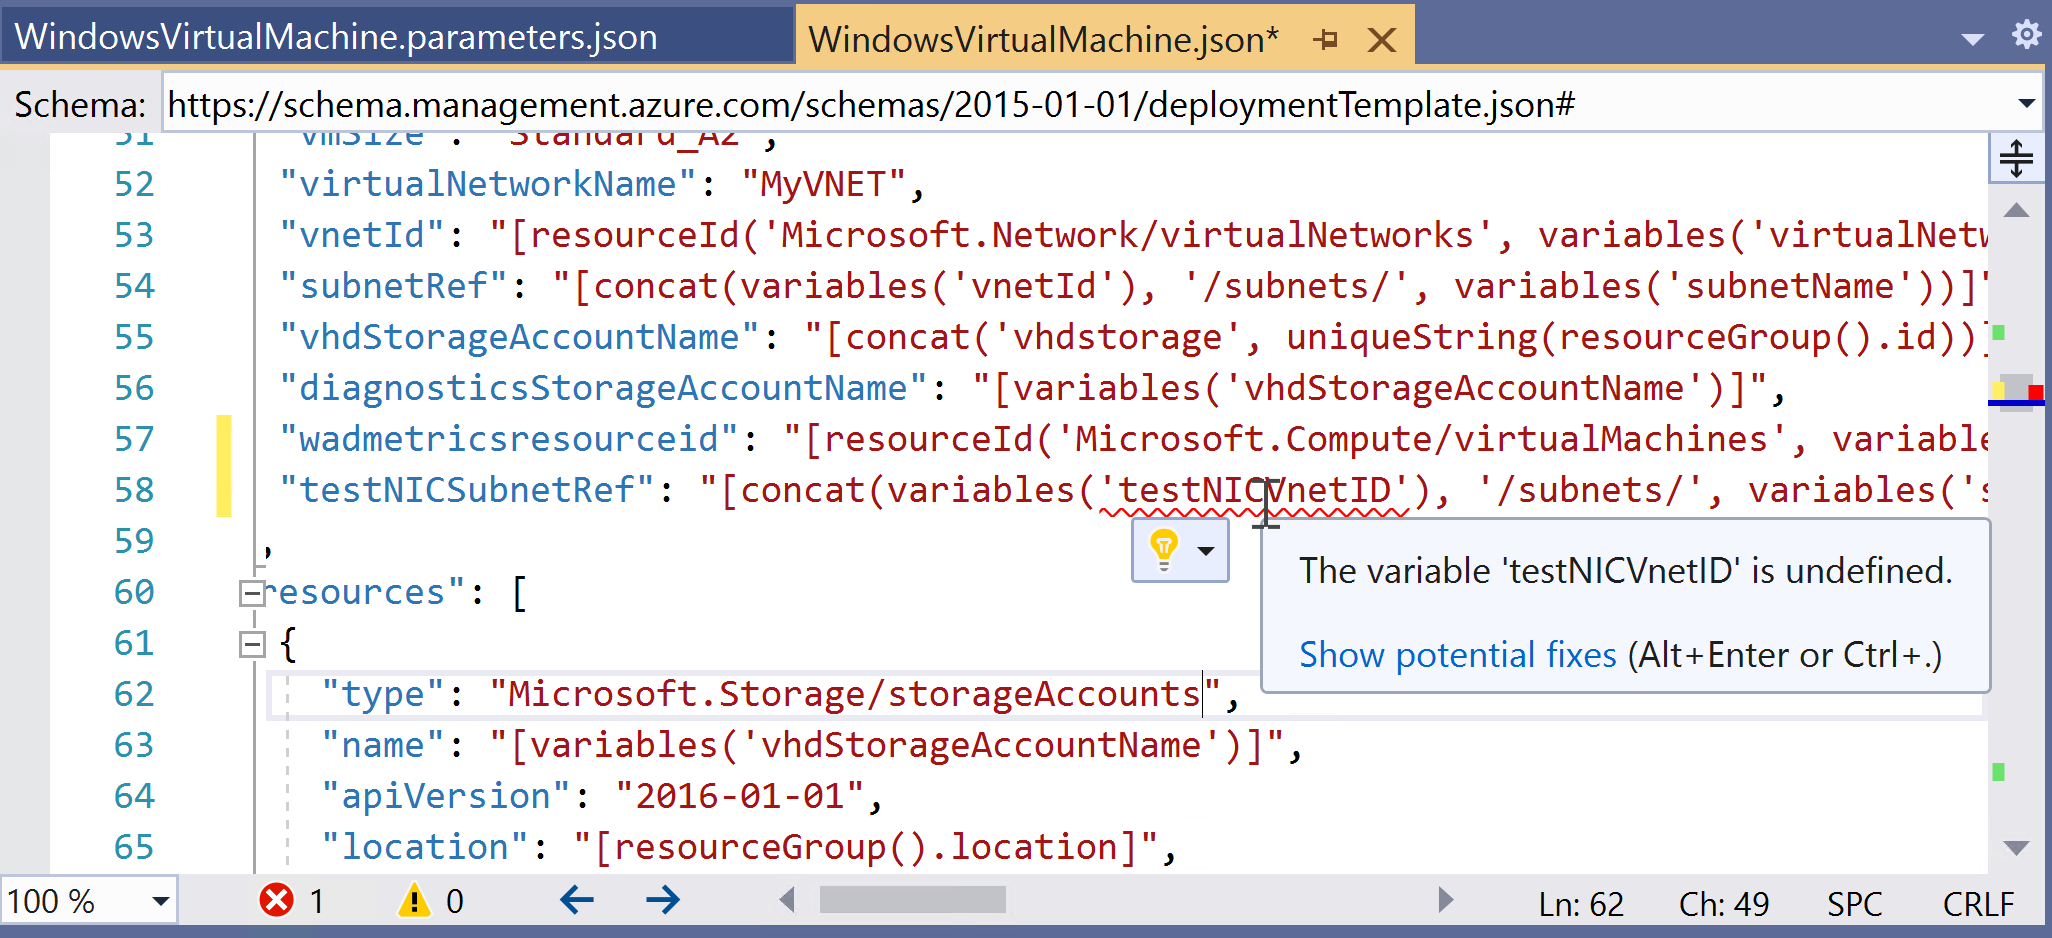
Overall, compared to the web editor in Azure portal, authoring experience in Visual Studio is way better. However, this is a heavy solution. On a decently configured system, it takes close to a minute to just open Visual Studio. Also, as you may have already seen, the starter templates do not support selecting the Azure quickstart templates from the GitHub repository. Within the template editor, you can auto-complete the resource property names once the resource type property is populated. However, there are no quick snippets that you can use directly. This, for me, kills productivity. There may be a few external marketplace extensions but there is no built-in support.
Visual Studio Code
This is my favorite tool. No doubt. There are several reasons as you will read in this section. This tweet poll just endorses my choice.
tweet 1280058881322872833
Throughout this series, you will see using VS Code only for authoring ARM templates. Therefore, I will skip any details similar to Visual Studio based template authoring experience you just read earlier. Now, moving on to why I like VS Code for ARM template authoring, first of all, VS Code is an open source, lightweight, and faster alternative to Visual Studio. The extension support within VS Code is unmatchable. With the official Azure extensions and a bunch of other community extensions, you can be super productive when working with the complex ARM template files. Before you get started with authoring an ARM template in VS Code, you must first install the right set of extensions that will help you in the authoring process. The following list is the minimum you will need to follow the articles in this series. Alternatively, you can install the Azure Tools extension pack that will install following three plus a bunch of other extensions that you may never need.
Azure Account
The Azure account VS Code extension allows you to sign into Azure and access your Azure subscriptions. This is necessary for other Azure extensions to function. Once you install this extension, you get a set of commands to sign in, sign out, select subscriptions, create Azure accounts, and open Azure Cloud Shell within VS Code.
Azure Resource Manager (ARM) Tools
The ARM Tools extension is a must if you want to be productive authoring ARM templates in VS Code. This extension provides the full ARM template language support and provides a bunch of snippets to speed up the authoring process. You will see and use this extension a lot in the next parts of this article series and therefore I will not spend any more time on this here.
Azure Policy
Azure Policy extension can be used for authoring and managing policy definitions and assignments. This is in preview like a few other VS Code extensions. This is a good one to install as well as you follow this series of articles on Azure Resource Manager and want to try out Azure Policy related examples.
Azure CLI Tools
Finally, the Azure CLI Tools extension is what will help you when you author Azure CLI scripts to perform template deployments. This is an optional one if all you need is really the ability to run Azure CLI commands to validate and deploy templates within the VS Code terminal.
Deployment Tools
There are many ways to deploy ARM templates. This includes using Azure portal, Azure CLI, Azure PowerShell cmdlets, ARM REST API, and Python or Go SDK.
Azure Portal
Azure Portal allows you to author templates in an online editor or upload templates for deployments or deploy from a collection of quick start templates. We looked at the an example of this in the previous section already. Using the template editor in the Azure portal, you can author and deploy or you can simply upload a template for deployment. Many places online (including the Azure Quickstart template repository), you see a Deploy to Azure button that directly takes to you the custom deployment page. You can use this method to deploy a template stored in an online public repository to perform resource group level deployments. Here is how it appears in a webpage.
Clicking on the above button brings up the custom deployment blade asking for the input parameters needed for the template deployment.
Azure CLI
Azure CLI offers a method to deploy ARM templates as well. You can use the az deployment command to perform template deployment.
With the az deployment command, we can either use an online template file or local file.
Azure PowerShell
Similar to Azure CLI, you can use Azure PowerShell module as well to deploy ARM templates.
If you do not want to install any of these tools (Az CLI and Az PowerShell module) on your local system, you can always use Azure Cloud Shell within VS Code or launch Cloud Shell in the browser to start using any of these tools. Within this series of articles, you will occasionally see a button like the one displayed below. You can click on it to open Azure Cloud Shell and start performing command execution.
ARM REST API
ARM REST API is another way to do template deployment but I consider this a bit low-level and requires good amount of scripting / programming experience.
For most part of this series of articles on ARM, you will see Azure CLI examples. You will occasionally see a few Azure PowerShell examples. I will write about other deployment methods such as Terraform and Pulumi in a different series of articles. But, before you go there, it is good to get a good grasp of ARM fundamentals. Next few articles in this series of articles will dive into the ARM template authoring and deployment. For now, let us move on to discuss some features and services that work hand in hand with ARM.
Template Design and visualization Tools
As a cloud consultant or architect, you have to create the cloud architecture proposals before you go into the implementation phase. There are a bunch of tools – online and offline – that can help you create the architecture diagrams for your cloud infrastructure proposals. In this final section of this post, you will get to know about a few tools that I have used or using to create these architecture diagrams.
You can always use good old friend Microsoft Visio if you have a license for the product and I trust this a lot and use it. However, I will introduce other tools that you may find useful.
ARM template visualizer
The ARM template visualizer is not really a designer like Visio or any other tool you may see in this section but a good way to visualize an ARM template on a canvas. If you navigate to the ARM quickstart template GitHub repository, you will see a button like what is shown below.

And, when you on click on this button, it takes you to an ARM template visualizer where you can see the template in a visual form.
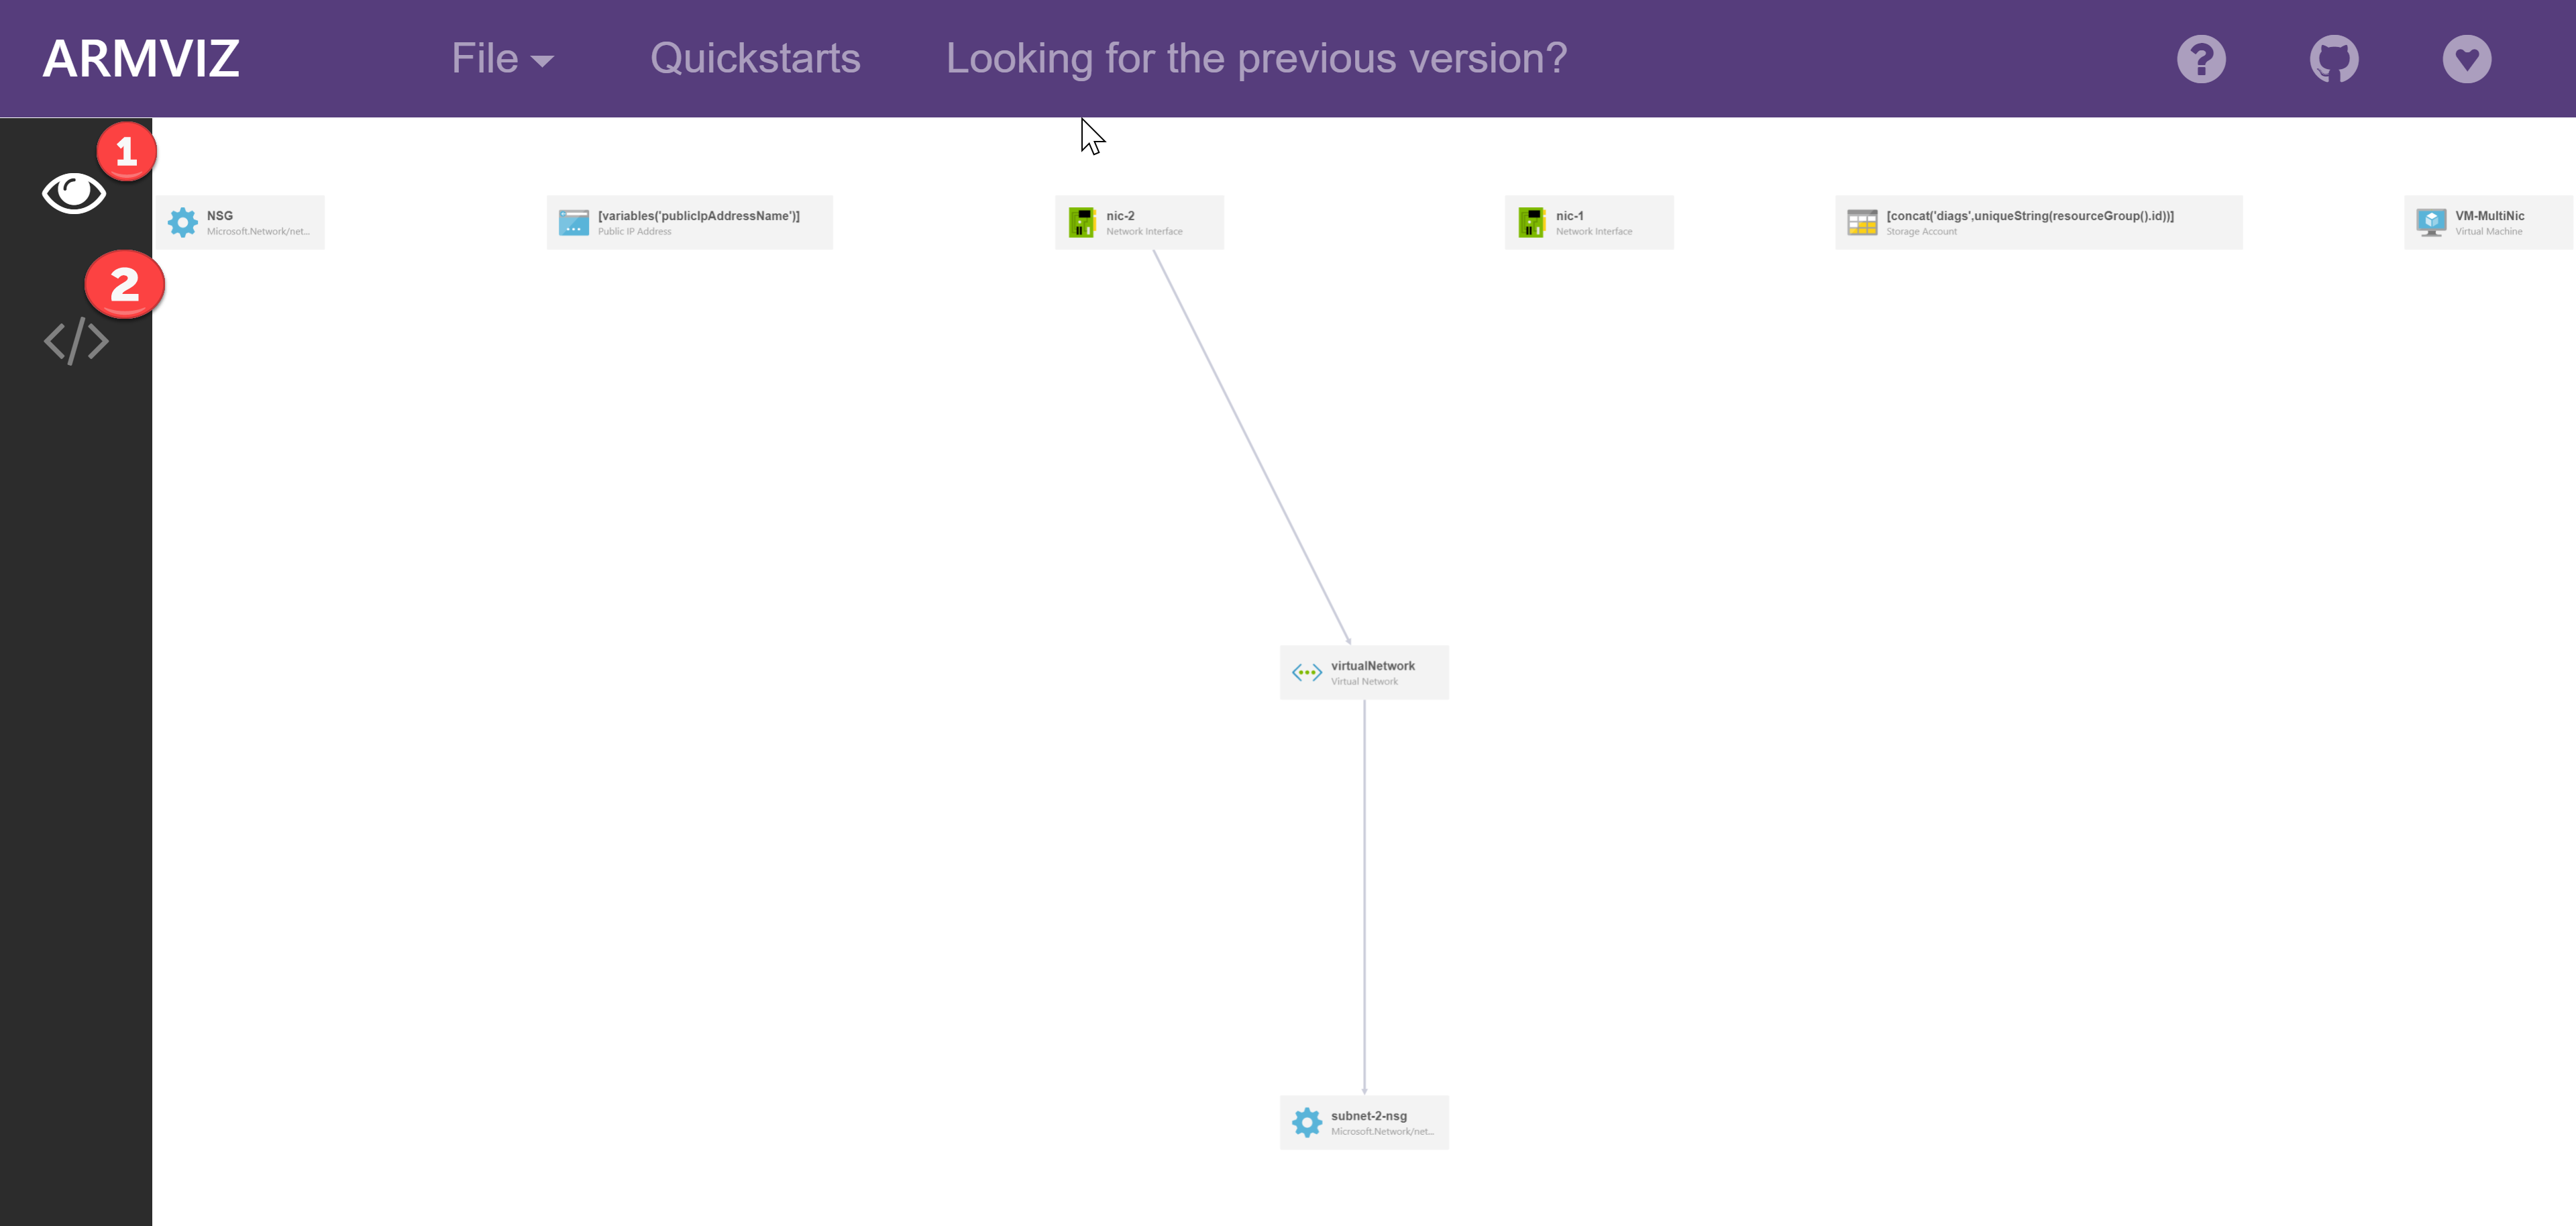
By default, the template visualization [1] opens up and you can click on </> [2] to see the ARM template JSON. You can edit the contents of the template and return back to the canvas to see the updated visualization. Going to the File menu, you can open a local template or download the template that is visualized.
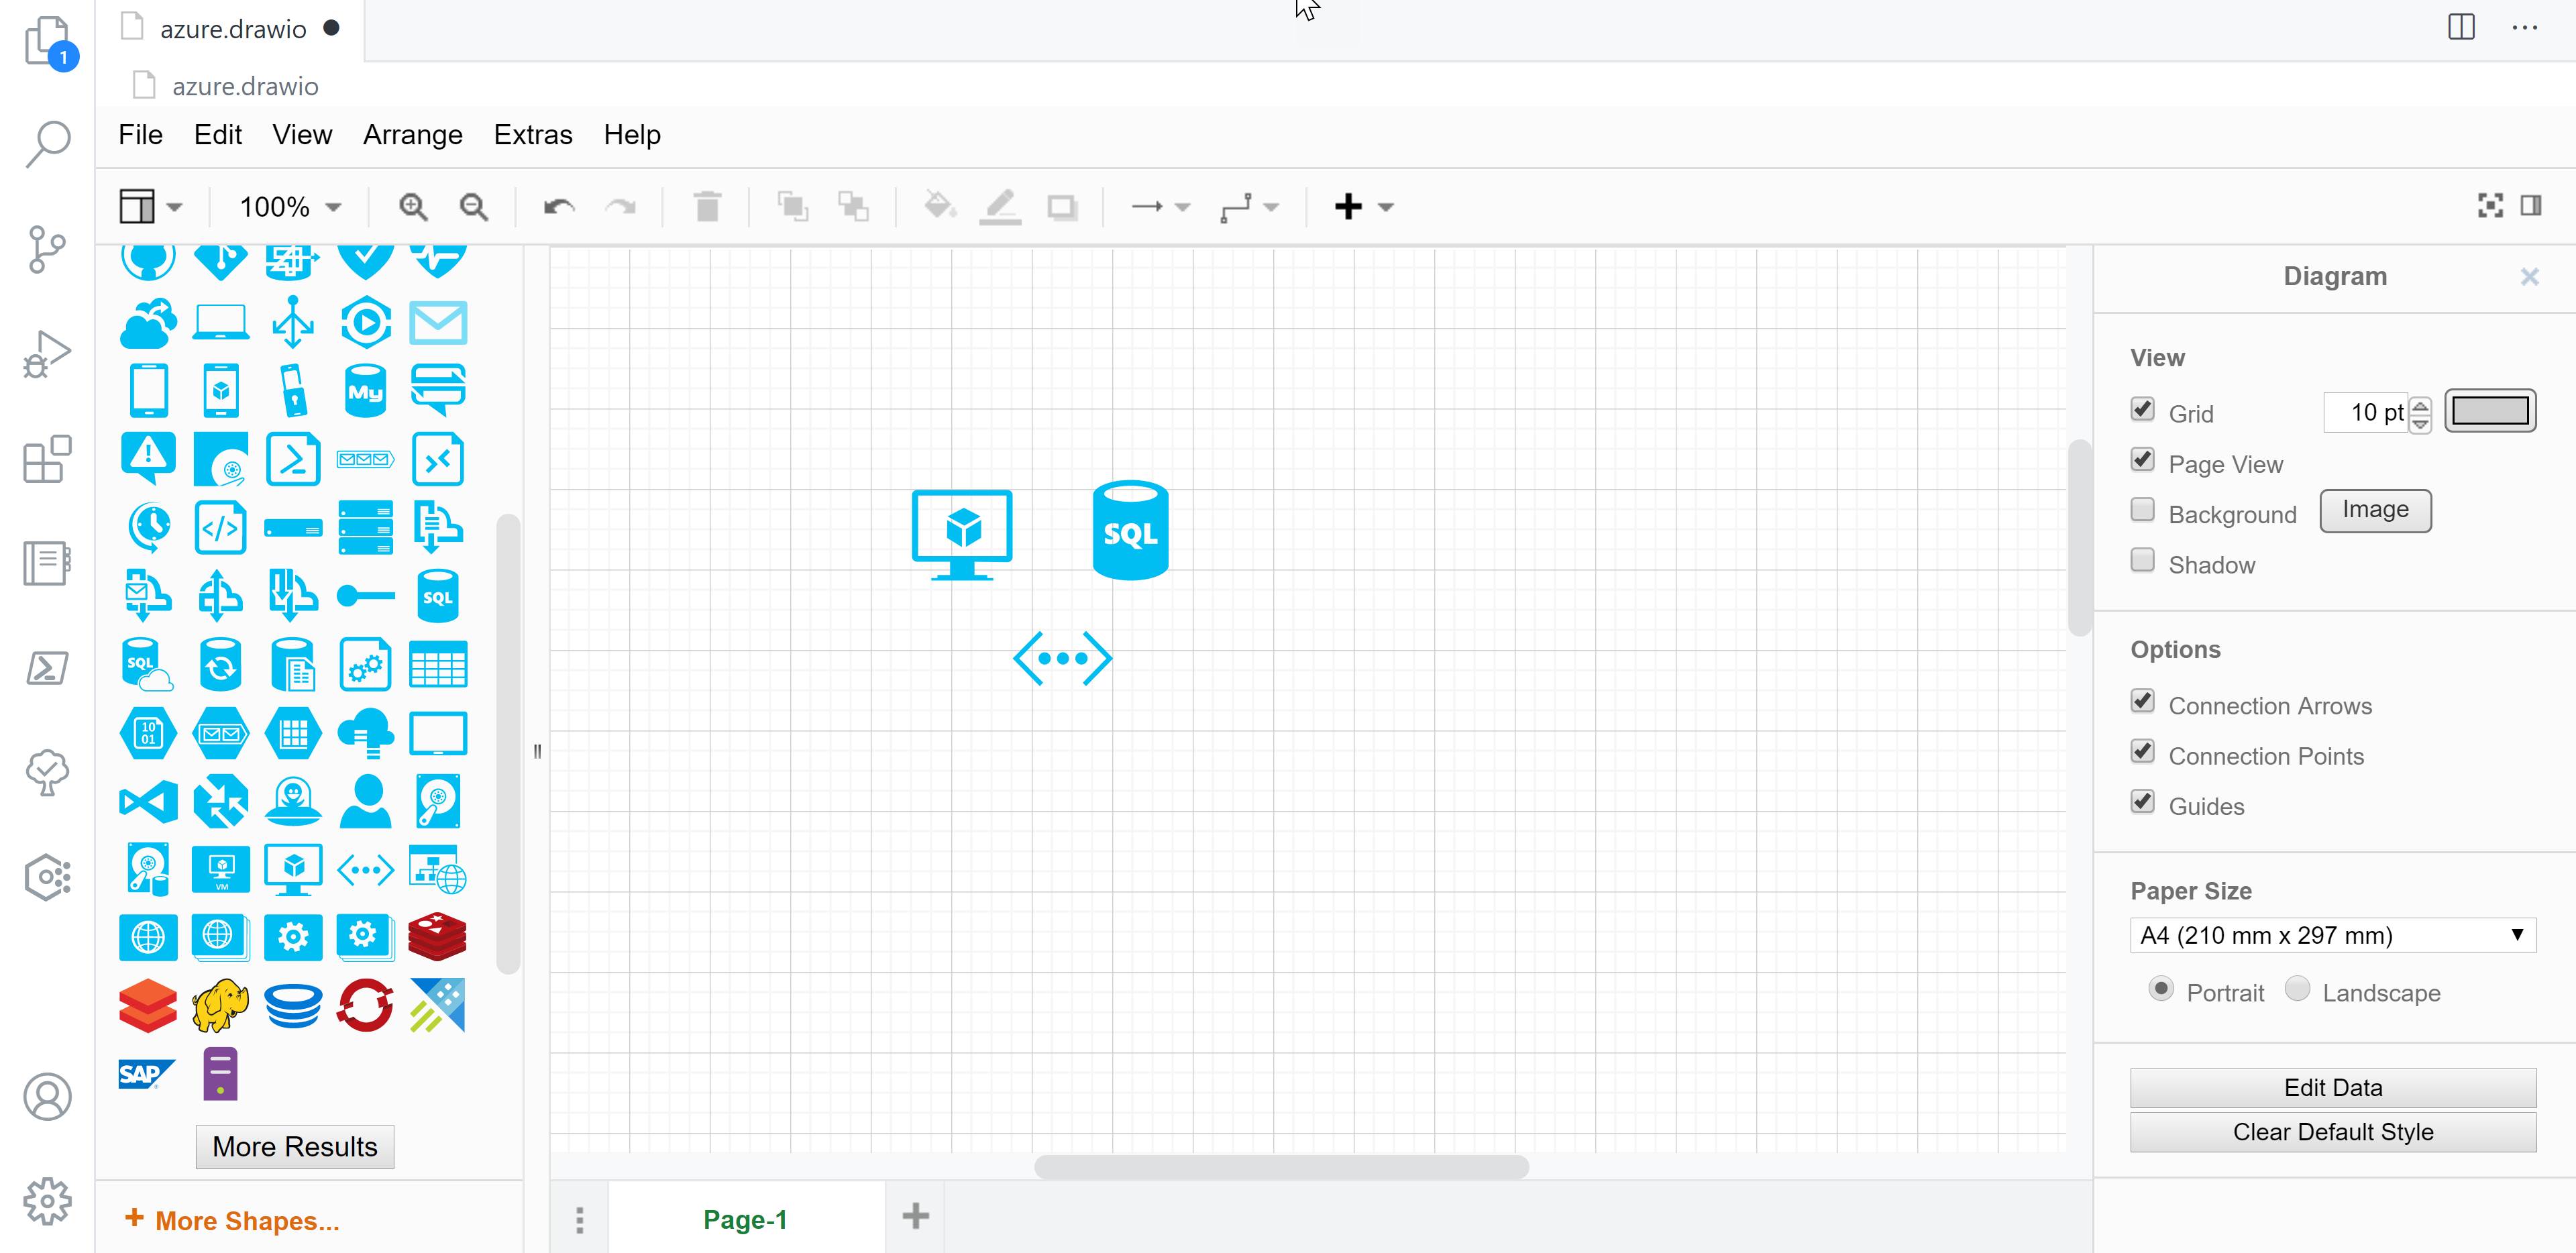
Draw.io
Draw.io is a web-based tool that can help you design and save Azure architecture diagrams. There is a VS Code extension as well for this and you can now create the diagrams right within VS Code.
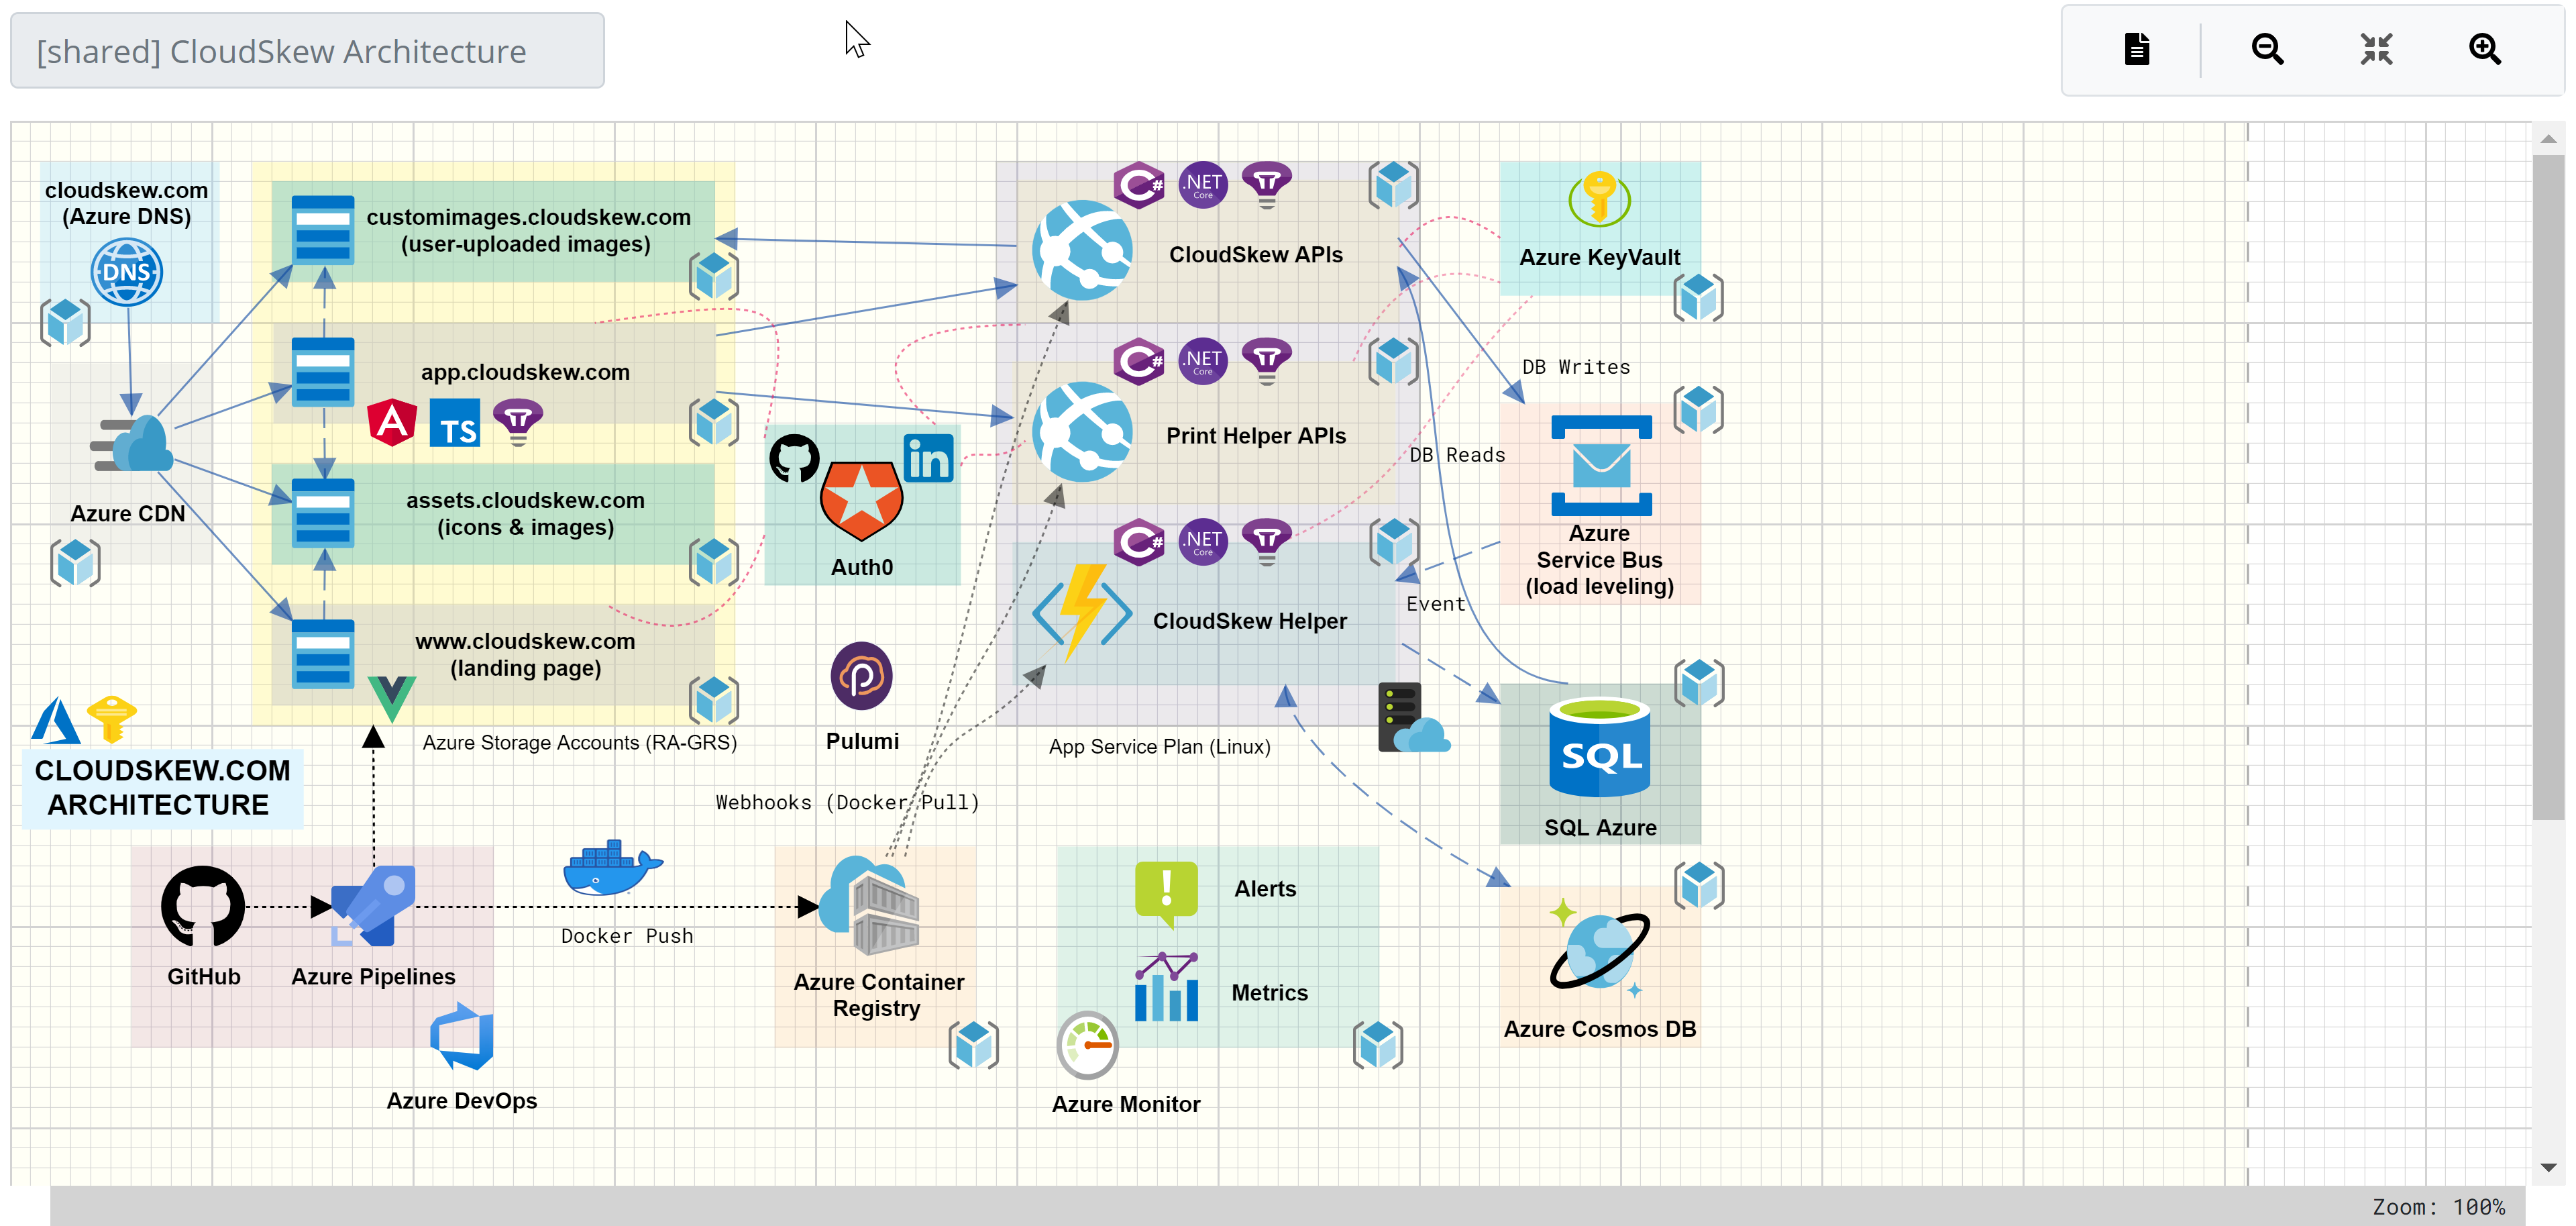
Cloudskew
Cloudskew is another web-based tool that provides a very nice canvas to create cloud architecture diagrams. This is also a free tool that offers several built-in cloud icon support.
There may be many other tools for ARM template design and visualization that I may not have tried yet. But, like I mentioned earlier, my trusted source is still good old Visio and I continue to use it.
So far in this article, we looked at different authoring tools, deployment methods, and finally a few options to design and visualize these ARM templates. This should get you equipped with the right tools to get started with template authoring. In the next part of this series, we will look at the basics of template authoring. Stay tuned.
Comments
Comments Require Consent
The comment system (Giscus) uses GitHub and may set authentication cookies. Enable comments to join the discussion.