Azure Bicep as a feature in VS Code development containers
Visual Studio Code development containers are magic! With the help of VS Code Remote - Containers extension and Docker Desktop, you can run a full-featured development environment within a container.
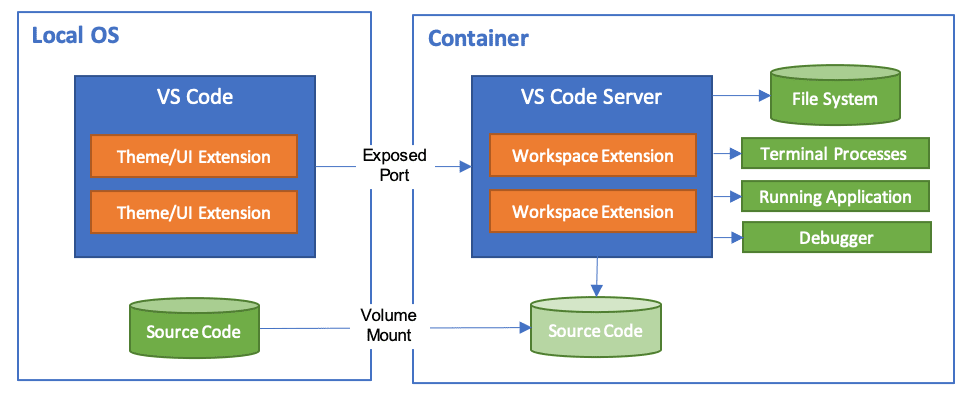
Image source: Microsoft
Containers, in general, help you package application code and all the dependencies. Devcontainers take advantage of this and help you share the development environment with other team members, and all have the same base setup for developing your project code. This eliminates any issues related to the development environment since your team will always use the same environment provided by a devcontainer.
Note: This is not a development containers fundamentals article.
A devcontainer can be created from a pre-built container image, Dockerfile, or Docker compose file. To start with, you can add the following JSON as devcontainer.json under the .devcontainer folder in your source code workspace.
|
|
Once this file is added and you have the VS Code Remote - Container extension installed, VS Code prompts you to open the workspace in a devcontainer. If you choose to open in a devcontainer, a container image gets created from what is described in the devcontainer.json.
I have been using devcontainers to standardize my development environment across systems and in GitHub codespaces. I have a devcontainer associated with almost every project I am working on. If you have read my earlier posts here, you will know that I am authoring a book on Azure Bicep. This book contains several Bicep examples across many chapters to demonstrate usage of Bicep language semantics and concepts. When I build examples for this book, I tend to test the example code across different versions of the Bicep. To help me quickly build the development environment for different versions of Bicep, I started using devcontainers. To simplify the preparation of devcontainer, I built a simple feature for Azure Bicep.
Development container features
Devcontainer features are in preview and help you choose what tools you want to install within a devcontainer.

Image source: Microsoft
The above example shows two features added to the devcontainer – Azure CLI and Git. The built-in list is missing Bicep CLI. However, it is not too difficult to build one yourself. You can use the template provided by Microsoft and add more features.
Here is what I did for adding Azure Bicep as a feature.
devcontainer-features.json
First, you need the meta data that describes your feature. You need to name it devcontainer-features.json.
|
|
You can add multiple features to the same JSON and access what you need by using the feature ID. This example shows only Azure Bicep as the feature. It has one parameter (options object). The Azure Bicep feature has version option to choose which version of Bicep you want to install and defaults to latest version. The entrypoint property specifies the script to call when build the devcontainer and extensions property specifies the VS Code extensions to install within the devcontainer.
install.sh
Once the devcontainer-features.json is ready, you need an install.sh file to configure the devcontainer with necessary settings – in this case, installing Azure Bicep CLI.
|
|
Similar to the devcontainer-features.json, you can have the installation logic for multiple features. If a feature ID is specified in the devcontainer.json, then the _BUILD_ARG_<FEATURE-ID> will be set in the devcontainer environment. This triggers the logic to create the necessary endpoint mentioned in the feature definition.
Feature release workflow
Finally, you need a workflow that creates a release of your devcontainer feature. You can take this from Microsoft’s dev-container-features-template repository. As soon as you create a release tag, this workflow triggers a release and uploads the artifact. This artifact gets downloaded during the devcontainer build process.
Consuming a devcontainer feature
You have already seen an example at the beginning. Adding your own feature to the devcontainer.json is not much different. Here is a complete example from the bicepbookexamples repository where I use this actively.
|
|
You can open this repository in VS Code and then use the Remote-Containers: Rebuild and Reopen in container command.

Building the devcontainer image may take a few minutes since the features need to get downloaded and installed. Once the container is ready, you can check the presence of all features you specified in the devcontainer.json by running the following commands.
|
|
One disadvantage of this method (using devcontainer features) is the size of the container image. The more features you add to the devcontainer.json, the larger the size of the image. This is because each feature becomes a layer in the image.
My new book Azure Bicep - Zero to Hero covers more about VS Code Development Containers and collaborating as a team.
Comments
Comments Require Consent
The comment system (Giscus) uses GitHub and may set authentication cookies. Enable comments to join the discussion.