Building container images - using no tools


In a couple of earlier articles, we looked at Linux constructs used in building container images and the OCI image specification which standardizes the container image format. It is now time to understand how we can create container images. Knowing this is important to optimize the image size and building secure container images. And, of course, this knowledge also helps us appreciate what tools like Docker CLI or Buildah among many others help us achieve. There are many tools to build container images. We shall look at each of these methods in-depth in later parts of this series of articles on container images. For today, we will look into building container images using no tools! Actually, just using built-in OS tools.

As we learned already, a container image is a made up of layers packaged as tarballs. Each of these tarballs represent a portion of the file system that is needed for the application in the container to function. For example, here is how the Golang image looks like [on the file system] when you extract it using Skopeo.

 1
 2
 3
 4
 5
 6
 7
 8
 9
10
11
12
13
14
vscode ➜ ~$ cat index.json | jq '.manifests[].digest'
"sha256:5e2f436ecda6b9f2ccdd912cfa462323100ba98e4399bdddb212f675d87fb85b"

vscode ➜ ~$ cat blobs/sha256/5e2f436ecda6b9f2ccdd912cfa462323100ba98e4399bdddb212f675d87fb85b | jq '.config.digest'
"sha256:b47d5cbdc30315fb21d7299ceacc1146985c84230421fd5e4a07e8b009575a11"

vscode ➜ ~$ cat blobs/sha256/5e2f436ecda6b9f2ccdd912cfa462323100ba98e4399bdddb212f675d87fb85b | jq '.layers[].digest'
"sha256:a8ca11554fce00d9177da2d76307bdc06df7faeb84529755c648ac4886192ed1"
"sha256:e4e46864aba2e62ba7c75965e4aa33ec856ee1b1074dda6b478101c577b63abd"
"sha256:c85a0be79bfba309d1f05dc40b447aa82b604593531fed1e7e12e4bef63483a5"
"sha256:195ea6a58ca87a18477965a6e6a8623112bde82c5b568a29c56ce4581b6e6695"
"sha256:52908dc1c386fab0271a2b84b6ef4d96205a98a8c8801169554767172e45d8c7"
"sha256:a2b47720d601b6c6c6e7763b4851e25475118d80a76be466ef3aa388abf2defd"
"sha256:14a70245b07c7f5056bdd90a3d93e37417ec26542def5a37ac8f19e437562533"

index.json at the root of the OCI layout contains a pointer to the manifest that describes the configuration and layers within the image. As seen here, both manifest and image config have file’s SHA256 hash as the file name and both files are JSON documents.

Image config, as we learned earlier, is what the container runtime uses to setup the container. It contains an ordered collection of file system layers and the execution parameters to create the container. What is important for our discussion is at the beginning of the configuration JSON. Here is an example from the golang image.

 1
 2
 3
 4
 5
 6
 7
 8
 9
10
11
12
13
14
15
16
17
18
19
20
21
22
23
24
25
26
27
28
vscode  ~$ cat golang/blobs/sha256/b47d5cbdc30315fb21d7299ceacc1146985c84230421fd5e4a07e8b009575a11 | jq .
{
  "created": "2022-11-16T04:16:44.241793636Z",
  "architecture": "amd64",
  "os": "linux",
  "config": {
    "Env": [  "PATH=/go/bin:/usr/local/go/bin:/usr/local/sbin:/usr/local/bin:/usr/sbin:/usr/bin:/sbin:/bin",
      "GOLANG_VERSION=1.19.3",
      "GOPATH=/go"
    ],
    "Cmd": [
      "bash"
    ],
    "WorkingDir": "/go"
  },
  "rootfs": {
    "type": "layers",
    "diff_ids": [
      "sha256:ccba29d6937047c719a6c048a7038d3907590fbb8556418d119469b2ad4f95bc",
      "sha256:f1c1f22985847a54884b1448b7e41f2852c7f4fab4b71014ba38cc2990cdc9f1",
      "sha256:80231db1194c4e9941e3c4e00c704f527889863ea2222b691ff7f8583b912aa0",
      "sha256:89c3244a87b279c98478c9248c9cbfba18ca16866e38c54f0134b31bbfd3ab27",
      "sha256:6a7921805df03a2c5bbc8a24979077ce43b466d1b4ace36afd045e51fdbbe24f",
      "sha256:de3f6c83fe06d179f2cdc189bd123dd159c78b2b80cd6739fde25988b1142925",
      "sha256:6201ebf6567d8a29c3458610efb2b681fec4b8c127668d8d223f504520ed351e"
    ]
  },
  ....

Each layer in the image is a gzipped tarball, once again, containing the SHA256 hash as the file name. So, if we need to build a container image by hand, we need to really follow the same process of packaging each of our image layers. Let us look at that.

Building a hello-cloud image

To understand the process of building a container image, we shall use a simple hello-cloud Go program. Our image will contain only one layer – the hello-cloud program. Here is our simple Go program.

 1
 2
 3
 4
 5
 6
 7
 8
 9
10
11
12
13
14
15
16
17
18
19
20
package main

import (
	"fmt"
	"os"
)

func main() {
	var name string

	if len(os.Args) == 2 {
		name = os.Args[1]
	}

	if name == "" {
		fmt.Println("Hello, 🌍!")
	} else {
		fmt.Println("Hello,", name, "👋")
	}
}

Nothing fancy here. This program takes an optional input. This optional input can be your name or whatever you like. If there is no input, it prints Hello, 🌍!. You can build the binary using go build hello-cloud.go command.

1
2
3
4
vscode ➜ ~/hello-cloud$ ./hello-cloud
Hello, 🌍!
vscode ➜ ~/hello-cloud$ ./hello-cloud "Cloud Native Central"
Hello, Cloud Native Central 👋

Go programs are statically linked and therefore have no OS dependencies. Let us now look at creating a folder structure needed for this.

1
2
3
4
5
6
vscode ➜ ~/hello-cloud$ tree imageLayer/
imageLayer/
├── bin
└── tmp

2 directories, 0 files

We shall now move the hello-world binary into the bin folder.

1
2
3
4
5
6
7
vscode ➜ ~/hello-cloud$ mv hello-cloud imageLayer/bin/

vscode ➜ ~/hello-cloud$ tree imageLayer/
imageLayer/
├── bin
│   └── hello-cloud
└── tmp

We have the contents of our image layer ready. We can now package this into a gzipped tarball.

 1
 2
 3
 4
 5
 6
 7
 8
 9
10
11
12
13
14
15
16
vscode ➜ ~/hello-cloud$ cd imageLayer/

vscode ➜ ~/hello-cloud/imageLayer$ tar -czvf ../hello-cloud.tar.gz *
bin/
bin/hello-cloud
tmp/

vscode ➜ ~/hello-world/imageLayer$ tree ../
../
├── hello-cloud.tar.gz
└── imageLayer
    ├── bin
    │   └── hello-cloud
    └── tmp

3 directories, 2 files

This is good. However, to be able to run a container from this image layer, we need to feed tell the container runtime how to use the layers and the execution parameters to setup the container. So, let us step back a bit and see what the earlier example of golang image’s configuration JSON contained. Every container image is specific to an operating system and architecture. The golang image that we pulled is a linux/amd64 image. Our hello-cloud binary is built on a Linux amd64 system as well.

To be able to invoke our hello-cloud binary, we need to set the right environment variables. Also, we want this binary to get invoked when the container starts. These environment and execution parameters needs to be within the config section of the configuration JSON.

So, here is how our configuration JSON will start.

 1
 2
 3
 4
 5
 6
 7
 8
 9
10
11
12
13
{
    "architecture": "amd64",
    "os": "linux",
    "config": {
      "Env": ["PATH=/bin"],
      "Entrypoint": [
        "hello-cloud"
      ],
      "Cmd": [
        "Cloud Native Central!"
      ]
    }
}

We set the Entrypoint to the hello-world binary and the Cmd array to a single argument that will be passed to the binary.

The next important thing that needs to be added is the DiffID of the image layer. The diff ID is the digest over the layer’s uncompressed tarball. We can obtainthis using the sha256sum command.

1
2
vscode ➜ ~$ gunzip < hello-world/hello-cloud.tar.gz | sha256sum
690fa2812df903a4cee676e28389e154fe022f2a26fb29c4c97e9c6583fa5bc6  -

We need to add the serialized version of this digest to the configuration JSON. So, here is how our final configuration JSON looks like.

 1
 2
 3
 4
 5
 6
 7
 8
 9
10
11
12
13
14
15
16
17
18
19
20
21
22
23
24
25
26
{
  "architecture": "amd64",
  "os": "linux",
  "config": {
    "Env": [
      "PATH=/bin"
    ],
    "Entrypoint": [
      "hello-cloud"
    ],
    "Cmd": [
      "Cloud Native Central!"
    ]
  },
  "rootfs": {
    "type": "layers",
    "diff_ids": [
      "sha256:690fa2812df903a4cee676e28389e154fe022f2a26fb29c4c97e9c6583fa5bc6"
    ]
  },
  "history": [
    {
      "created_by": "Ravikanth C"
    }
  ]
}

As we saw in the golang image example earlier, we need a manifest that combines configuration JSON and the layers. These artifacts are referenced using their digest values as well. So, let us generate the digests for both configuration JSON and the layer tar.gz. We will also need the size in bytes which can be derived from the ls output. The layer digest is different from the DiffID we captured earlier. The layer digest identifies the compressed content and DiffID, as mentioned earlier, identifies the uncompressed content. Container runtimes deal with uncompressed layer content and therefore the configuration JSON must include the digest of the uncompressed layer.

 1
 2
 3
 4
 5
 6
 7
 8
 9
10
11
vscode ➜ ~/hello-cloud$ sha256sum < hello-world.tar.gz
e251e682f7e64cff127020015be3254313b3a7900f54d82ecf34653192be4c21  -

vscode ➜ ~/hello-cloud$ sha256sum < configuration.json
da17376c4c02667544fb07a8788cfa4c294f89464534d3a76a45ee004cebacf5  -

vscode ➜ ~/hello-cloud$ ls -l
total 1064
-rw-r--r-- 1 rchaganti rchaganti     364 Nov 27 13:19 configuration.json
-rw-r--r-- 1 rchaganti rchaganti 1074934 Nov 27 13:42 hello-world.tar.gz
drwxr-xr-x 4 rchaganti rchaganti    4096 Nov 27 11:11 imageLayer

We need to add the appropriate mediaType for both configuration JSON and each layer. Here is how our manifest.json looks like.

 1
 2
 3
 4
 5
 6
 7
 8
 9
10
11
12
13
14
15
16
{
  "schemaVersion": 2,
  "mediaType": "application/vnd.oci.image.manifest.v1+json",
  "config": {
    "mediaType": "application/vnd.oci.image.config.v1+json",
    "size": 277,
    "digest": "sha256:da17376c4c02667544fb07a8788cfa4c294f89464534d3a76a45ee004cebacf5"
  },
  "layers": [
    {
      "mediaType": "application/vnd.oci.image.layer.v1.tar+gzip",
      "size": 1074934,
      "digest": "sha256:e251e682f7e64cff127020015be3254313b3a7900f54d82ecf34653192be4c21"
    }
  ]
}

Alright. Do we have the image ready? Not quite yet. We need to push it to an image registry. While, on surface, it looks like a container image is a singular entity but in reality it is not. As we have already seen, a container image includes a bunch of layers, a configuration, and a manifest. When Docker CLI or any other tool pushes images to a registry, these tools do so in a specific sequence. Since we are building this without any tools such as Docker CLI, we need to push these artifacts manually using the Docker registry HTTP API.

Here is the workflow.

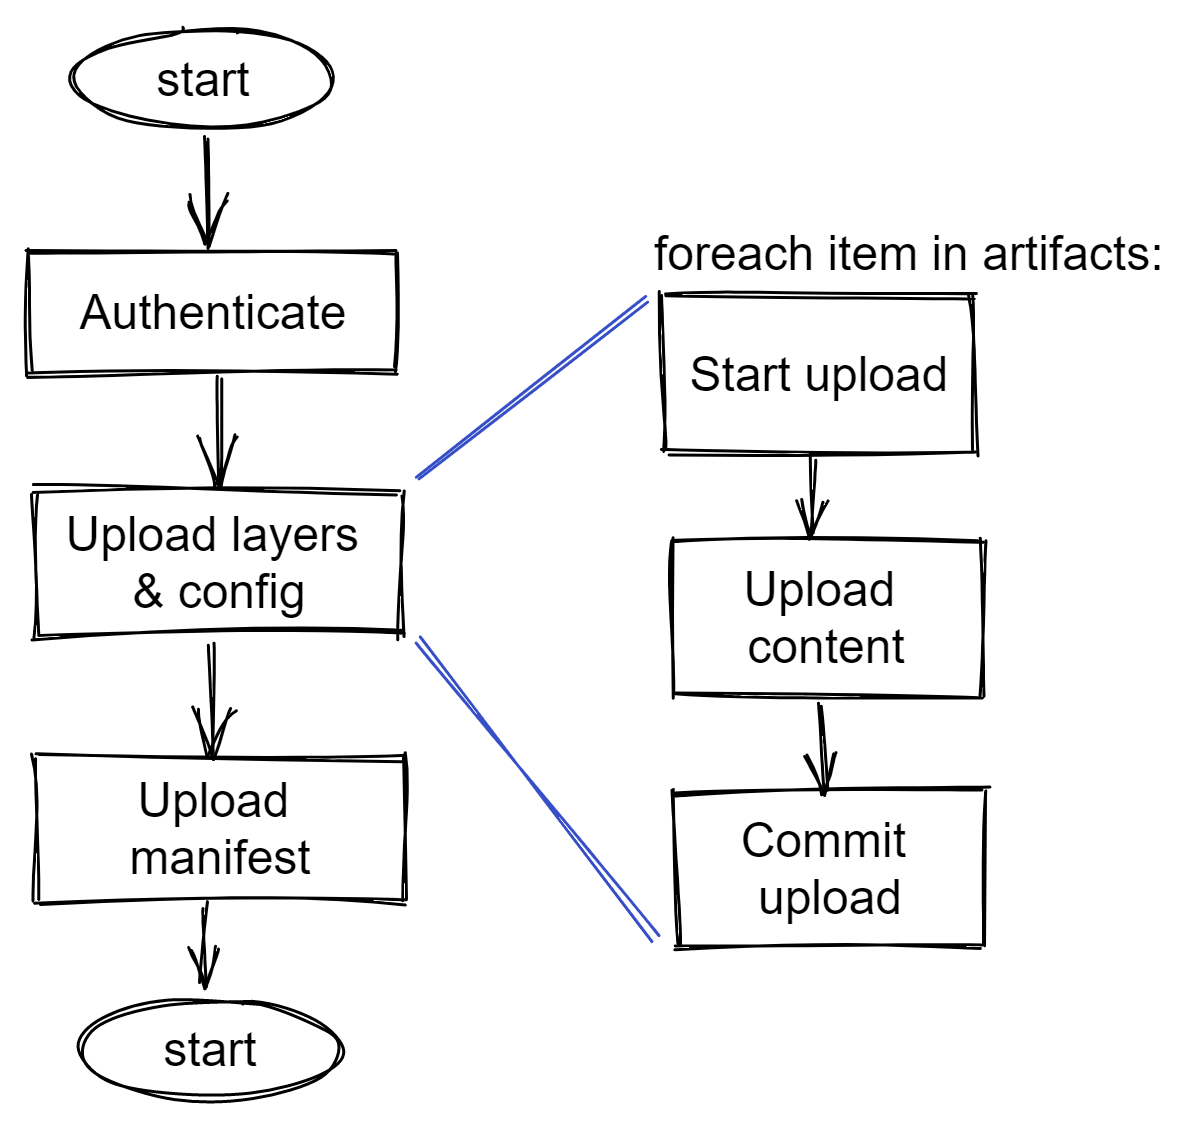
Let us start. We need to first authenticate with Docker Hub. There are many ways to do this but we will use token authentication.

1
2
3
vscode ➜ ~/hello-cloud$ USERNAME=ravikanth
vscode ➜ ~/hello-cloud$ REPO="${USERNAME}/hello-cloud"
vscode ➜ ~/hello-cloud$ TOKEN=$(curl -v -u "$USERNAME" "https://auth.docker.io/token?service=registry.docker.io&scope=repository:$REPO:pull,push" | jq '.token' | cut -d\" -f2)

The above command will prompt for a password to authenticate with Docker Hub and retrieve the token from the response.

Upload blobs

Once we have the auth token, we need to upload each blob (layers and configuration JSON) to the repository. Let us start with hello-world.tar.gz.

1
2
3
4
5
vscode ➜ ~/hello-cloud$ LOCATION=$(curl -i https://registry.hub.docker.com/v2/$REPO/blobs/uploads/ -H "Authorization: Bearer $TOKEN" -d '' | grep location | cut -d" " -f2 | tr -d '\r')

vscode ➜ ~/hello-cloud$ LOCATION=$(curl -i $LOCATION -X PATCH -H "Content-Length: $LAYERSIZE" -H "Authorization: Bearer $TOKEN" -H "Content-Type: application/octet-stream" --data-binary @e251e682f7e64cff127020015be3254313b3a7900f54d82ecf34653192be4c21 | grep location | cut -d" " -f2 | tr -d '\r')

vscode ➜ ~/hello-cloud$ curl "$LOCATION&digest=sha256:$LAYERDIGEST" -X PUT -H "Authorization: Bearer $TOKEN" -v

The first command starts an upload and retrieves the location for the upload. The second command uses the location from first command and uploads the blob. Finally, the third command commits the upload at the location returned by second command and specifies the digest of the blob.

we just need to repeat these steps for each layer and configuration JSON. Since we have only one layer, let us just push the configuration JSON as well.

1
2
3
4
5
vscode ➜ ~/hello-cloud$ LOCATION=$(curl -i https://registry.hub.docker.com/v2/$REPO/blobs/uploads/ -H "Authorization: Bearer $TOKEN" -d '' | grep location | cut -d" " -f2 | tr -d '\r')

vscode ➜ ~/hello-cloud$ LOCATION=$(curl -i $LOCATION -X PATCH -H "Authorization: Bearer $TOKEN" -H "Content-Type: application/octet-stream" --data-binary @4500bf72b8876e180985cb9d30dcbfb4b37c6212af4a1e66f6a59e9c44e4430e | grep location | cut -d" " -f2 | tr -d '\r')

vscode ➜ ~/hello-cloud$ curl "$LOCATION&digest=sha256:$CONFIGDIGEST" -X PUT -H "Authorization: Bearer $TOKEN" -v

Upload the manifest

Finally, we need to upload the manifest.

1
vscode ➜ ~/hello-cloud$ curl "https://registry.hub.docker.com/v2/$REPO/manifests/latest" -X PUT -H "Content-Type: application/vnd.oci.image.manifest.v1+json" -H "Authorization: Bearer $TOKEN" --data-binary @manifest.json -v

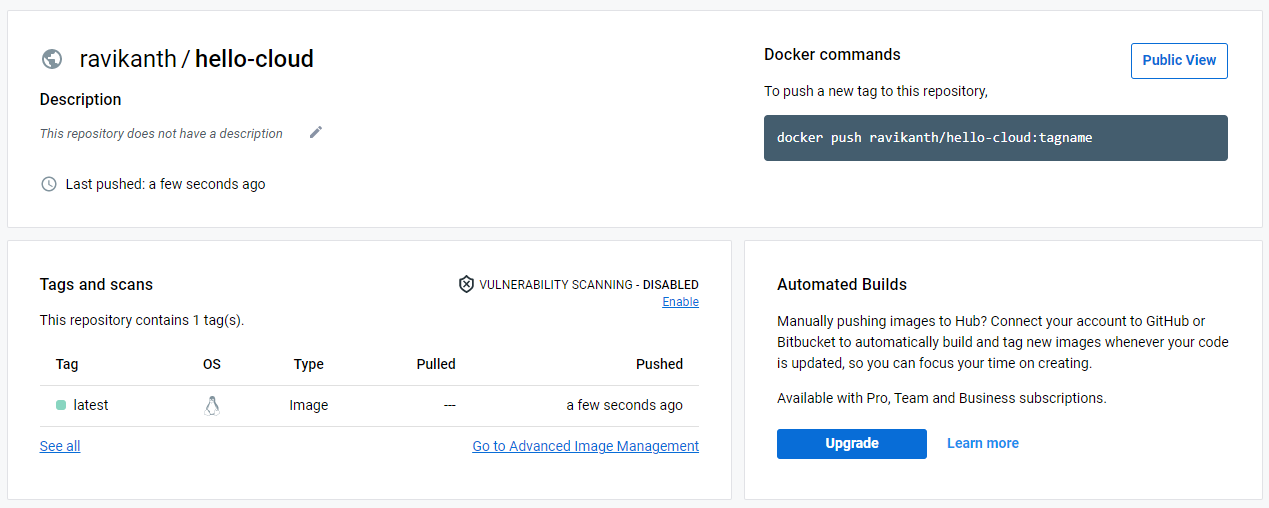
Once the manifest upload is complete, you can find the image on Docker Hub.

Can we not run the image we created without pushing it to Docker Hub or another registry? We can! Let us save that for a different day. For now, we will pull the image we just pushed and try to run a container.

 1
 2
 3
 4
 5
 6
 7
 8
 9
10
11
vscode ➜ ~$ docker pull ravikanth/hello-cloud:latest
latest: Pulling from ravikanth/hello-cloud
Digest: sha256:a23f26c0df0206f3135ca7c7c02d896b9d9fa43373fb6f5c8be8c7615b4e4402
Status: Image is up to date for ravikanth/hello-cloud:latest
docker.io/ravikanth/hello-cloud:latest

vscode ➜ ~$ docker run ravikanth/hello-cloud:latest
Hello, Cloud Native Central! 👋

vscode ➜ ~$ docker run ravikanth/hello-cloud:latest Readers!
Hello, Readers! 👋

This is it! What’s next? We shall look at some tools to build these container images. Stay tuned.

Share on: