Understanding container images - The fundamentals
Containers have been around for a while. There is no need for an introduction to containers anymore but If you are still looking for some background, you can read a series of articles I have written on this blog. Docker simplified working with containers by introducing a way to package your applications and application dependencies as container images. It also provided the tooling that made running container instances from these images easy. This meant the user space tools abstracted all complex details and removed the need to know the inner workings of containers. Like every other technology, knowing the internals of how something is built becomes important when troubleshooting issues or optimizing what the technology does. And, of course, knowing / learning internals is fun too!
Today’s article is a collection of my notes [I made] as I started digging into how container images are built. First, the basics.
Note: This article uses the Docker engine as an example. The fundamental concepts around managing container images do not change between container engines.
The basics
Let us step back a bit and understand why there is a need for container images. Before containerization was made famous by Docker Inc., IT shops used virtualization as a way to deploy multiple applications on a single physical server. Virtualization vendors provide tools to do this efficiently and sometimes in an automated manner. However, each virtual machine requires a full operating system and application dependencies. Assuming that a single VM took ~10GB [very optimistic assumption] of space for OS alone, running 100 of them on a physical system will consume ~1TB. If all your VMs are running the same OS, this is a huge waste of disk space to store duplicate files. You had to install application dependencies in each VM separately, even when most applications have common dependencies. These limitations brought a bunch of operational challenges, such as patching/updates, portability, and distribution, as well.
Some virtualization vendors provided using differencing disks [for application code and dependencies] that shared a single parent disk containing an operating system. This, to some extent, helped, but it came with performance penalties and the same set of operational challenges.
When dotCloud, the company where Docker was born, started playing with Linux constructs to run applications as isolated processes [containers], they developed a method to package application code and dependencies that did not result in the same challenges as virtual machines. This packaging made the distribution of application code easy but solved the portability issues. What worked on a developer workstation worked in the production without a change. This packaging is what we call a container image. A container image is an immutable package of operating system files, application code, and dependencies. Container images consist of reusable layers that are stacked on top of each other. Before you dive into consuming or creating images, it is important to understand the Linux construct used in dealing with container images. It is called the Union File System.
Union File System
The Union File System (UnionFS) in Linux allows merging the contents of one or more file systems [directories] while keeping the content [physically] separate. Different implementations, such as AUFS and OverlayFS, are meant for union mounts. Each of these different implementations has its pros and cons. To understand the concept of a union file system, let us take OverlayFS as an example.
OverlayFS deals with layers of content – one or more lower layers and one upper layer. The lower layers are treated as read-only and the upper layer as read-write. OverlayFS provides a unified view of these layers through a union mount.

As you can see in this depiction, the merged or union view takes content from both lower and upper layers. If a file exists in both layers, such as file F3, the file in the upper layer overrides the one in the lower layer(s). Each file or directory operation has a specific result.
Adding new files
When adding a new file, OverlayFS adds it to the upper layer.
Deleting an existing file
When you delete a file or folder from the upper layer, it gets deleted. However, when you delete a file that is in the lower layer(s), a special character device gets created with the same name in the upper layer. The lower layers are read-only; therefore, no files or folders get deleted. The character device in the upper layer indicates that the file or folder should be hidden from the unified view.
Modify an existing file
There won’t be any special change if you modify a file in the upper layer. However, if you modify a file in the lower layer(s), the file first gets copied to the upper layer, and then the changes are made to this copy.
Talk is cheap. Let us see this in action.
OverlayFS in action
Before creating a union mount, you must first prepare a few directories.
|
|
Do not create any files in the merged or work directories. Merged will be the union mount, where the unified view of lower and upper directories will be available. Now, you can use the mount command to perform a union mount.
|
|
The mount command above mounts the directories, lowerdir and upperdir, as a union mount under the merged folder. The workdir can be considered a temporary scratch space copying files from lower to upper.
|
|
Once the mount command succeeds, the contents of the lower and upper directories will be merged to provide a unified view. You can now try different operations, as depicted in the earlier images.
Note: When working with the union file system, you must make all changes in the unified mount. In the example, it is the merged directory.
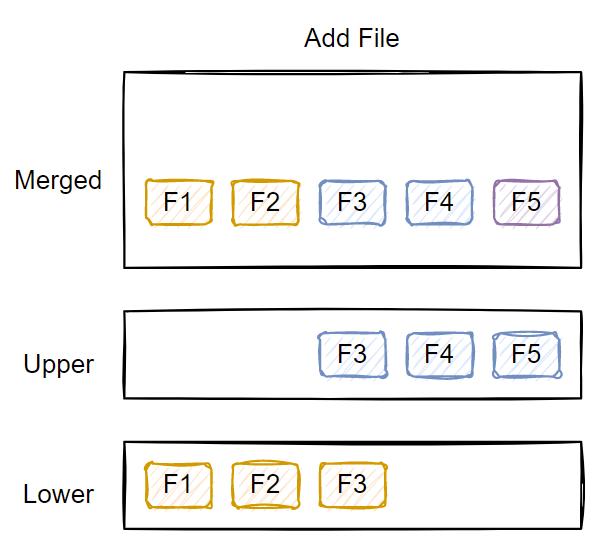
Adding file
|
|
Adding a file to the merged view adds it to the upper layer as that is the read/write layer.
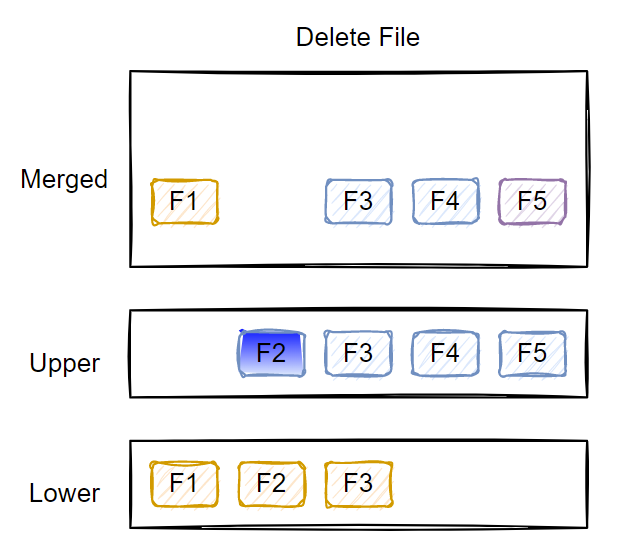
Deleting a file
|
|
Deleting file f2 results in a special character file in the upper layer. The lower layer, however, remains untouched.
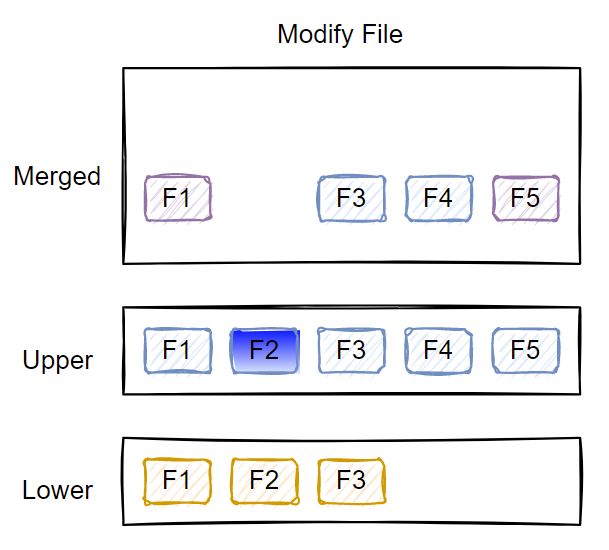
Modify file
When you modify a file, depending on where it is – upper or lower – a copy-up action takes place. For example, if you modify file f1 in the lower layer, f1 is copied to the upper layer and modified in the upper layer.
|
|
As the above example shows, file f1 in the lower layer is left untouched. A copy of f1 is present in the upper layer and gets modified to add the new line.
Now that you understand how OverlayFS works, it is time to see how container engines use the union file system to manage container images.
Container images
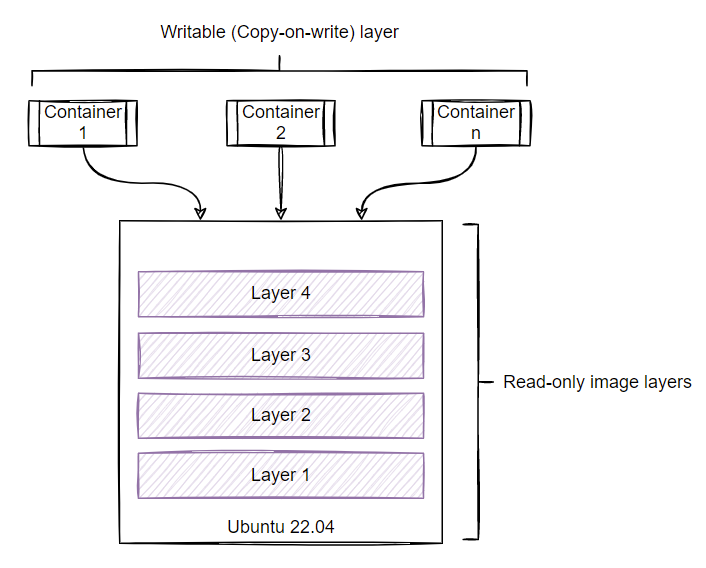
Container engines like Docker support different types of storage drivers responsible for combining stacked layers into a single unified view. Similar to what you saw in the earlier example, each layer contains only the differences from the below layer. The immutable nature of these layers makes the container image reusable and allows you to run multiple containers from a single image. Each container gets its thin writable layer to facilitate writing to the container file system or modifying or deleting existing files. The storage driver used by the container engine is responsible for managing the copy-on-write (CoW) layer. The Docker engine defaults to overlay2 as the storage driver.
Let us dig into how this works. First, let us pull an image from the Docker hub for this exercise.
|
|
The image that we just pulled has three layers. The overlay2 driver on the Docker host stores the image layers at /var/lib/docker/overlay2.
|
|
The directories at this location are uncompressed image layers; therefore, the ID does not match the layer ID in the image. The directory named l contains the symbolic links to the diff directory within each uncompressed layer.
If you have multiple other images on the docker host already, you can use the docker image inspect command to find the right uncompressed layer IDs for a specific image.
|
|
The property names – LowerDir, UpperdDir, MergeDir, and WorkDir – in the above output should be familiar by now. The layer IDs listed in the output will correlate to the ls output earlier. If you observe this output, the LowerDir property has more than one layer associated with it as the value.
|
|
These layers are represented in the order of their position in the container image. Therefore, ec861e1affe1b78197b7cc7f6f4381c6de0e490e04a60dc1ff684a9f7ddeab22 is the lowest layer and d63b70e8f22063b1eb4296b70c2e231392e28b104475104e14f7346530e0dd39 is the layer above the lowest layer. From the image pull output, you see that there are three layers in this image. The layer represented by UpperDir is the topmost layer in this image.
Now that we know the order of the layers, let us move on to see what is there in each of these uncompressed layer directories.
The lowest layer contains three entries.
|
|
This image is based on alpine:latest and therefore diff directory in the lowest layer contains the OS files. Let us move to the next layer. If you look at the last command in the output, file namedlink in the uncompressed layer is referencing the diff directory in the same layer.
Let us move to the next layer in the stack.
|
|
All uncompressed layers above the lowest layer contain five entries. The diff directory contains the contents of the layer – a zero-byte hello.txt file in this case. The file named lower points to the lower layer in the stack. And, in this example, it naturally points to the lower layer diff directory. You can ignore the rest of the entries in this uncompressed layer. In each layer, the link file contains the symbolic link to the layer’s diff directory.
Finally, we have one more layer to look at.
|
|
This layer has two layers below it and therefore you see two entries (separated by :) in the file named lower. Similar to the previous layer, the diff directory in the layer contains a file named hello.txt. As this is the upper layer or the topmost layer, when a container is created using this image, you should see the contents of this hello.txt file within the container.
To better understand this, you need to visualize this layer structure.

As described earlier, container images are immutable. You cannot write anything directly to these layers. The only way to consume these layers is to create a container instance. You can do that using the docker run command.
|
|
Note: Starting this container in the background will help in exploring the copy-on-write operations.
In an earlier illustration, you saw how more than one container can be created from a single image and how each gets its own copy-on-write (CoW) read/write layer. So, in theory, this CoW layer must be somehow getting associated with the uncompressed image layers that you explored. This association can be found by running the docker container inspect command.
|
|
This looks similar to what you have seen in the image information. The LowerDir has four different layers in the below order.
|
|
This is essentially the three image layers you saw earlier and an additional container layer. You may have observed MergeDir and WorkDir in the image information output. However, as images are immutable, these values do not matter much for an image. In the case of a container, these values do matter. Therefore, the /var/lib/docker/overlay2/38705da4838102c3b9d2ae8aeb49844dac84dae95881df61fcffd1685caf9751/merged directory contains the unified view of all image layers.
|
|
Now, try writing a new file in the running container.
|
|
You can see that a new file got added inside the container. The view represents the contents of MergedDir. You can check the directory represented by UpperDir to see if it appears there as well.
|
|
If you follow the same steps you followed to determine the links between multiple image layers, you will see the association between the CoW layer and the lower immutable image layers.

This is one messy diagram but it demonstrates the point. The topmost layer is the CoW read/write layer and all layers below are read-only layers. I mentioned earlier that this is a temporary lived read/write layer. What happens if we stop and start the container? What happens if we remove the container?
Try it yourself. Hint: The file you created within the container survives a container restart.
Oh, BTW, you can use a tool called dive to look into the container images. While that is a great time saver, it is not as much fun as exploring the images manually – the hard way.
This is one long article but I had fun refining the notes I made to write this. This article showed how images are managed by the storage driver. You may have read elsewhere that container images can be used with any container engine. How is that made possible? Let us review that in the next article around Open Container Initiative (OCI) and the OCI image specification.
Comments
Comments Require Consent
The comment system (Giscus) uses GitHub and may set authentication cookies. Enable comments to join the discussion.