In the previous article, we looked at how OverlayFS is used to work with container images. We learned how the image layers are associated with each other and how the copy-on-write layer gets created when a containers gets created from an image. Container registries such as Docker Hub and Quay offer container images for several popular applications and you can publish your images as well. There are different tools available to build and push images to container registries. Whatever container engine you use – Docker or Podman – you can simply pull the image [built using any tool] from the registry and use it. How is this interoperability made possible? The answer is the work Open Container Initiative (OCI) is doing.
Around 2015, containerization started becoming mainstream, a few companies started creating competing tools. Rkt was one such implementation. Folks at CoreOS created Application Container Image (ACI) format and Application Container Execution (ACE) specifications and started implementing tools. At the same time, Docker was already successful in bringing containers to the masses. So, industry saw an opportunity to eliminate fragmentation in the container ecosystem and worked with Docker, CoreOS, and other companies to create Open Container Initiative (OCI) to develop standards around container formats, runtimes, and registries. Most or all container engines and tools implement OCI specifications.
In today’s article, we will review OCI image specification and explore the how images are packaged.
Image Specification
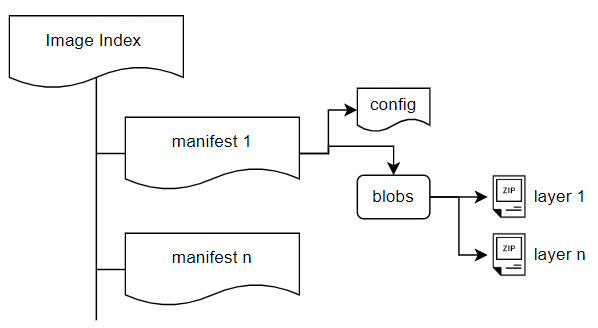
The OCI image specification contains an image index, image manifest, a set of file system layers, and a configuration. While it sounds like a lot, it is actually quite simple.
The above figure represents the association among different parts of the OCI image specification. This starts with an optional image index.
Image index
This, literally, an index of manifests that point to images for different platforms / architectures.
As you see in this example, the image index within an OCI image points to an array of image manifests. You will see multiple manifests if the image is a multi-architecture image. The mediaType property within image index will always be set to application/vnd.oci.image.index.v1+json. For each manifest representing a container image, the mediaType will be set to application/vnd.oci.image.manifest.v1+json.
Note: OCI image specification can also be used to package non-container image artifact types. We will learn about it another day.
You can refer to the image specification for a complete description of each property within the image index. The digest property identifies the manifest that contains the remaining image details such as image filesystem layers and configuration. We will learn about the OCI image layout on disk but before that let us take a look at the manifest format as well.
Image manifest
The image manifest contains references to the image configuration JSON and a set of file system layers used to create the image. The contents of an image manifest are specific to a platform and OS version.
The config element refers to the JSON representation of image metadata, execution parameters for creating a container, and filesystem layers (tar balls) to use when creating the container. As you see, the mediaType will be set to application/vnd.oci.image.config.v1+json.
{"created":"2022-10-16T05:24:35.948125525Z","architecture":"amd64","os":"linux","config":{"Env":["PATH=/usr/local/sbin:/usr/local/bin:/usr/sbin:/usr/bin:/sbin:/bin"],"Cmd":["/bin/sh"],"Labels":{"maintainer":"ravikanth@ravichaganti.com"}},"rootfs":{"type":"layers","diff_ids":["sha256:994393dc58e7931862558d06e46aa2bb17487044f670f310dffe1d24e4d1eec7","sha256:9760f635cf77ac2d1a7f69d98d977eabfcf7977e8e4b51b80222481ff0fb2164","sha256:2d15fd73d3ab4c53b646668461b9facddd2e7a5ec0007a47cb99e748472a4fb5"]},"history":[{"created":"2022-08-09T17:19:53.274069586Z","created_by":"/bin/sh -c #(nop) ADD file:2a949686d9886ac7c10582a6c29116fd29d3077d02755e87e111870d63607725 in / "},{"created":"2022-08-09T17:19:53.47374331Z","created_by":"/bin/sh -c #(nop) CMD [\"/bin/sh\"]","empty_layer":true},{"created":"2022-10-16T05:24:35.841023842Z","created_by":"LABEL maintainer=ravikanth@ravichaganti.com","comment":"buildkit.dockerfile.v0","empty_layer":true},{"created":"2022-10-16T05:24:35.841023842Z","created_by":"RUN /bin/sh -c touch hello.txt # buildkit","comment":"buildkit.dockerfile.v0"},{"created":"2022-10-16T05:24:35.948125525Z","created_by":"RUN /bin/sh -c echo \"this is an update to the hello.txt\" >> hello.txt # buildkit","comment":"buildkit.dockerfile.v0"}]}
This example looks a lot similar to what you see when running docker image inspect imageName. The diff_ids represent the digest of the layer’s uncompressed tar archive. In fact, these Diff IDs correlate to the RootFS layers you see in the docker image inspect output.
The image layer digests you see in the above listing are different from what you see in the image manifest layers array. The layer digests in the image manifest indicate the image layers stored on the file system when you extract an image to a local folder. So, how do we extract an image? There are a few tools that can help extracting OCI images to a local folder. Let us take a look at Skopeo.
Skopeo is a tool to work with images and image registries. Skopeo can copy images between registries, delete images, extract images, inspect, and sign images. The example above copies an image from Docker Hub to the local file system using the OCI layout.
The oci-layout file in the above listing is a JSON file that contains the version of the image layout.
The output of the tree command is similar to what you saw in the image representation at the beginning. If you look at the image manifest JSON above, you will notice that 3e6080001d7b2e588ba7bd7c83b4fe5cdc389c5619525db7f24656198f7d44ab, 5b5387c8849f2140efd643840a2af9829f0616cba8516bc3b01e67529a80406b, and da30198d6af810de0ead95a824b42b1748f62816bcb0486d9b60090c70e02759 are the compressed image layers on disk.
1
2
3
4
5
6
$ file hello-world/blobs/sha256/*
hello-world/blobs/sha256/30a76a4a2be556c8ff8cff68a3e6a68656a2e2272329b3d4eac5a90072929f7c: JSON data
hello-world/blobs/sha256/3e6080001d7b2e588ba7bd7c83b4fe5cdc389c5619525db7f24656198f7d44ab: gzip compressed data, original size modulo 2^32 5826560hello-world/blobs/sha256/5b5387c8849f2140efd643840a2af9829f0616cba8516bc3b01e67529a80406b: gzip compressed data, original size modulo 2^32 2048hello-world/blobs/sha256/8b895fab1ad99d2ce5a24b59e3029741fa14d80a98e42cbe352ebea2f64b4446: JSON data
hello-world/blobs/sha256/da30198d6af810de0ead95a824b42b1748f62816bcb0486d9b60090c70e02759: gzip compressed data, original size modulo 2^32 1536
You can, alternatively, extract an image locally available as a regular directory.
Since we are reviewing OCI image specification and we shall stick to the OCI layout.
Within the OCI image layout, the blobs folder contains image manifest, configuration, and the layer tarballs. We have looked at the manifest and configuration JSON files already. From the blobs folder, you can extract the layers using the tar command.
$ mkdir base-layer
$ tar -xvf 3e6080001d7b2e588ba7bd7c83b4fe5cdc389c5619525db7f24656198f7d44ab --directory base-layer
$ ls -l base-layer/
total 68drwxr-xr-x 2 rchaganti rchaganti 4096 Aug 9 14:17 bin
drwxr-xr-x 2 rchaganti rchaganti 4096 Aug 9 14:17 dev
drwxr-xr-x 16 rchaganti rchaganti 4096 Aug 9 14:17 etc
drwxr-xr-x 2 rchaganti rchaganti 4096 Aug 9 14:17 home
drwxr-xr-x 7 rchaganti rchaganti 4096 Aug 9 14:17 lib
drwxr-xr-x 5 rchaganti rchaganti 4096 Aug 9 14:17 media
drwxr-xr-x 2 rchaganti rchaganti 4096 Aug 9 14:17 mnt
drwxr-xr-x 2 rchaganti rchaganti 4096 Aug 9 14:17 opt
dr-xr-xr-x 2 rchaganti rchaganti 4096 Aug 9 14:17 proc
drwx------ 2 rchaganti rchaganti 4096 Aug 9 14:17 root
drwxr-xr-x 2 rchaganti rchaganti 4096 Aug 9 14:17 run
drwxr-xr-x 2 rchaganti rchaganti 4096 Aug 9 14:17 sbin
drwxr-xr-x 2 rchaganti rchaganti 4096 Aug 9 14:17 srv
drwxr-xr-x 2 rchaganti rchaganti 4096 Aug 9 14:17 sys
drwxrwxr-x 2 rchaganti rchaganti 4096 Aug 9 14:17 tmp
drwxr-xr-x 7 rchaganti rchaganti 4096 Aug 9 14:17 usr
drwxr-xr-x 12 rchaganti rchaganti 4096 Aug 9 14:17 var
This is the base layer of the image containing all operating system files.
What we have seen so far should give a good idea around what OCI image specification defines and tools such as Skopeo help us explore this.
We understand the image specification but how exactly are these images built to comply with this specification? How do we determine how many layers to be created and what gets into each layer? For that, we need to dig into workflows and tools that are used to build container images. We will explore that in the next article.
Comments
Comments Require Consent
The comment system (Giscus) uses GitHub and may set authentication cookies. Enable comments to join the discussion.