PowerShell 2.0 remoting guide: Part 3 – Enable remoting
In this part of the series of articles on PowerShell 2.0 remoting, we will look at how to enable remoting in different scenarios. This post assumes that you are running a supported operating system and you have installed all necesary pre-requisite software.
So, how do you enable remoting?
Remoting in PowerShell 2.0 can be enabled by just running the following cmdlet
Enable-PSRemoting
Note: You have to run this at a elevated PowerShell prompt. Also, all your active networks should be set to “Home” or “Work” network location. Setting firewall exceptions for remoting will fail if the network location is set to “Public”.
Yes. That is it. You will be asked to respond to a couple of questions — based on OS architecture — as you see in the screenshot here.
As you see above, Enable-PSRemoting internally uses Set-WSManQuickConfig and a few other cmdlets. The second prompt around Microsoft.PowerShell32 will appear only on x64 OS. However, you should always use the more comprehensive Enable-PSRemoting cmdlet. If you don’t want to see all these prompts and but want to enable remoting in a more slient manner, you can use the -force parameter along with the cmdlet. Other parameters to Enable-PSRemoting cmdlet include -confirm and -whatif. You can run this cmdlet on all machines where you want to be able to receive commands from other machines in the network.
How can you verify if remoting is enabled or not? You can use the Enter-PSSession cmdlet to test if remoting is enabled on the local machine or not.
|
|
If remoting is enabled and functional, you will see the prompt changing to something like this:
PowerShell remoting in a workgroup environment
You will not be able to connect to a computer in workgroup just by running Enable-PSRemoting cmdlet. This is essentially because the security levels on a workgroup joined computer are more stringent than on a domain joined computer.
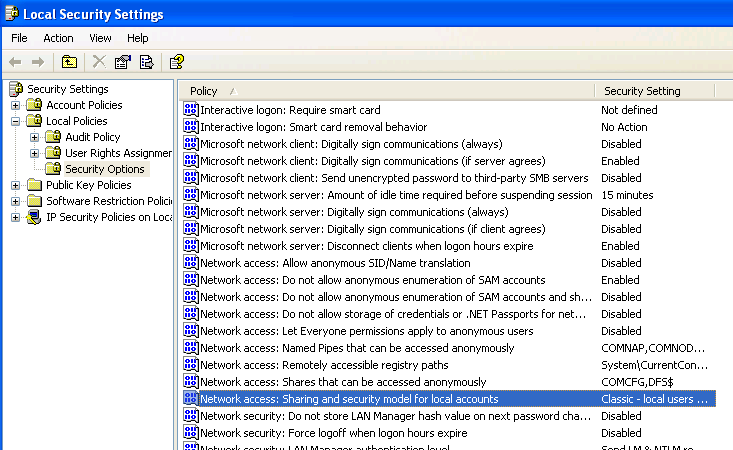
On Windows XP systems, you need to make sure the local security policy to enable classic mode authentication for network logons. This cabe be done by opening “Local Security Policy” from Control Panel -> Administrative Tools. Over there, navigate to Local Policies -> Security Options and double click on “Network Access: Sharing and Security Model for local accounts” and set it to classic.
Once the above change is made, you can enable remoting using Enable-PSremoting and then run:
|
|
On Vista and later operating systems in workgroup model, you need to run the above cmdlet only. After these steps are performed, you should be able to send commands to a remote computer in a workgroup enviroment.
To enable remoting for multiple computers in an enterprise or domain environment, you can use group policy. For more information on this, refer to the “HOW TO ENABLE REMOTING IN AN ENTERPRISE” section at http://technet.microsoft.com/en-us/library/dd347642.aspx
In the next set of posts, we will see how to execute commands on remote machines using various cmdlets available within PowerShell remoting.
Share on:

