OpenClaw installation and gateway bootstrap

4 min read
The best way to understand OpenClaw is to try it. The safest way to do that is to run it inside a container.

In the first part of this series, we looked at what OpenClaw is, its architecture, and its features. In this hands-on part of the series, we will build and run OpenClaw as a container and verify the gateway’s health. Let us get started.

Building and running the OpenClaw container

I chose to run OpenClaw inside a container to ensure I can freely experiment with different features, including file system access. Before you can run OpenClaw in a container, you need to build the image from source. Let us start by preparing a few directories.

1
2
3
4
5
# OpenClaw config & agent data
mkdir "$env:USERPROFILE\.openclaw" -Force

# Your workspace (finance, productivity, knowledge files)
mkdir "$env:USERPROFILE\workspace" -Force

We will then create a .env file for storing API keys and other secrets.

1
2
3
4
@"
GEMINI_API_KEY=your_actual_key_here
OPENCLAW_GATEWAY_TOKEN=openclaw-secret-token
"@ | Out-File -FilePath "$env:USERPROFILE\.openclaw\.env" -Encoding UTF8

> When you open the dashboard in your browser, it will ask for a token. Use openclaw-secret-token to log in. Replace your_actual_key_here with your actual key from Google AI Studio or which ever provider you choose to use.

We will now need to seed the gateway’s initial configuration.

Create %USERPROFILE%\.openclaw\openclaw.json and paste the following JSON blob.

 1
 2
 3
 4
 5
 6
 7
 8
 9
10
11
12
13
14
15
16
17
18
19
20
21
{
  "gateway": {
    "mode": "local",
    "bind": "lan",
    "controlUi": {
      "allowedOrigins": ["http://localhost:18789", "http://127.0.0.1:18789"]
    }
  },
  "agents": {
    "defaults": {
      "model": {
        "primary": "google/gemini-2.5-pro",
        "fallbacks": ["google/gemini-2.5-flash"]
      },
      "models": {
        "google/gemini-2.5-pro": { "alias": "Gemini Pro" },
        "google/gemini-2.5-flash": { "alias": "Gemini Flash" }
      }
    }
  }
}

We are now ready to build the container image from the OpenClaw source code. We’ll build the container image locally, directly from the OpenClaw source repository.

1
2
3
4
5
6
7
8
9
# Clone the repository
git clone https://github.com/openclaw/openclaw.git "$env:USERPROFILE\openclaw-source"
Set-Location "$env:USERPROFILE\openclaw-source"

# Build the Docker image
docker build -t openclaw:local -f Dockerfile .

# Return to your home directory
Set-Location "$env:USERPROFILE"

Building this image takes a while. On my local PC with 16GB of memory, it took close to 10 minutes. Once the image is ready, you can launch the container.

1
2
3
4
5
6
7
8
docker run -d `
  --name openclaw `
  --restart unless-stopped `
  -v "$env:USERPROFILE\.openclaw:/home/node/.openclaw" `
  -v "$env:USERPROFILE\workspace:/home/node/workspace" `
  -p 18789:18789 `
  --env-file "$env:USERPROFILE\.openclaw\.env" `
  openclaw:local dist/index.js gateway run

Here is a quick explanation of the flags we used.

Flag Purpose
--restart unless-stopped Auto-restart on crash or reboot
-v ...\.openclaw:/home/node/.openclaw Persist config, agents, memory, credentials
-v ...\workspace:/home/node/workspace Persist your data (finance, tasks, notes)
-p 18789:18789 Map container port to host for dashboard access
--env-file Injects API keys into the container

Once the container starts, you should see logs similar to what is shown below.

 1
 2
 3
 4
 5
 6
 7
 8
 9
10
11
12
13
14
15
16
2026-05-08 16:51:33.696 | 2026-05-08T11:21:33.695+00:00 [gateway] loading configuration
2026-05-08 16:51:33.808 | 2026-05-08T11:21:33.807+00:00 [gateway] resolving authentication
2026-05-08 16:51:33.840 | 2026-05-08T11:21:33.839+00:00 [gateway] starting...
2026-05-08 16:51:35.335 | 2026-05-08T11:21:35.334+00:00 [gateway] auto-enabled plugins for this runtime without writing config:
2026-05-08 16:51:35.335 | - google/gemini-2.5-pro model configured, enabled automatically.
2026-05-08 16:51:35.687 | 2026-05-08T11:21:35.686+00:00 [gateway] starting HTTP server...
2026-05-08 16:51:35.693 | 2026-05-08T11:21:35.692+00:00 [gateway] ⚠️  Gateway is binding to a non-loopback address. Ensure authentication is configured before exposing to public networks.
2026-05-08 16:51:36.090 | 2026-05-08T11:21:36.090+00:00 [health-monitor] started (interval: 300s, startup-grace: 60s, channel-connect-grace: 120s)
2026-05-08 16:51:38.291 | 2026-05-08T11:21:38.291+00:00 [gateway] agent model: google/gemini-2.5-pro (thinking=medium, fast=off)
2026-05-08 16:51:38.298 | 2026-05-08T11:21:38.297+00:00 [gateway] http server listening (7 plugins: browser, canvas, device-pair, file-transfer, memory-core, phone-control, talk-voice; 4.4s)
2026-05-08 16:51:38.304 | 2026-05-08T11:21:38.304+00:00 [gateway] log file: /tmp/openclaw/openclaw-2026-05-08.log
2026-05-08 16:51:38.361 | 2026-05-08T11:21:38.360+00:00 [gateway] starting channels and sidecars...
2026-05-08 16:51:38.822 | 2026-05-08T11:21:38.821+00:00 [browser/server] Browser control listening on http://127.0.0.1:18791/ (auth=token)
2026-05-08 16:51:38.870 | 2026-05-08T11:21:38.869+00:00 [gateway] ready
2026-05-08 16:51:38.895 | 2026-05-08T11:21:38.894+00:00 [heartbeat] started
2026-05-08 16:51:39.744 | 2026-05-08T11:21:39.743+00:00 [gateway] update available (latest): v2026.5.7 (current v2026.5.6). Run: openclaw update

You can check the gateway’s health by running node dist/index.js gateway health inside the container.

1
2
3
PS C:\> docker exec openclaw node dist/index.js gateway health
Gateway Health
OK (31ms)

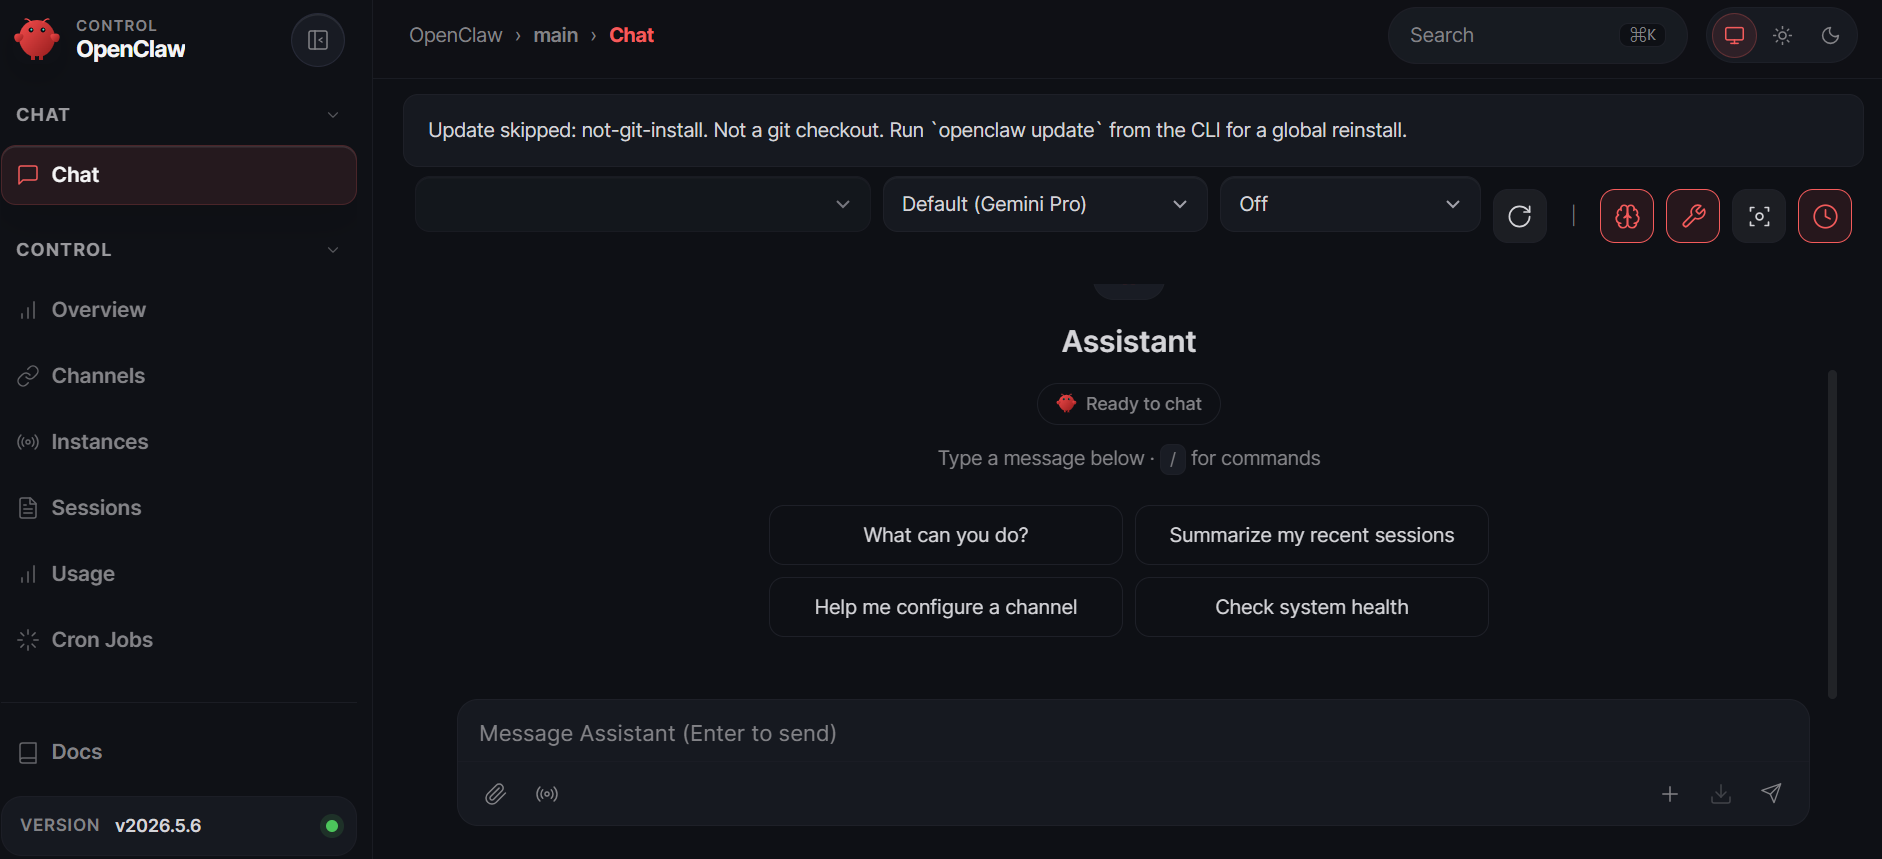
At this point, the gateway dashboard UI should be accessible at “http://127.0.0.1:18789/”. In the UI, enter the token from the .env file.

At this time, we have the OpenClaw gateway running in a container. Because the .openclaw directory is mounted as a volume, you can edit config files directly on Windows with any text editor. The changes are reflected inside the container instantly (OpenClaw watches for config changes and hot-reloads).

Here is a quick, handy tip. I have added a few custom functions to my PowerShell profile to access a few aspects of OpenClaw state.

1
2
3
function oc { docker exec openclaw node dist/index.js @args }
function oc-it { docker exec -it openclaw node dist/index.js @args }
function oc-logs { docker logs -f openclaw }

With these handy functions, I can now run oc gateway health instead of the complete docker exec command.

1
2
3
PS C:\Users\ravik> oc gateway health
Gateway Health
OK (28ms)

In the next part, we shall complete onboarding and integrating WhatsApp channel.

Share this article

Comments