Installing and Configuring Kubernetes cluster using kubeadm on Ubuntu


This article is more like a note to myself, but this may help if you are looking at configuring a Kubernetes cluster on Ubuntu.

There are many ways to install and configure Kubernetes cluster for learning and development purposes. You can use Docker Desktop or Rancher Desktop or https://podman-desktop.io/ or minikube or microk8s to create a single node cluster for your development work quickly. I am a big fan of Docker Desktop and use that for any quick experiments. However, I need a multi-node cluster with additional services for anything more than simple deployment. I use Ubuntu virtual machines and configure a Kubernetes cluster using kubeadm.

In this article, I walk through the steps I followed to set up a virtual Kubernetes cluster.

Virtual machine configuration

To ensure I have enough resources in the cluster, I created four Ubuntu 22.04 LTS virtual machines on my Windows 11 system. Each of these VMs is configured with two virtual CPUs and 2GB of virtual memory. It is recommended to configure each virtual machine with a static IP address. I created an external virtual switch to enable Internet connectivity within the Ubuntu guest OS. Of the four virtual machines, I chose to use one as the control plane node and the other three as worker nodes.

Container runtime

Kubernetes uses a Container Runtime Interface (CRI) compliant container runtime to orchestrate containers in Pods.

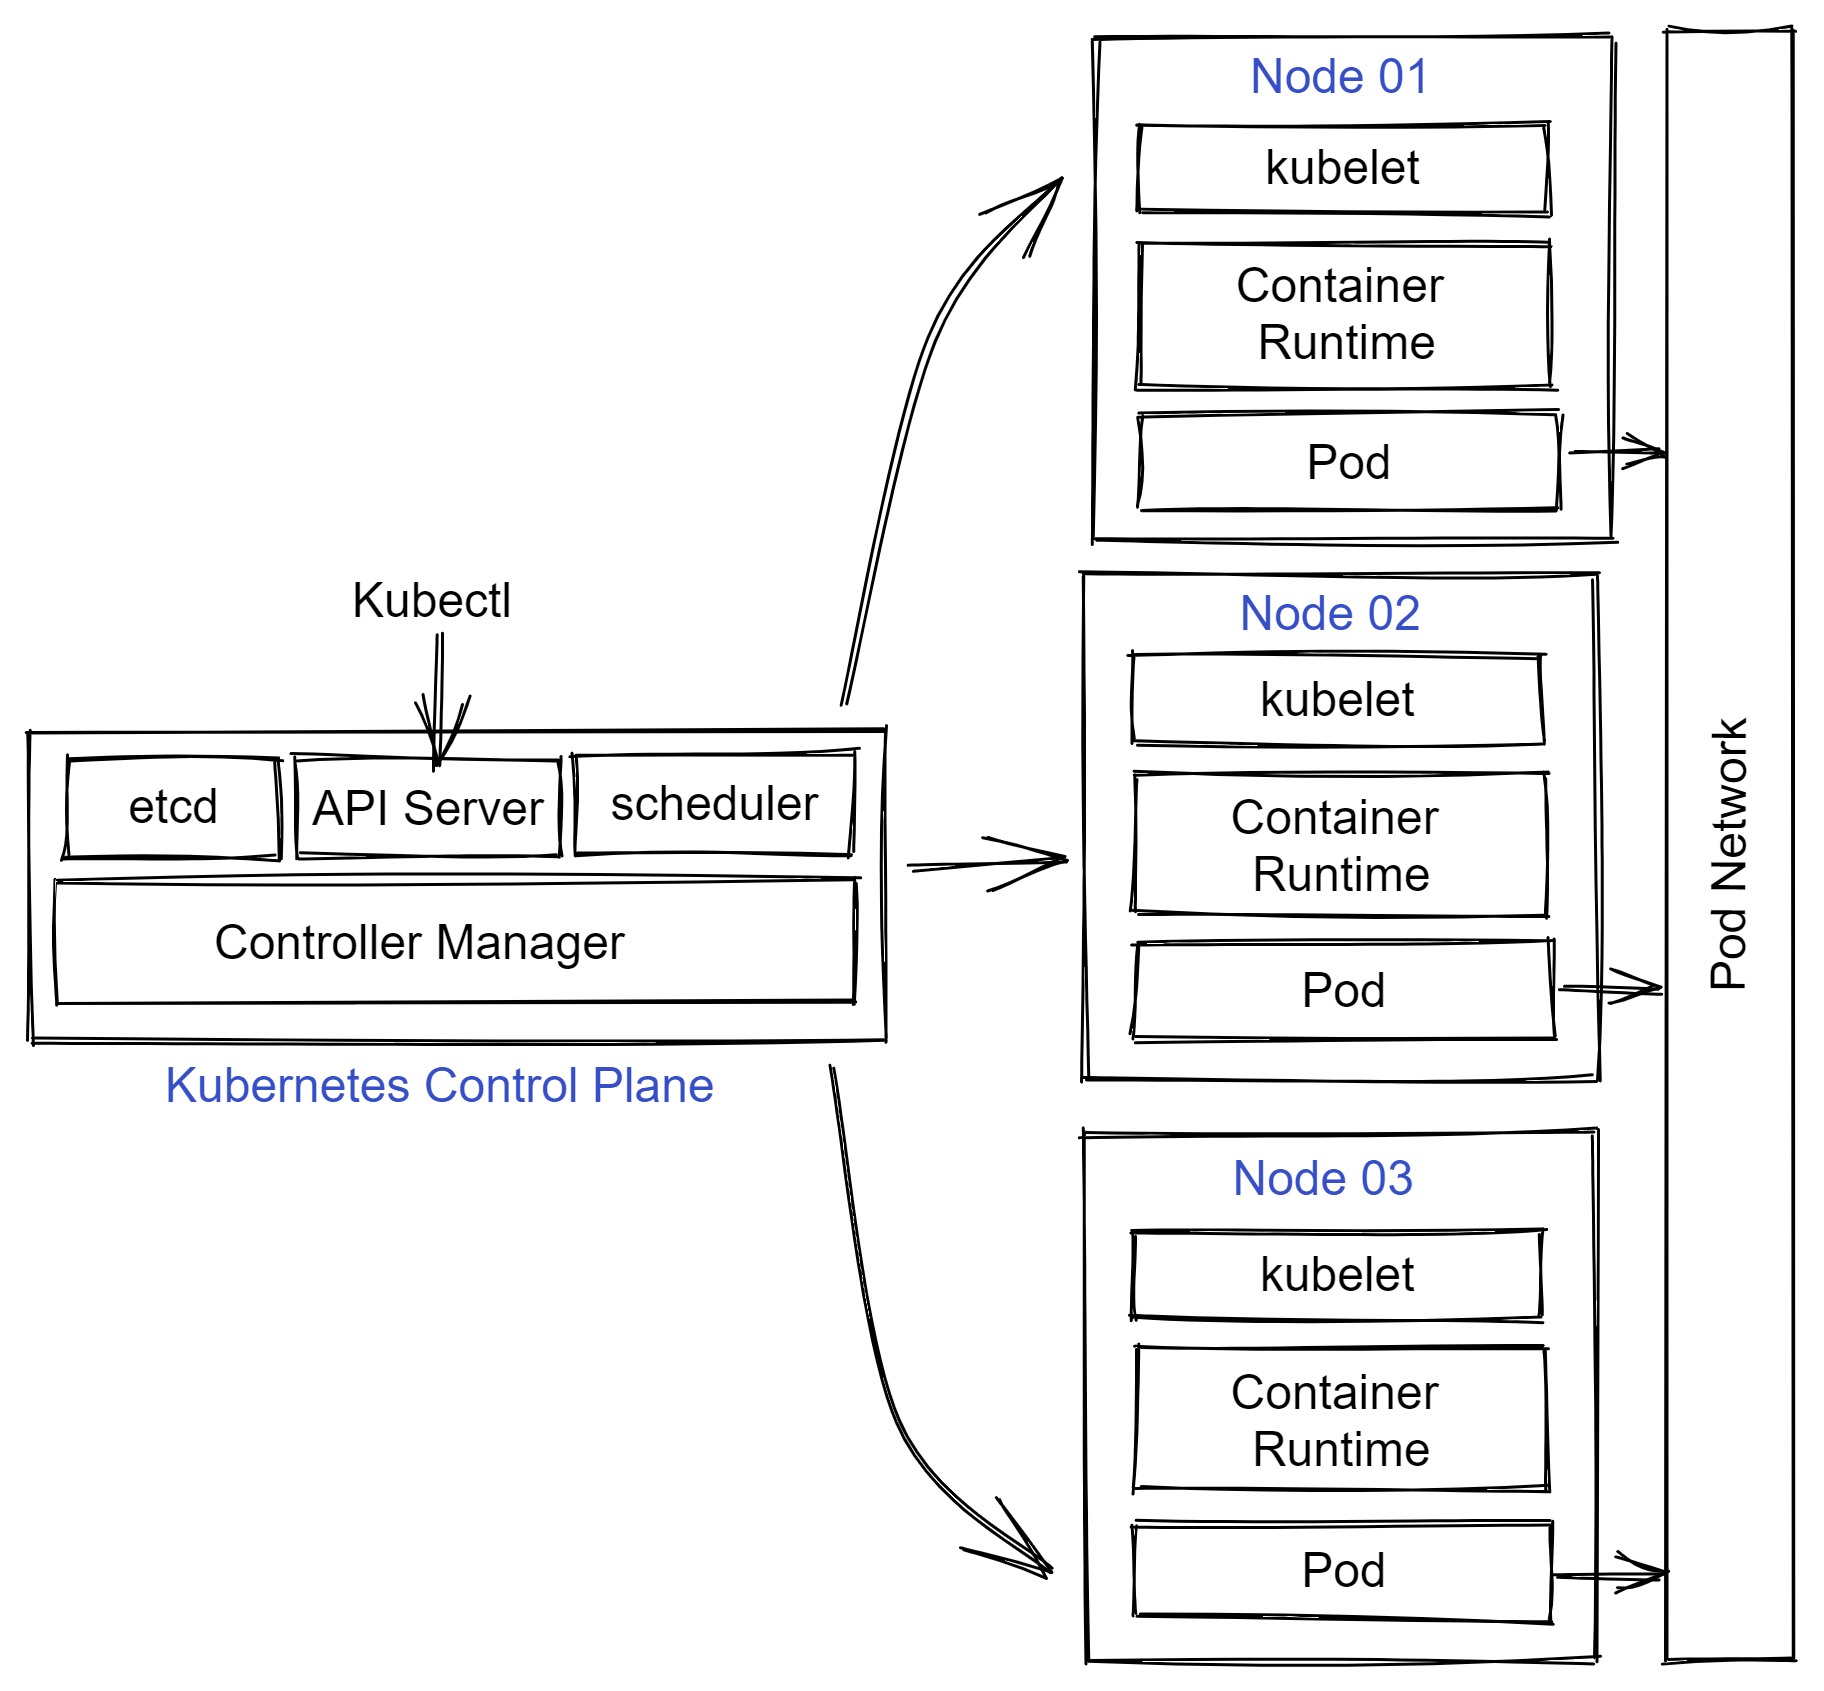
Many runtimes are supported within Kubernetes. The most popular ones include Docker (via cri-dockerd), containerd, and CRI-O. The choice of a runtime depends on several factors, such as performance, isolation needs, and security. For this virtual cluster. I chose containerd as the runtime for my virtual cluster.

Container Network Interface (CNI)

Kubernetes requires a CNI-compatible Pod network addon for Pods within the cluster to communicate with each other. You can choose from many open-source and commercial CNI plugins to implement the Pod network. Once again, you need to consider factors such as ease of deployment, performance, security, and resource consumption to choose the Pod network addon that is correct for your Kubernetes cluster and the workload you plan to run.

I chose Calico as the pod network addon for the ease of deployment and considering the fact that I have some prior experience with Calico.

Preparing control plane and worker nodes

Each node in the Kubernetes cluster the following components.

  • A container runtime
  • Kubectl - The command line interface to Kubernetes API
  • Kubelet - Agent on each node that receives work from the scheduler
  • Kubeadm - Tool to automate deployment and configuration of a Kubernetes cluster

Before going into this, you must ensure that nodes that will be a part of the Kubernetes cluster can communicate with each other and the firewall ports required for node-to-node communication are open.

The following network ports must be open for inbound TCP traffic on the control plane node.

  • 6443
  • 2379:2380
  • 10250
  • 10257
  • 10259
  • 179 (required for Calico)

On the worker nodes, you should configure to allow incoming TCP traffic on the following ports.

  • 10250
  • 30000:32767

On Ubuntu, you can use ufw command to perform this configuration.

1
sudo ufw allow proto tcp from any to any port 6443,2379,2380,10250,10257,10259,179

To see the bridged traffic, you must disable swap and configure IPv4 forwarding and IP tables on each node. Before all this, ensure each node has the latest and greatest packages. You will needcurl as well on the node to download certain packages.

1
2
sudo apt-get update
sudo apt-get install -y apt-transport-https ca-certificates curl

You must disable swap on each node that will be a part of the Kubernetes cluster.

1
2
sudo swapoff -a
sudo sed -i '/^\/swap\.img/s/^/#/' /etc/fstab

You must also check if the swap is listed in the /etc/fstab and either comment or remove the line.

Next, configure IPv4 forwarding and IP tables on each node.

 1
 2
 3
 4
 5
 6
 7
 8
 9
10
11
12
13
14
15
16
17
18
19
#Enable IP tables bridge traffic on all nodes
# https://kubernetes.io/docs/setup/production-environment/container-runtimes/#forwarding-ipv4-and-letting-iptables-see-bridged-traffic
cat <<EOF | sudo tee /etc/modules-load.d/k8s.conf
overlay
br_netfilter
EOF

sudo modprobe overlay
sudo modprobe br_netfilter

# sysctl params required by setup, params persist across reboots
cat <<EOF | sudo tee /etc/sysctl.d/k8s.conf
net.bridge.bridge-nf-call-iptables  = 1
net.bridge.bridge-nf-call-ip6tables = 1
net.ipv4.ip_forward                 = 1
EOF

# Apply sysctl params without reboot
sudo sysctl --system

Installing containerd

The next set of commands download the latest release of containerd from GitHub and configure it. You need to run this on each node.

 1
 2
 3
 4
 5
 6
 7
 8
 9
10
11
12
13
14
15
16
17
18
19
20
21
22
23
24
25
26
27
28
29
30
31
32
33
CONTAINERD_VERSION="1.7.4"
RUNC_VERSION="1.1.9"
CNI_PLUGINS_VERSION="1.3.0"

# Install containerd
curl -Lo /tmp/containerd-${CONTAINERD_VERSION}-linux-amd64.tar.gz \
         https://github.com/containerd/containerd/releases/download/v${CONTAINERD_VERSION}/containerd-${CONTAINERD_VERSION}-linux-amd64.tar.gz
sudo tar Cxzvf /usr/local /tmp/containerd-${CONTAINERD_VERSION}-linux-amd64.tar.gz

# Install runc
curl -Lo /tmp/runc.amd64 https://github.com/opencontainers/runc/releases/download/v${RUNC_VERSION}/runc.amd64
sudo install -m 755 /tmp/runc.amd64 /usr/local/sbin/runc

# clean up containerd and runc files
rm -rf /tmp/containerd-${CONTAINERD_VERSION}-linux-amd64.tar.gz /tmp/runc.amd64

# install containerd config
sudo mkdir -p /etc/containerd
containerd config default | sudo tee /etc/containerd/config.toml
sudo sed -i 's/SystemdCgroup = false/SystemdCgroup = true/' /etc/containerd/config.toml
sudo curl -Lo /etc/systemd/system/containerd.service https://raw.githubusercontent.com/containerd/cri/master/contrib/systemd-units/containerd.service  
sudo systemctl daemon-reload
sudo systemctl enable --now containerd
sudo systemctl status containerd --no-pager

# Install CNI plugins
curl -Lo /tmp/cni-plugins-amd64-v${CNI_PLUGINS_VERSION}.tgz \
         https://github.com/containernetworking/plugins/releases/download/v${CNI_PLUGINS_VERSION}/cni-plugins-linux-amd64-v${CNI_PLUGINS_VERSION}.tgz
sudo mkdir -p /opt/cni/bin
sudo tar Cxzvf /opt/cni/bin /tmp/cni-plugins-amd64-v${CNI_PLUGINS_VERSION}.tgz

# clean up CNI plugins
rm -rf /tmp/cni-plugins-amd64-v${CNI_PLUGINS_VERSION}.tgz

Installing kubeadm, kubelet, and kubectl

These three tools are needed on each node.

1
2
3
4
5
6
7
sudo curl -fsSL https://pkgs.k8s.io/core:/stable:/v1.28/deb/Release.key | sudo gpg --dearmor -o /etc/apt/keyrings/kubernetes-apt-keyring.gpg

echo 'deb [signed-by=/etc/apt/keyrings/kubernetes-apt-keyring.gpg] https://pkgs.k8s.io/core:/stable:/v1.28/deb/ /' | sudo tee /etc/apt/sources.list.d/kubernetes.list

sudo apt-get update
sudo apt-get install -y kubelet kubeadm kubectl
sudo apt-mark hold kubelet kubeadm kubectl

The above commands download and install the three tools that we need on each node. Once installed, we mark the packages as held so that they don’t get automatically upgraded or removed.

Initialize Kubernetes cluster

Once the prerequisite configuration is complete, you can initialize the Kubernetes cluster using kubeadm init command.

1
2
3
4
5
6
7
8
9
IPADDR=$(hostname -I)
APISERVER=$(hostname -s)
NODENAME=$(hostname -s)
POD_NET="10.244.0.0/16"

sudo kubeadm init --apiserver-advertise-address=$IPADDR \
                  --apiserver-cert-extra-sans=$APISERVER \
                  --pod-network-cidr=$POD_NET \
                  --node-name $NODENAME

This command starts a few preflight checks and the necessary Pods to start the Kubernetes control plane. At the end of successful execution, you will see output similar to what is shown here.

 1
 2
 3
 4
 5
 6
 7
 8
 9
10
11
12
13
14
15
16
Your Kubernetes control-plane has initialized successfully!

To start using your cluster, you need to run the following as a regular user:

  mkdir -p $HOME/.kube
  sudo cp -i /etc/kubernetes/admin.conf $HOME/.kube/config
  sudo chown $(id -u):$(id -g) $HOME/.kube/config

You should now deploy a Pod network to the cluster.
Run "kubectl apply -f [podnetwork].yaml" with one of the options listed at:
  /docs/concepts/cluster-administration/addons/

You can now join any number of machines by running the following on each node
as root:

  kubeadm join <control-plane-host>:<control-plane-port> --token <token> --discovery-token-ca-cert-hash sha256:<hash>

Before proceeding or clearing the screen output, copy the kubeadm join command. You need this to join the worker nodes to the Kubernetes cluster.

Prepare kube config

Before installing the Pod network addon, you need to make sure you prepare the kubectl config file. kubeadm init command provides the necessary commands to do this.

1
2
3
mkdir -p $HOME/.kube
sudo cp -i /etc/kubernetes/admin.conf $HOME/.kube/config
sudo chown $(id -u):$(id -g) $HOME/.kube/config

Once this is done, verify if the Kubernetes control plane objects can be queried or not.

1
kubectl get nodes

This command will show only the control plane node and be shown as NotReady. This is because the Pod network is not ready. You can now install the Pod network addon.

Installing Calico

Installing Calico is just two steps. First, we install the opertor.

1
2
curl -Lo /tmp/tigera-operator.yaml https://raw.githubusercontent.com/projectcalico/calico/v3.24.5/manifests/tigera-operator.yaml
kubectl create -f /tmp/tigera-operator.yaml

Next, we need to install the custom resources.

1
curl -Lo /tmp/custom-resources.yaml https://raw.githubusercontent.com/projectcalico/calico/v3.24.5/manifests/custom-resources.yaml

In this YAML, you need to modify the the spec.calicoNetwork.ipPools.cidr to match what you specified as the argument to --pod-network-cidr. Once this modification is complete, you can implement the custom resources.

1
2
3
CIDR='10.244.0.0/16'
sed -i "s|192.168.0.0/16|$CIDR|" /tmp/custom-resources.yaml
kubectl create -f /tmp/custom-resources.yaml

You need to wait for the Calico Pods to transition to Ready state before you can proceed towards joining the worker nodes to the cluster.

1
$ watch kubectl get pods -n calico-system

Once all Calico pods in the calico-system namespace are online and ready, you can check if the control plane node is in ready state or not using kubectl get nodes command.

Finally, you can move on to joining all worker nodes the cluster. You need to run the command you copied from the kubeadm init command on each worker node.

1
2
$ kubeadm join IP:6443 --token token \
        --discovery-token-ca-cert-hash hash

Note: IP, token, and hash in the command you copied will be different.

The node joining process takes a few minutes. On the control plane node, you can run watch kubectl get nodes command wait until all nodes come online and transition to ready state.

1
2
3
4
5
6
$ kubectl get nodes
NAME       STATUS   ROLES           AGE     VERSION
cplane01   Ready    control-plane   4h42m   v1.28.1
node01     Ready    <none>          4h28m   v1.28.1
node02     Ready    <none>          4h28m   v1.28.1
node03     Ready    <none>          4h28m   v1.28.1

You should also verify if all control plane pods are online and ready or not.

 1
 2
 3
 4
 5
 6
 7
 8
 9
10
11
12
13
14
15
16
17
18
19
20
21
22
$ kubectl get pods --all-namespaces
NAMESPACE          NAME                                       READY   STATUS    RESTARTS        AGE
calico-apiserver   calico-apiserver-f975659ff-fscmd           1/1     Running   2 (3h56m ago)   4h31m
calico-apiserver   calico-apiserver-f975659ff-jq9hn           1/1     Running   2 (3h56m ago)   4h31m
calico-system      calico-kube-controllers-6b57db7fd6-grkdh   1/1     Running   2 (3h56m ago)   4h33m
calico-system      calico-node-2kfq2                          1/1     Running   2 (3h55m ago)   4h29m
calico-system      calico-node-6h65z                          1/1     Running   2 (3h56m ago)   4h33m
calico-system      calico-node-f4vml                          0/1     Running   2 (3h55m ago)   4h29m
calico-system      calico-node-rfpdz                          0/1     Running   2 (3h55m ago)   4h29m
calico-system      calico-typha-75884b99f4-dhrmp              1/1     Running   3 (3h55m ago)   4h29m
calico-system      calico-typha-75884b99f4-sss9d              1/1     Running   3 (3h56m ago)   4h33m
kube-system        coredns-565d847f94-knrf8                   1/1     Running   2 (3h56m ago)   4h42m
kube-system        coredns-565d847f94-mtxrs                   1/1     Running   2 (3h56m ago)   4h42m
kube-system        etcd-cplane01                              1/1     Running   2 (3h56m ago)   4h42m
kube-system        kube-apiserver-cplane01                    1/1     Running   2 (3h56m ago)   4h42m
kube-system        kube-controller-manager-cplane01           1/1     Running   2 (3h56m ago)   4h42m
kube-system        kube-proxy-9s7c7                           1/1     Running   2 (3h55m ago)   4h29m
kube-system        kube-proxy-dq5rc                           1/1     Running   2 (3h55m ago)   4h29m
kube-system        kube-proxy-kfs78                           1/1     Running   2 (3h56m ago)   4h42m
kube-system        kube-proxy-zl7sb                           1/1     Running   2 (3h55m ago)   4h29m
kube-system        kube-scheduler-cplane01                    1/1     Running   2 (3h56m ago)   4h42m
tigera-operator    tigera-operator-6bb5985474-cmnxp           1/1     Running   3 (3h56m ago)   4h35m

This is it. You now have a four node Kubernetes cluster that you can use for your learning, development, and even production (if you are brave enough!).

Share on: